Use Pay Transaction Import to add earnings, deductions, or other pay transactions in bulk for employees
The pay transaction import option is useful when you're setting up year-to-date earnings before go-live, migrating historical data, or processing recurring transactions for multiple employees.
Before you begin
Make sure you have:
Employees set up in Jemini with their employment records
Payrolls created for the relevant employees
Transaction configuration codes – these are the codes for the types of pay transactions you're importing (like earnings, allowances, deductions)
Import permissions enabled in your security profile
If you're unsure about transaction codes, ask your Jemini support consultant.
Preparing your pay transaction file
Ask your Jemini support consultant for the pay transaction CSV template.
The template looks like this:
.png)
NOTE: This screenshot shows the general look of the template but might not be the latest version.
The template has notes in a second tab. Use this tab to check the rules and recommendations for each field.
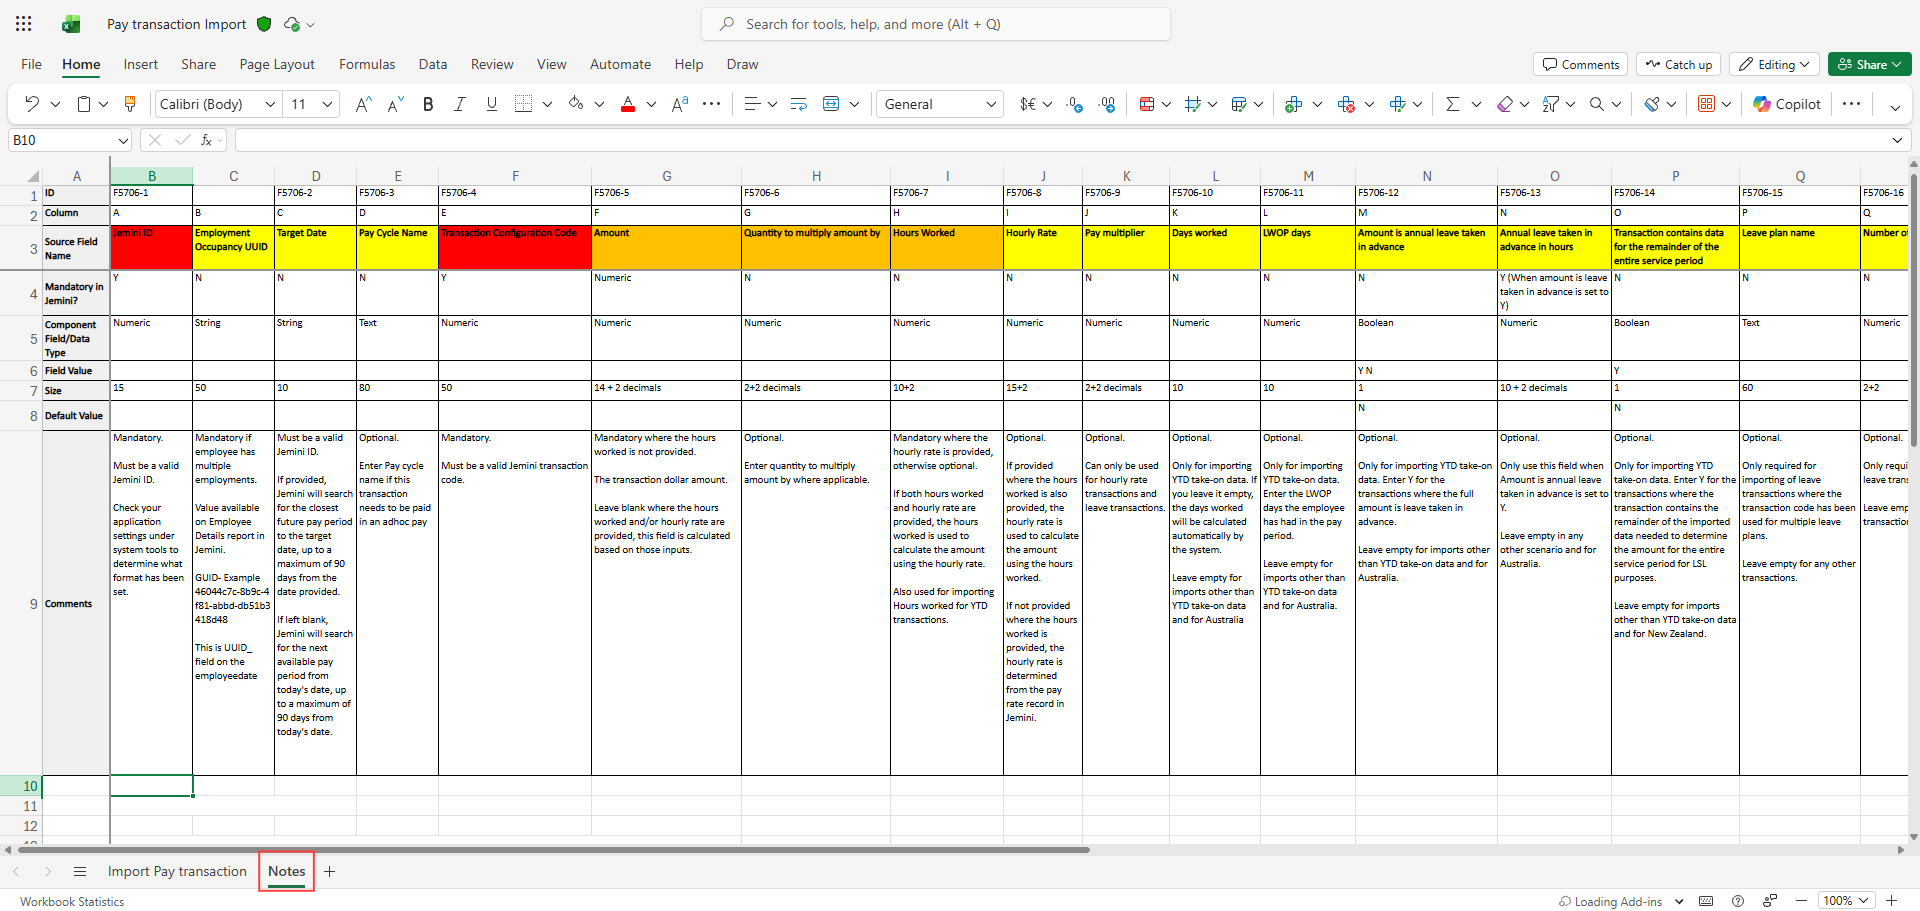
NOTE: This screenshot shows the general look of the template but might not be the latest version.
Required vs optional fields
Required fields
Every row must include:
Jemini ID: The employee number (For example, EMP001). If the employee has multiple employments, you'll also need the Employment Occupancy UUID.
Target Date: The date the transaction applies to. Use formats like dd/MM/yyyy or yyyy-MM-dd.
Transaction Configuration Code: The numeric code for the transaction type (For example, 100 for ordinary hours, 200 for allowances). You'll find these codes in System > Payroll Transaction Configuration.
Optional and conditional fields
The template will indicate which of the remaining fields are optional or mandatory, depending on the transaction type.
Leave fields blank if they don't apply to your transaction.
To learn more, refer to Preparing your CSV file.
Save the file in CSV format
When you’re ready to save the file, make sure the correct tab is open in Excel.
In Excel, go to File > Save a Copy.
Select CSV (Comma delimited) (*csv) from the file type dropdown list.
Select Save.
A message will appear about not supporting workbooks with multiple sheets. Select OK to save only the active sheet.
Now you’re ready to import your data into Jemini.
How to import your data
Uploading your file
Go to System > Import.
Select the Pay Transactions card.
Set the CONTAINS HEADER ROW toggle to Yes or No.
Set it to Yes if you’ve used the template – your file has a header row.
Set to No if your file doesn’t have a header row.
Drag and drop your files into the box on screen or use the Select a file from your computer button and find your prepared CSV file.
When dragging and dropping, make sure the box border turns light blue before you drop the file.
Jemini will process your file and show you a preview.
Reviewing the preview
The preview shows each row from your file with validation results.
Check for errors: Red indicators show errors that you must fix before importing.
Check for warnings: Orange indicators show potential issues that don't prevent the import.
You can filter the preview to show all records, errors only, or warnings only.
If you see errors, cancel the import by selecting the red X button, fix the issues in your original file, and upload again.
If you see warnings, either cancel the import and upload your updated file, or acknowledge the warnings.
For more on import errors and warnings, refer to Checking your data before it imports.
Completing the import
Once you're happy with the preview:
Select the Green Tick Button to continue to confirmation.
Select Go ahead.
Jemini processes the records in the background. When complete, you'll see a success message.
Verifying your import
After importing:
Go to the relevant pay cycle to check the transactions appear correctly.
Review employee records to confirm the data is accurate.
Check that any leave-related transactions updated leave balances as expected.
Troubleshooting common errors and warnings
Error: Employee not found
Check the Jemini ID matches exactly (including any leading zeros)
If the employee has multiple employments, add the Employment Occupancy UUID
Error: Invalid transaction code
Verify the code exists in System > Payroll Transaction Configuration
Make sure you're using the code number, not the transaction name
Error: Invalid date format
Check your dates match one of the accepted formats (dd/MM/yyyy or yyyy-MM-dd)
Make sure dates are valid (no 31/02/2025)
Warning: Leave balance will be negative
This means the leave transaction exceeds available balance
You can proceed if this is intentional (like leave in advance) or adjust the hours
For further help, contact your Jemini support consultant.
