Use Import to quickly bring large amounts of data into Jemini
Rather than entering information manually for dozens or hundreds of employees, you can prepare your data in a spreadsheet, save it as a CSV file, and upload it to Jemini.
Import is useful when you're setting up Jemini for the first time, migrating historical data, processing bulk updates, or preparing for go-live.
Who can import data into Jemini:
System Administrators, Jemini support consultants, and HR and Payroll administrators
Jemini supports four types of bulk imports
Pay Transactions: Import pay transaction data for employees, such as year-to-date earnings or recurring allowances
Leave: Import approved leave records when migrating from another system or setting up historical leave
Leave Balances: Import opening leave balances during implementation or system migration
Pay Rates: Import employee pay rate information for new setups or bulk pay increases
All import types follow the same general workflow
This consistency makes it easy to work with different import types once you're familiar with the process.
To import your data:
Select import type
Choose which type of data you're importing from the four optionsGet the CSV template
Ask your Jemini support consultant for the CSV template with the correct column headers. You'll see the template criteria in Jemini when you select the import typePrepare your file
Fill in the template with your data, following the field requirements. Only fill out fields that are relevant to youUpload the file
Select your prepared CSV file to uploadReview preview
Check the validation results before confirmingConfirm import
If everything looks correct, confirm to create the recordsVerify results
Check that the imported data appears correctly in Jemini
Checking your data before it imports
When you upload a file, Jemini validates your data before creating any records. This preview step lets you catch and fix errors before they affect your system.
.png)
Errors
Errors prevent the import from proceeding. You'll need to fix these issues in your file and upload again.
Common errors include:
Missing required information (like employee ID or dates)
Invalid values (like incorrect transaction codes)
Data format problems (like text in number fields)
Warnings
Warnings alert you to potential issues but don't prevent the import. You can choose to proceed or fix the warnings first.
Common warnings include:
Leave balance impacts (like taking leave that exceeds the available balance)
Date-related notices (like leave spanning multiple pay periods)
The preview screen shows errors and warnings alongside each row of data, making it easy to identify which records need attention.
Filtering import results
If your import has many rows, you can filter the preview to show:
All records: See everything in your file
Errors only: Focus on records that must be fixed
Warnings only: Review records with potential issues
This filtering helps you work through issues efficiently, especially with large imports.
Import works with Multiple Employments
Jemini supports importing data for employees with multiple concurrent employments. To make sure your data goes to the right employment/occupancy record, you'll need to include the Employment Occupancy UUID in your import file.
The UUID is a unique identifier for each employment/occupancy record. It’s optional for most imports, but mandatory for employees with multiple employments.
When an employee has ONE employment:
You can use just the Jemini ID (employee number) and leave the Employment Occupancy UUID field blank. Jemini will find the single employment record automatically.
Example CSV row:
EMP001,,2025-01-15,Weekly Pay,100,500.00...
^^ Empty UUID field – this is fine for single employment
When an employee has MULTIPLE employments:
You must provide the Employment Occupancy UUID. This targets the exact employment/occupancy record for your import data.
Example CSV row:
EMP001,abc123-def456-ghi789,2025-01-15,Weekly Pay,100,500.00...
^^ UUID required for multiple employments
Ask your Jemini support consultant for the UUIDs
Employment Occupancy UUIDs aren’t currently visible in Jemini. Contact your Jemini support consultant to get the UUIDs you need for your import.
Preparing your CSV file
Use the correct template
Always start with the CSV template provided by your Jemini support consultant. The template has the correct column headers and order that Jemini expects.
Don't rename or reorder columns – Jemini reads the data based on column position, not column names.
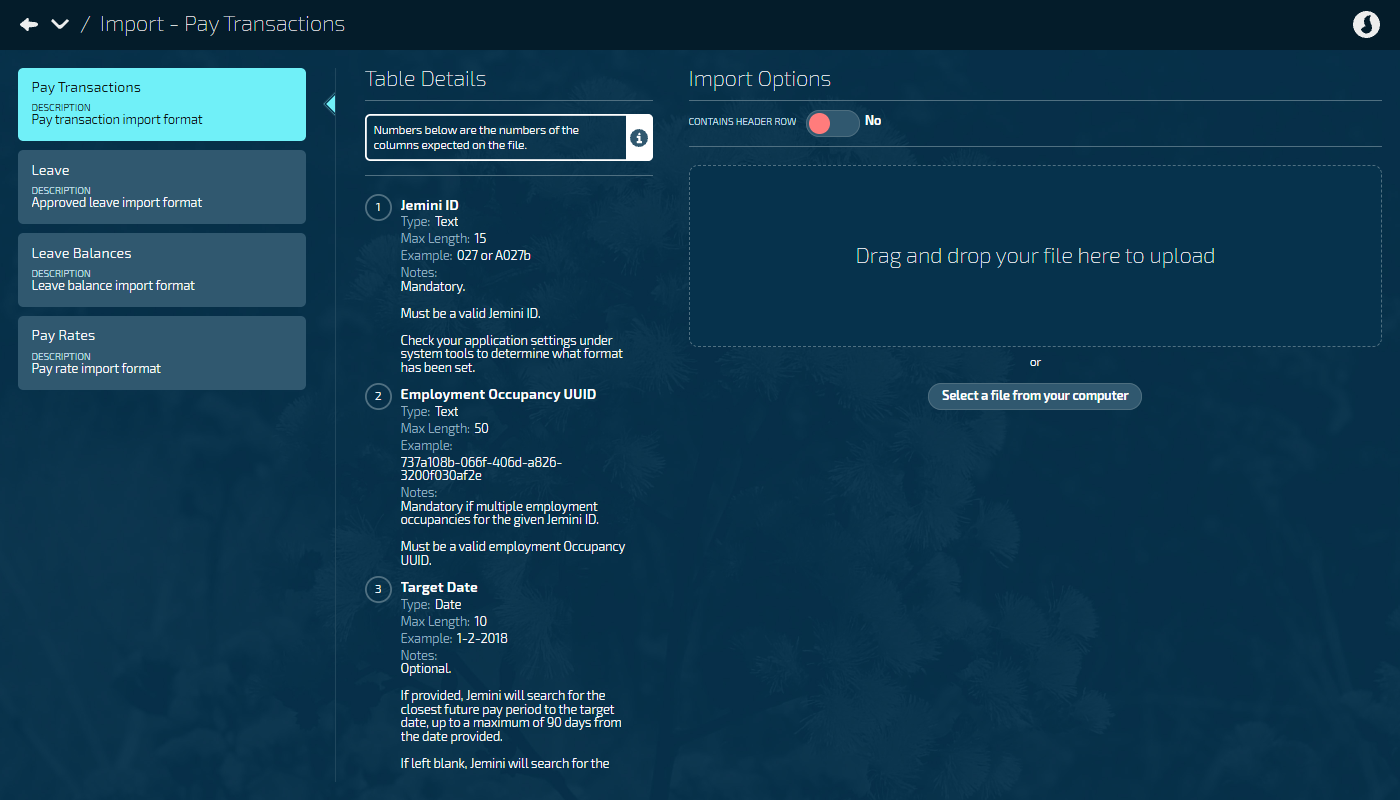
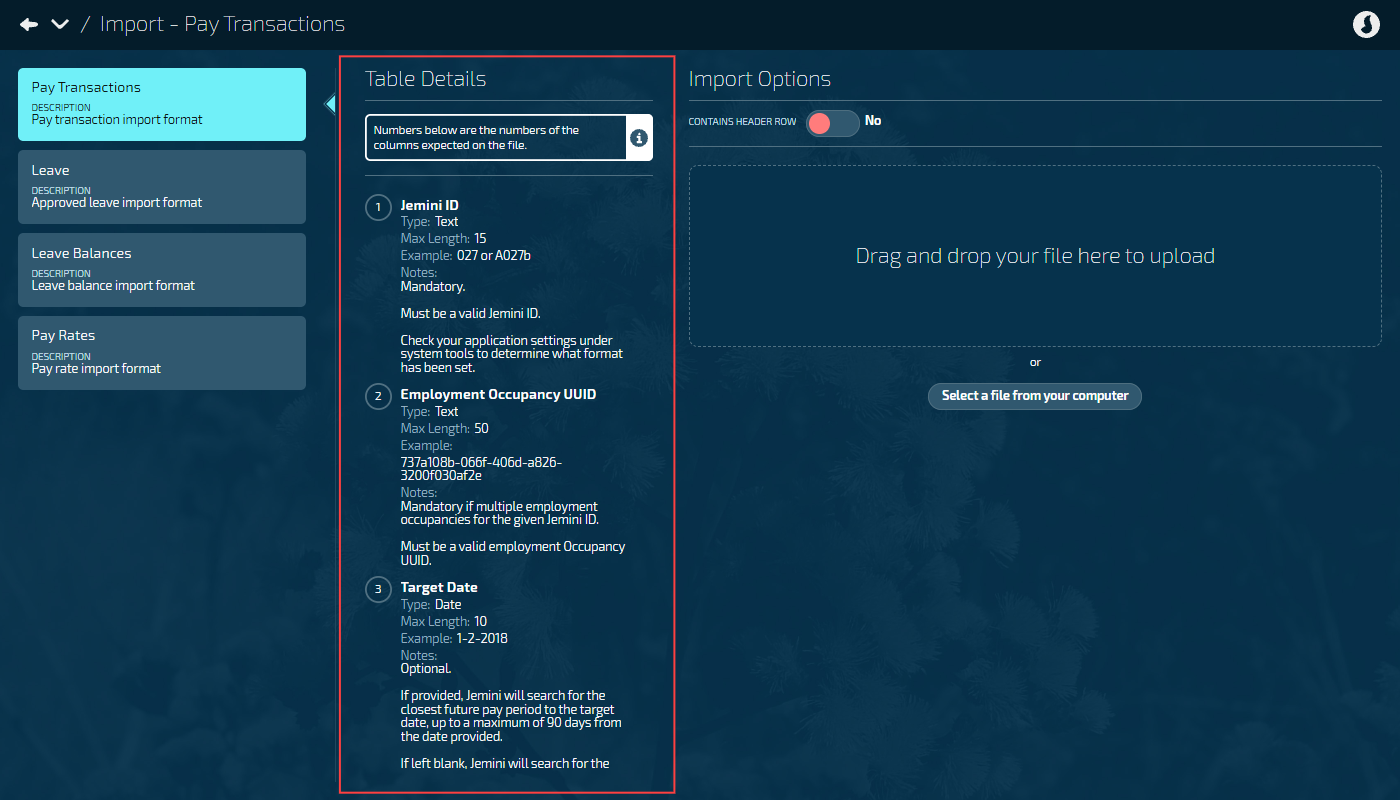
TIP
The Table Details section in the Import view shows the latest CSV file requirements. This screenshot shows the Pay Transactions table details (as at 24 November 2025). Column 1 is ‘Jemini ID’, column 2 is ‘Employment Occupancy UUID’, column 3 is ‘Target Date’, and so on.
If your file isn’t importing correctly, check the Table Details to see if your file’s columns match the required format.
Save as CSV format
When you're ready to upload:
In Excel, go to File > Save As.
Choose CSV (Comma delimited) (*.csv) as the file type.
Give your file a clear name (like "PayRates_Import_Jan2025.csv").
Save the file.
Don't save as Excel (.xlsx) or other spreadsheet formats – Jemini only accepts CSV files.
Watch out for formatting issues
Dates:
Use the date format shown in the template (usually dd/MM/yyyy or yyyy-MM-dd). Jemini accepts multiple date formats, but consistency helps avoid errors.
Numbers:
Don't include currency symbols ($, £, etc.)
Use decimal points, not commas (write 1500.50, not 1,500.50)
Remove any thousand separators (write 100000, not 100,000)
Text fields:
If a field contains commas, put the entire value in quotes (like "Auckland, Head Office")
Remove any extra spaces before or after values
Be consistent with how you write employee IDs (don't mix EMP001 and emp001)
Yes/No fields:
Use Y or N (uppercase or lowercase both work)
Don't write "Yes" or "No" – stick to single letters
Empty fields:
Leave optional fields blank – don't write "N/A", "nil", or "-"
Required fields must have values
Keep your data clean
Before saving:
Remove any test rows or notes you added while working
Delete any completely empty rows (but don’t delete columns)
Make sure there are no merged cells
Remove any Excel formulas – paste values only
Check your employee IDs:
Match exactly how they appear in Jemini (including any leading zeros)
If an employee ID is EMP001 in Jemini, don't write EMP1 in your import
Test with a small sample first
If you're importing hundreds of rows:
Create a test file with 5-10 rows first
Upload and check the preview for any errors
Fix any issues in your main file
Upload the full file once you know the format is correct
This saves time by catching formatting problems early.
Tips to avoid import errors
Don’t save as Excel format: Jemini only accepts CSV format. If you save as Excel format, it can add formatting that causes import errors.
Don’t change column headers: Keep the template headers exactly as your consultant provided them.
Don’t paste source formatting: When you copy data from other sources, use ‘paste as plain text’ or ‘paste values only’. This avoids bringing across hidden formatting that can cause import errors.
Don’t use special characters: Avoid characters like ©, ®, or emojis in your data. Stick to standard letters, numbers, and basic punctuation.
What to do if your upload fails
If you see unexpected errors after uploading:
Ask your Jemini support consultant for a fresh template to make sure you're using the current version
Open your CSV in Notepad to check for any unexpected characters or formatting
Try re-saving your file. Sometimes re-saving as CSV (Comma delimited) can fix encoding issues
Contact your Jemini support consultant if you're still having trouble. They can review your file and help identify the problem
Initial access and setup
How to grant a user access to Import functionality
Anyone with system administrator permissions can perform these actions.
If you need access to Import, talk to your system administrator or raise an iHelp through Infusion.
Steps to grant access
Go to System > Security profiles.
Select the Security Profile that needs access to the Import feature.
In the Permissions table, scroll down and expand SYSTEM and IMPORT to find the Import application and Import records permissions.
Tick the Enable box to activate the Import feature.
Tick the View, Add, Change, and Delete boxes for Import permissions as needed.
Select the Green Tick Button to save your changes.
For further assistance, reach out to our support team: raise an iHelp through Infusion.
