Navigation: System | Notification Catalogue
Click or tap here to view permission settings
The notification catalogue is typically only accessible to the system administrator. However, if you need to give another user access:
- Go to System | Security profiles.
- Select the Security Profile that requires access to the Notification Catalogue bubble.
- In Permissions, scroll down and expand the Notification | Notification application | Notification records to find the Notification Catalogue permissions.
- Tick the boxes to Enable, View, Add, Change and Delete notification records.
Notifications in Jemini are messages emailed to an employee, their manager, or specific position establishments to tell them about events or actions required of them. Notifications keep the recipient informed about important activities related to various features. These notifications can range from reminding about upcoming events, notifying about record changes, or communicating other relevant information.
The notification catalogue holds all system-generated and custom notifications specifically created for your company.
What are system-generated notifications?
Cards marked with the Jemini system icon are pre-set notifications created by Jemini. These notifications can't be edited or deleted. However, you can change the notification name and the activation status.
What are custom notifications?
You can create a custom notification to match your brand voice and tone and highlight specific information you want the recipients to know.
When you create a notification for a feature, it becomes available for selection when adding a new record in that specific feature.
Features that can have custom notifications attached are:
- Aspiration groups
- Employee Termination
- Entitlement to work
- Occupancy
- Onboarding steps
- Pay Rate
- Performance groups
- Super Fund
- Upskilling curricula, courses, or sessions
For example, after you’ve set up an Aspirations notification, you can go to the Aspirations groups catalogue and add it to a chosen group. Recipients will then receive the notification based on the group's start or end date, according to the specifications provided when creating it in the notification catalogue.
Use Controls to filter the catalogue results
You can filter the notification cards by name or status in the Controls section.
The Active filter is selected by default, so only active notifications are displayed. Remove this filter to view inactive notifications, which are identifiable by the Inactive icon.
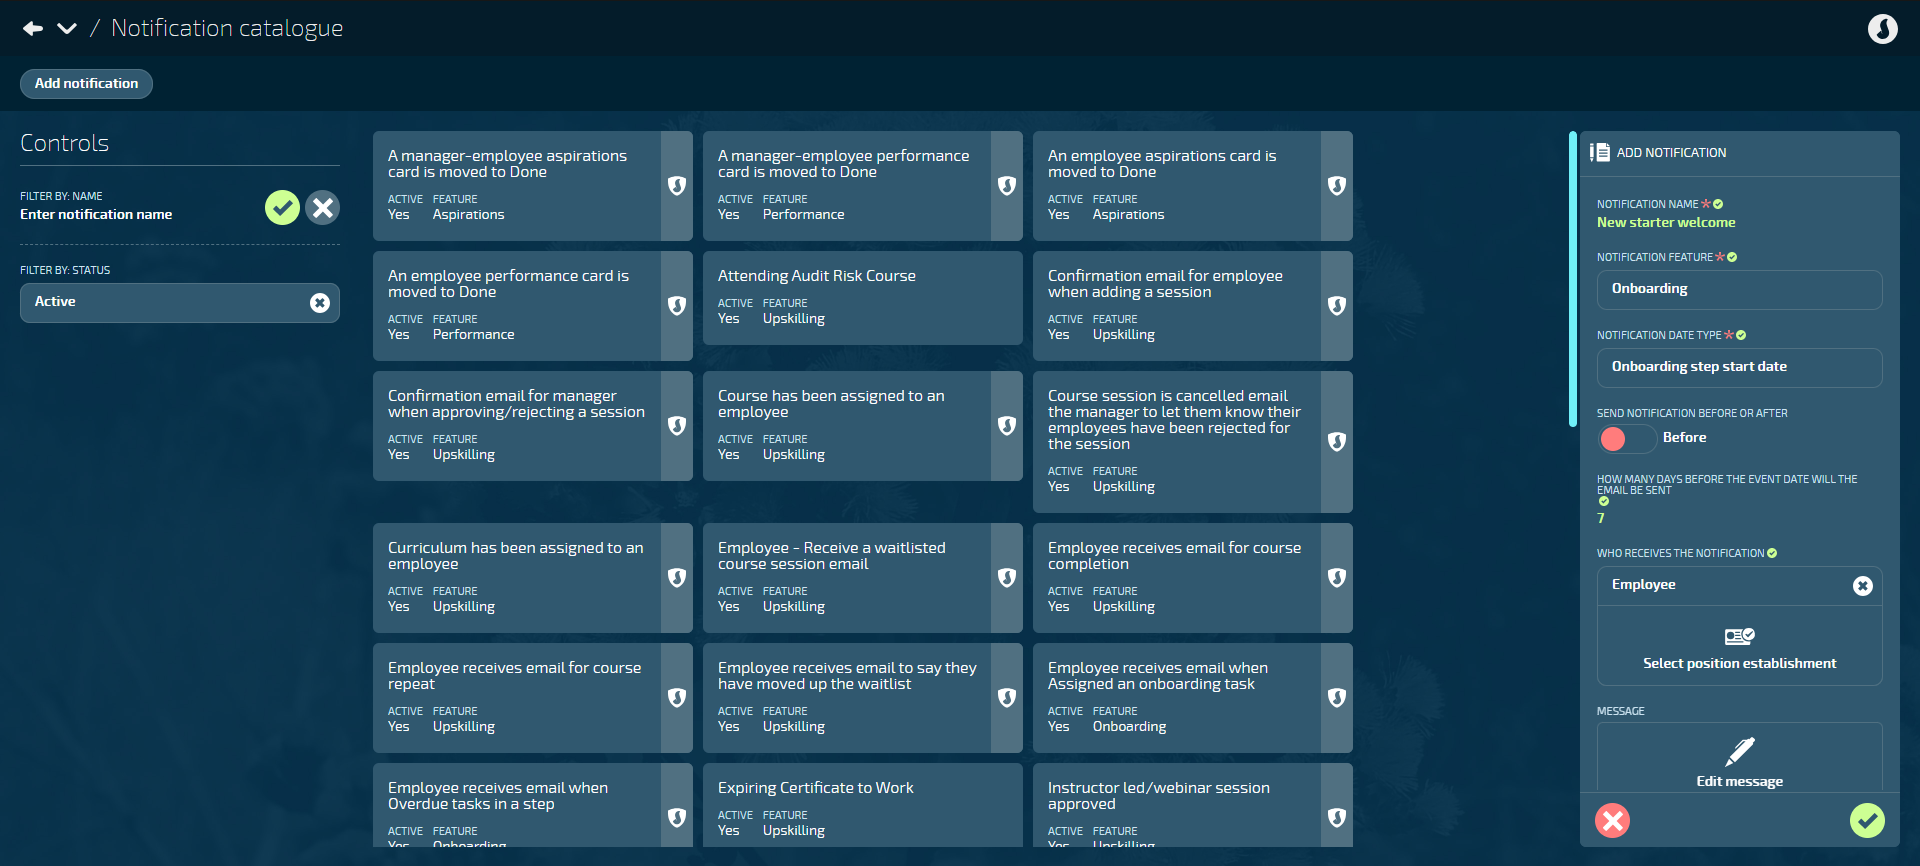
How to add a custom notification
- Go to System | Notification Catalogue.
- Select Add notification to open the ADD NOTIFICATION panel.
- Enter the NOTIFICATION NAME. We recommend using a descriptive name that clearly conveys the purpose of the notification.
- Open the NOTIFICATION FEATURE backpack and choose the feature to link with the notification.
- Open the NOTIFICATION DATE TYPE backpack and choose the event that will trigger the notification when linked to a feature's record.
- Set SEND NOTIFICATION BEFORE OR AFTER to Before or After.
a. If you choose Before, specify HOW MANY DAYS BEFORE THE EVENT DATE WILL THE EMAIL BE SENT. For example, if you want the notification to be sent a week before the event date, enter the number 7.
b. If you choose After, specify HOW MANY DAYS BEFORE THE EVENT DATE WILL THE EMAIL BE SENT. For example, if you want the notification to be sent a couple of days after the event date, enter the number 2. - Choose WHO RECEIVES THE NOTIFICATION from the Select user type or Select position establishment backpacks.
- You can only choose employee or manager, but you can select more than one position establishment.
- Alternatively, enter an email address in the SEND TO field if the recipient isn't available from those options.
- Additionally, you can enter WHO RECEIVES A COPY OF THE NOTIFICATION.
- Select Build message to open the MESSAGE editor.
- The Build message button will appear after you select the NOTIFICATION DATE TYPE.
- The MESSAGE editor allows you to tailor your message to the recipient and enter information related to the feature.
- You can insert variables related to your chosen feature (such as employee name or record start date).
- Learn more about how to use the message editor below.
- Once you've finished building your message, select the Circled tick icon or the Shrink icon to close the MESSAGE editor.
- Set ACTIVE to Yes or No, depending on whether you want to make the notification available to select in the feature record panel.
- Select the Green Tick Button to save and close the ADD NOTIFICATION panel.
How to edit a custom notification
- Go to System | Notification Catalogue.
- Choose the notification card to edit. When you select the card, the NOTIFICATION panel will open.
Cards that are marked with the Jemini system icon are pre-set notifications created by Jemini. You can only edit these cards' notification name and activation status.
- (Optional): Edit the NOTIFICATION NAME. We recommend using a descriptive name that clearly conveys the purpose of the notification.
- The NOTIFICATION FEATURE and NOTIFICATION DATE TYPE backpacks will be greyed out and can't be edited.
- (Optional): Set the SEND NOTIFICATION BEFORE OR AFTER to Before or After.
a. If you choose Before, specify HOW MANY DAYS BEFORE THE EVENT DATE WILL THE EMAIL BE SENT. For example, if you want the notification to be sent a week before the event date, enter the number 7.
b. If you choose After, specify HOW MANY DAYS BEFORE THE EVENT DATE WILL THE EMAIL BE SENT. For example, if you want the notification to be sent a couple of days after the event date, enter the number 2. - (Optional): Choose WHO RECEIVES THE NOTIFICATION from the Select user type or Select position establishment backpacks.
- You can only choose employee or manager, but you can select more than one position establishment.
- Alternatively, enter an email address in the SEND TO field if the recipient isn't available from those options.
- Additionally, you can enter WHO RECEIVES A COPY OF THE NOTIFICATION.
- (Optional): Select Edit message to open the MESSAGE editor.
- The MESSAGE editor allows you to tailor your message to the recipient and enter information related to the feature.
- You can insert variables related to your chosen feature (such as employee name or record start date).
- Learn more about how to use the message editor below.
- Select the Circled tick icon or the Shrink icon to close the MESSAGE editor if you had it open for editing.
- (Optional): Set ACTIVE to Yes or No, depending on whether you want to make the notification available to select in the feature record panel.
- Select the {{{glossary.Green Tick Button}} to save and close the NOTIFICATION panel.
How to delete a custom notification
- Go to System | Notification Catalogue.
- Choose the notification card to edit. When you select the card, the NOTIFICATION panel will open.
Cards marked with the Jemini system icon are pre-set notifications created by Jemini and can't be deleted.
- Select the Delete Button.
- Select Go ahead when the CONFIRMATION message appears.
How to use the message editor
When you open a NOTIFICATION panel and select Build message (or Edit message), the message editor will open.
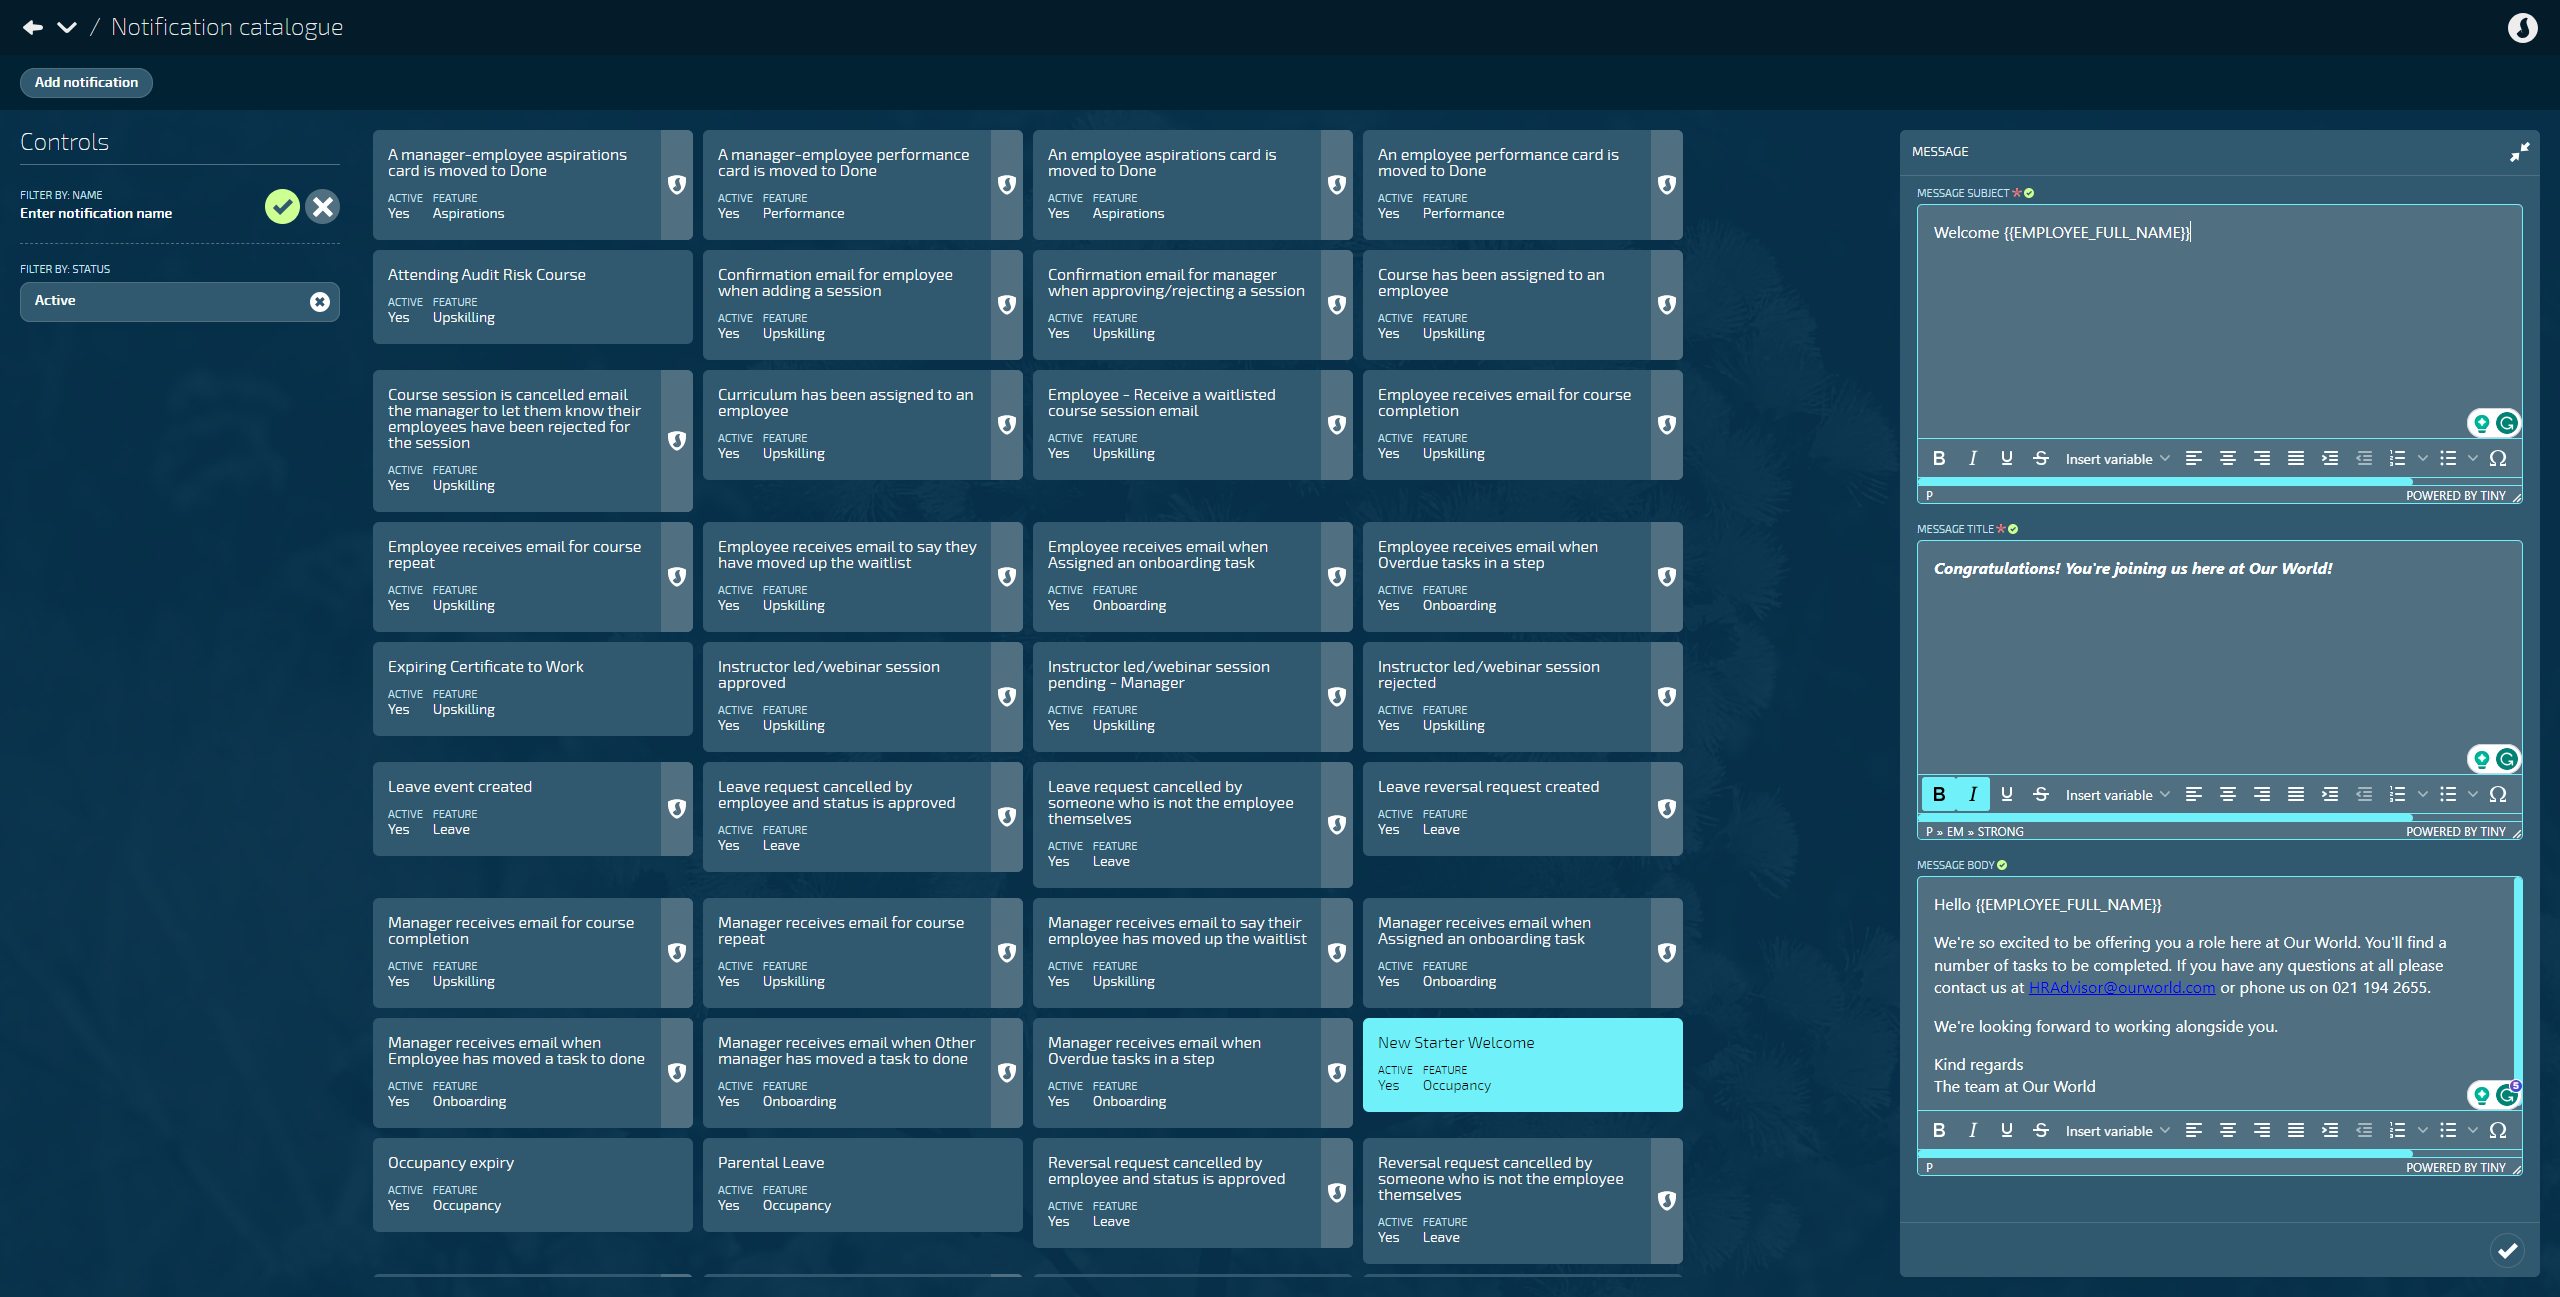
Three sections are available for composing the message, which will be sent in email format to the recipient. The three sections are:
- MESSAGE SUBJECT
The message subject is the email subject line. This section has a limit of 60 characters, so we recommend you make the message subject concise, relevant, and compelling. It should give recipients a clear idea of the email's content and encourage them to open it when it reaches their inbox. - MESSAGE TITLE
The message title is the heading within the email body. Like the message subject, it has a limit of 60 characters, so it needs to be short and to the point. Ideally, it will introduce the recipient to the main purpose of the email. - MESSAGE BODY
The message body is the body of the email. You can write it the same way you would compose a regular email. You may want to use this section to explain the purpose of the notification, why it was sent to the recipient, and what they need to do.
Customise your text and insert variables
The message editor uses a rich text editor to help you customise your text. You can make your text bold, italicised, underlined, and more:

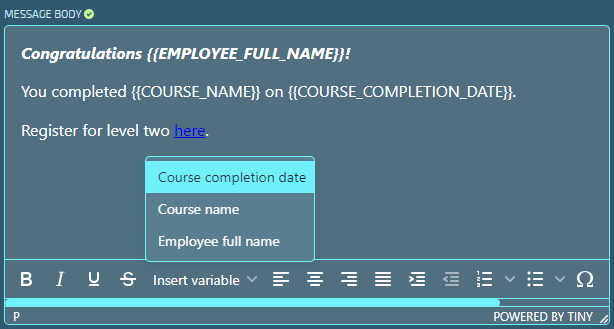
Insert variables to customise the message even further. For example, if you want to address it to the recipient, select Insert variable and choose Employee full name from the list. The list of available variables will change depending on the feature and dates you've selected in the ADD NOTIFICATION panel. For example, the screenshot below shows available variables for an Upskilling notification that will be triggered when the course is completed:
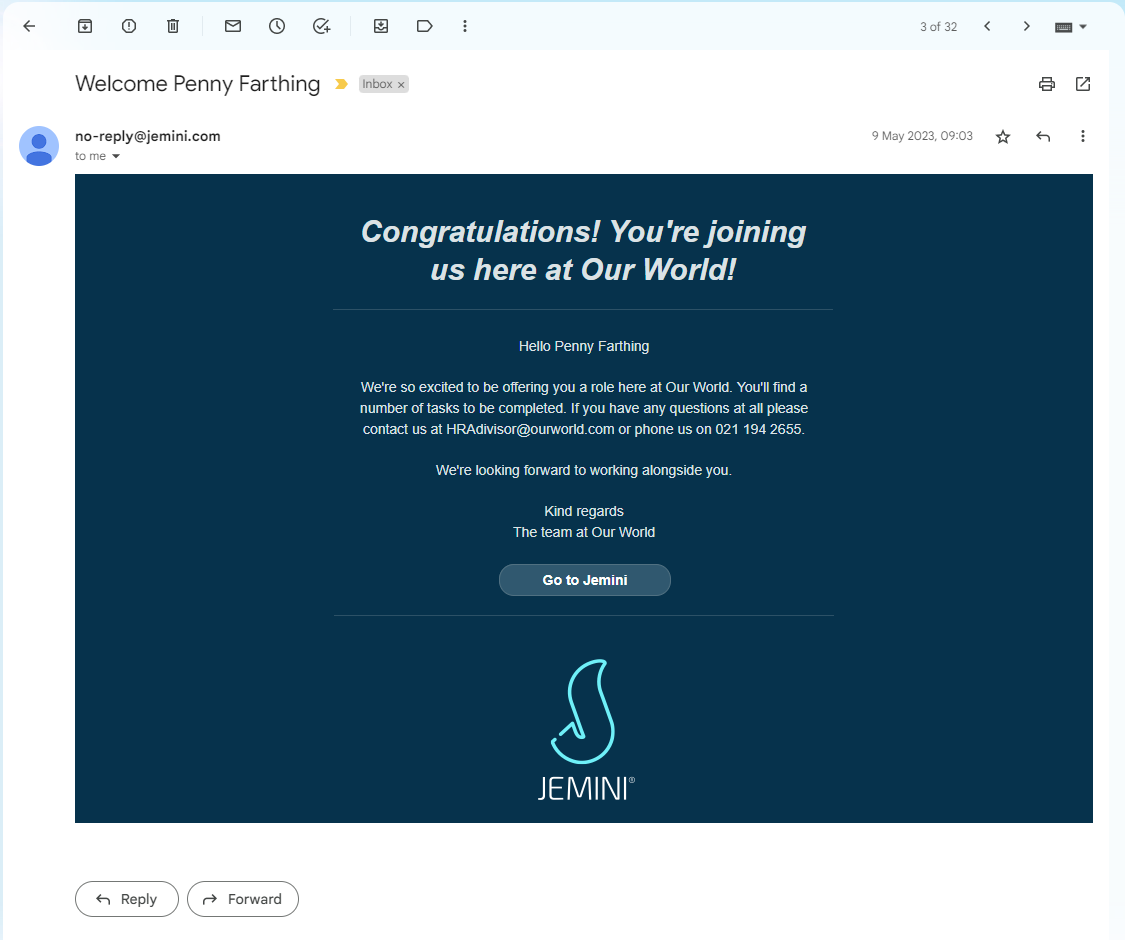
Example of a notification that has been sent to the recipient

.png)
 Select this icon when you're done making changes in the panel. Your changes will be saved, and the panel will close.