Who can benefit from this guide?
System Administrators and HR Administrators with the right permissions.
If you need access to Security Profiles, please speak to your system administrator or raise an iHelp through Infusion.
What you’ll find in this guide
Understanding the permissions panel
Configuring permissions step-by-step
Testing the security profile
Assigning the Security Profile to users
Understanding the permissions panel
Once you’ve created a security profile (as shown in How to add, edit, and delete Security Profiles), you need to configure what users with this profile can access and do. You can do this in the permissions panel.
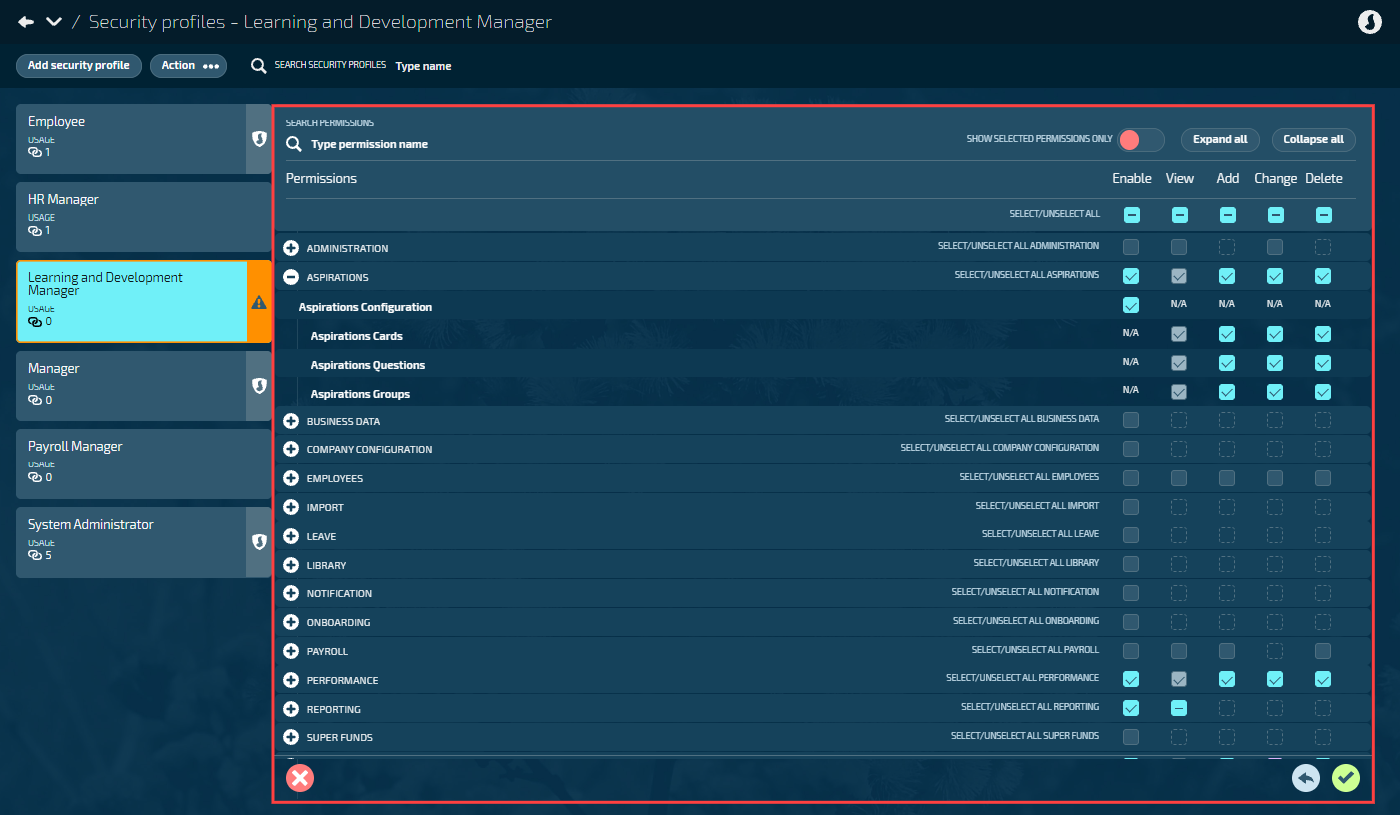
The permissions panel shows a hierarchical tree with top-level categories like Administration, Employees, Payroll, Leave, and Reporting. Each category contains subcategories and individual permissions.
Administration: System administration settings, auditing, security profiles, and user profiles
Aspirations: Aspirations configuration and management in Lifecycle
Business Data: Business-specific data management using core tables
Company Configuration: Locations, organisation components, and positions
Employees: Access to employee application, including their profile, action, and lifecycle records. Plus team leave and lifecycle access for managers
Import: Data import functions
Leave: Leave plans and leave events. Plus access to leave liability extract and leave balance extract functions in leave plans application
Library: Library configuration and management
Notification: Notification configuration and management
Onboarding: Onboarding workflows and processes in Lifecycle
Payroll: Payroll Configuration (including Tax Tables), Payroll Processing (including Payroll Management application). Plus costing, employment agreement, holidays, and range tables
Performance: Performance configuration and management in Lifecycle
Reporting: Access to PowerBI reporting across the Jemini applications: Pay, People, Business, System, Upskilling, and Onboarding
Super Funds: Superannuation fund configuration and management
Upskilling: Upskilling configuration and management in Lifecycle
Work Patterns: Work schedules and patterns configuration and management
Your Jemini: Employee self-service features, including their profile, action and lifecycle records
TIP
Some features have permissions spread across multiple categories. For example, Lifecycle permissions (Aspirations, Performance, and Upskilling) control configuration. To give managers access to employee lifecycle activities, enable Lifecycle in the Employees category. For employee access, enable it in Your Jemini.
Each permission has up to five checkboxes:
Enable: Access to the functional area
View: See records
Add: Create new records
Change: Edit existing records
Delete: Remove records
Configuring permissions step-by-step
Go to SYSTEM > SECURITY PROFILES.
Select the profile card to open the permissions panel.
Start with what users need access to:
Expand the relevant permission category (For example: 'Payroll' to control the Pay bubble).
Tick the Enable box – this makes the bubble or functional area visible in the user's navigation.
Select the appropriate permission levels:
Tick View if users need to see records.
Tick Add if users need to create new records.
Tick Change if users need to edit existing records.
Tick Delete if users need to remove records.
TIP
Some permissions have dependencies which Jemini handles automatically. For example, if you grant Change permission, Jemini will tick the required View permission for you.
Work through each category systematically:
Use the Expand all / Collapse all buttons to manage your view.
Review child permissions under each parent category.
Some permissions automatically grant related permissions.
Use SEARCH PERMISSIONS to find specific permissions:
Enter keywords in the search box at the top of the permissions panel.
The tree will filter to show only matching permissions.
Clear the search to see the full tree again.
Review your configuration:
Select SHOW SELECTED PERMISSIONS ONLY to see what you've enabled.
Verify the permissions match your requirements.
Check that you haven't over-granted or under-granted access.
Select the Green Tick Button to save the permissions.
TIP
Configure permissions in this order: Enable first, then View, then Add/Change/Delete. This way, you don't miss the foundational permissions.
Testing the security profile
Before assigning the profile to real users, test it thoroughly:
Create a test user account (or use an existing test account):
Go to SYSTEM > USER PROFILES.
Create a test user or select an existing one.
Assign the new security profile to the test user.
Sign in as the test user (or ask a colleague to test):
Use a different browser or incognito window
Sign in with the test user credentials
Verify functional access:
Check which bubbles are visible in the main menu
Confirm they match your intended configuration
Note any unexpected bubbles or missing ones
Test permission levels within each bubble:
Try to view records (should work if View is enabled)
Try to add a record (should work only if Add is enabled)
Try to edit a record (should work only if Change is enabled)
Try to delete a record (should work only if Delete is enabled)
Verify Employee Access:
Check which employees are visible
Confirm it matches the Employee Access level you configured
Try to access employees who should be hidden
Document test results:
Note any issues or unexpected behavior
Record what works as expected
Save this documentation with the profile configuration notes
If testing reveals issues, return to the security profile configuration and adjust the permissions, then test again.
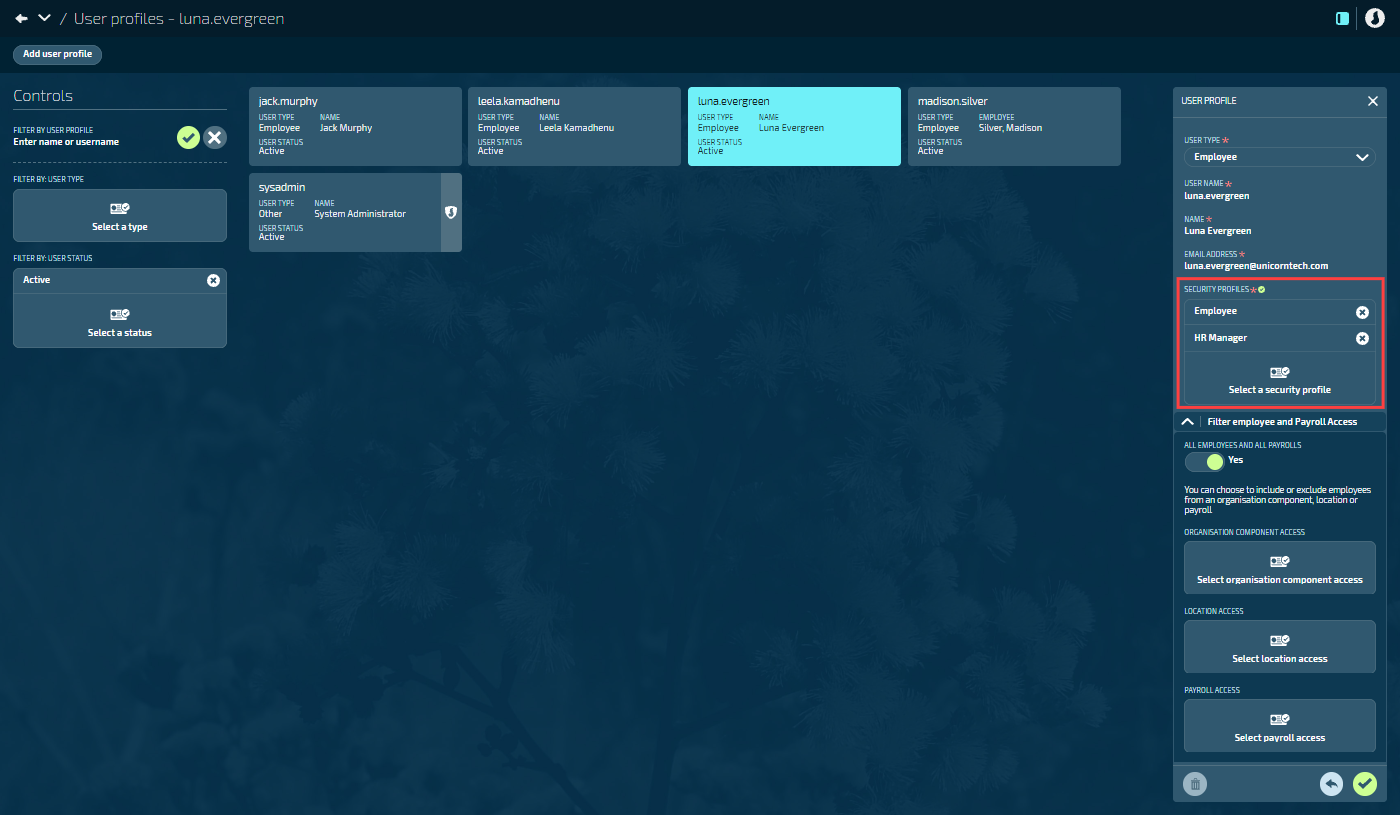
Assigning the Security Profile to users
Go to System > User Profiles to assign the new security profile to user accounts. You can assign more than one profile.
When a user has multiple security profiles, their permissions and employee access combine to give them the highest level of access from any profile. Jemini can't currently apply different permissions to different employee groups on the same user profile.