Who this guide is for
HR managers and administrators managing employee onboarding and role changes.
Manage employee job details in Occupancy
Occupancy records hold an employee's position, payroll, location, employment status, and working hours. Create or update these records for new hires, role changes, transfers, employment status changes, and contract updates.
Quick links:
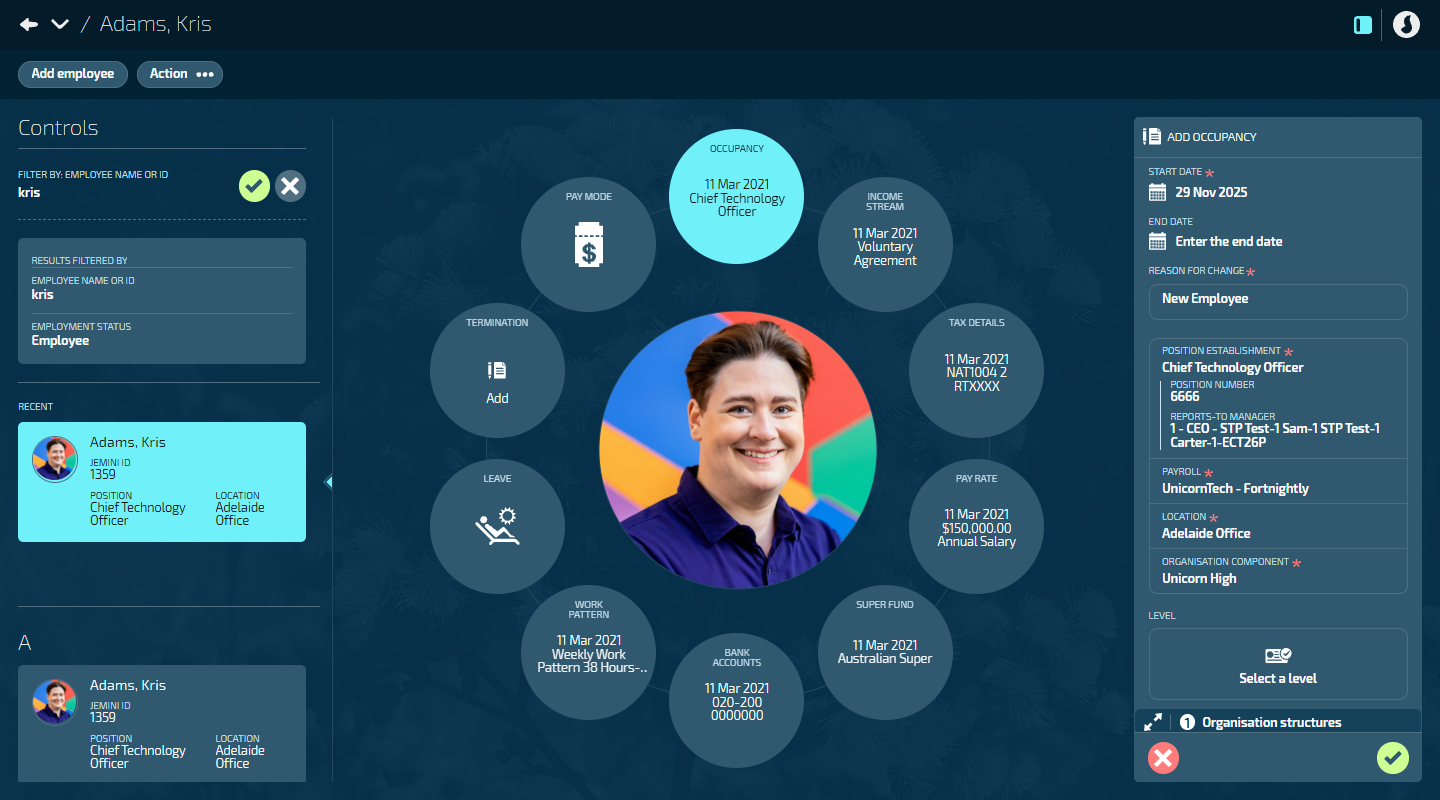
Core occupation details include:
Reason for change (tracks why the occupation is being created or updated)
Position and payroll assignment
Location and organisation component
Employment status (Permanent, Casual, Contractor, Temporary/Fixed Term)
Occupancy status (Active, Terminated, Suspended, Parental Leave)
Working hours:
Full-time hours (filled in automatically from position establishment)
Agreed hours and days per week
Optional fields:
Level, organisation structures, employment category, occupancy function
Public holidays and business leave attachment
Leave calculation settings
Costing types and notifications
TIP
Most employees have one employment stream (their job). Some employees work in multiple roles for your organisation and will have multiple employment streams. Each stream has its own occupancy record.
TIP
Occupancy records appear in different sections based on their dates:
Current: Records that have started (start date is today or earlier).
Forecast: Records that will start in the future (start date is tomorrow or later).
Historical: Records that have ended (end date is earlier than today).
How to add an Occupancy
These instructions guide you through the core steps for adding an Occupancy record.
TIP
Find instructions for optional fields, such as Levels or Organisation Structures*, in the table below.
*Some Organisation Structures are mandatory, depending on your system configuration.
Go to PEOPLE > EMPLOYEES.
Select the employee you need to manage.
Go to ACTION > OCCUPANCY. The dated OCCUPANCY panel will open.
An existing occupancy record will display. Select this record. (Only select Update occupancy record if editing an existing employee).
Default name is Initial employment stream.
If you’re using the Multiple Employments feature, this record might have a custom name.
(Optional) Enter an END DATE if the occupation has a known end date.
REASON FOR CHANGE automatically sets to 'New Employee'.
- This field tracks why you're creating the occupation record. You can change it if needed (for example, for secondary employment streams).
Select a position.
The POSITION ESTABLISHMENT backpack will open.
Choose a position from the backpack.
Use the Search if needed.
If the position isn’t available, set it up in BUSINESS > POSITIONS.
Select Yes or No when the confirmation message asks if you want to inherit the position’s location and organisation.
If you select Yes, the LOCATION and ORGANISATION COMPONENT fields will auto-populate using the rules set in the Position Establishment.
If you select No, you’ll need to add LOCATION and ORGANISATION COMPONENT manually.
Select a position.
The POSITION ESTABLISHMENT backpack will open.
Choose a position from the backpack.
Use the Search if required.
Select the position to close the backpack.
Select the EMPLOYMENT STATUS.
Permanent (default selection)
Casual
Contractor
Temporary/Fixed Term
Select the OCCUPANCY STATUS. Options are:
Active (default selection)
Terminated Occupancy
Suspended Occupancy
Parental Leave
Set ATTACH PUBLIC HOLIDAYS TO THE EMPLOYEE to Yes or No.
If set to Yes, public holidays for the employee's location will automatically attach to their pay when the holiday or holidays occur.
If set to No, public holidays won’t attach. For example, set to No if the employee isn't eligible for paid public holidays.
Set ATTACH BUSINESS LEAVE TO THE EMPLOYEE to Yes or No.
If set to Yes, business leave days for the employee’s location will automatically attach to their pay when the business leave day or days occur.
If set to No, business leave days won’t attach. For example, set to No if the employee doesn’t receive paid business leave days.
FULL-TIME HOURS PER WEEK, HOURS STATUS, and FULL-TIME EQUIVALENT (FTE) details come from the chosen position establishment and employment status. These are read-only.
Adjust the Agreed working week.
The AGREED HOURS PER WEEK fill in automatically from the position establishment. Edit if needed.
Enter the AGREED DAYS PER WEEK.
Select the Green Tick Button to save and close the panel.
You'll see a new record in the CURRENT or FORECAST section of the OCCUPANCY panel. Select X to close the panel.
How to update an Occupancy
IMPORTANT
Once the pay cycle process attached to the occupancy has reached the direct credit phase, the current occupancy record can no longer be edited, as it will interfere with processed calculations. Instead, you’ll need to update the occupancy with a new record.
If you need to make changes to the occupancy (for example, a change in employment status), create a new occupancy record.
Go to PEOPLE > EMPLOYEES.
Select the employee you need to manage.
Go to ACTION > OCCUPANCY. The dated OCCUPANCY panel will open.
Select Update Occupancy.
The ADD OCCUPANCY panel will open and contain the occupancy details for the existing occupancy. The only change is the START DATE which defaults to tomorrow’s date.
Make any necessary changes to the occupancy. For details on each setting, refer to how to add an occupancy above or the optional fields instructions below.
Remember to update the REASON FOR CHANGE.
Choose a reason from the backpack (for example, 'Promotion', 'Internal Transfer',
'Contract Extension').
Use the Search if needed.
Select the reason to close the backpack.
Select the Green Tick Button to save and close the panel.
You’ll see a new record in the CURRENT or FORECAST section of the dated OCCUPANCY panel depending on the occupancy start date. The previous record's end date is automatically set to the day before the new record's start date. Select the X to close the dated OCCUPANCY panel.
How to delete an Occupancy
IMPORTANT
Once the pay cycle process attached to the occupancy has reached the direct credit phase, you can no longer delete the current occupancy record, as it will interfere with processed calculations. Instead, you’ll need to update the occupancy with a new record, as shown above in How to edit an Occupancy.
If the pay cycle process attached to the occupancy hasn’t reached the direct credit phase, you can follow the steps below.
You can't delete the initial occupancy record. At least one occupancy record must exist for each employment. Delete future-dated occupancy records by selecting the Delete Button.
Go to PEOPLE > EMPLOYEES.
Select the employee you need to manage.
Go to ACTION > OCCUPANCY. The dated OCCUPANCY panel will open.
Select the Delete Button on the occupancy record.
Alternatively, open the occupancy record and select the Delete Button there.
Select Go ahead when the confirmation message appears, or select Go back if you’ve changed your mind.
Optional fields instructions
Some of these fields are only visible if your system administrator has set them up.
Field | Instructions | What it's for and how to configure it |
|---|---|---|
Level |
| Classify occupation by seniority for reporting. Configured in: People Core Tables > Job Level |
Organisation Structures |
| Link occupation to organisation components. Configured in: Business > Organisation Components |
Employment Category |
| Additional employment classification. Configured in: People Core Tables > Employment Category |
Occupancy Function |
| Track job function for reporting. Configured in: People Core Tables > Occupancy Function |
Employment Agreement Classification |
| Links the employee to their role within an employment agreement. This automatically connects them to the correct pay rates, steps, and allowances defined in the agreement. Configured in: Pay > Employment Agreement |
Leave Configuration |
| For New Zealand only. Configure leave payment calculations for NZ employees. Use Average Daily Pay settings for variable-hour employees and 4-week averaging for permanent employees. Set Average Daily Pay or 4-week average calculations. Configured in: Occupancy panel |
Content |
| Document additional information about the occupancy. Add notes, attach files, or link to related resources. Configured in: Occupancy panel |
Costing |
| Split costs across departments or projects. Configured in: Pay > Costing |
Notifications |
| Set up notifications for this occupation. Configured in: System > Notifications |


 Select this icon when you're done making changes in the panel. Your changes will be saved, and the panel will close.