Navigation: People | Leave | Team Leave
System administration permissions
Click or tap here to view permission settings
To give a user access to the Team Leave bubble:
Go to SYSTEM > SECURITY PROFILES.
Select the Security Profile that requires access to the Team Leave bubble.
In Permissions, scroll down and expand LEAVE to find the Leave Plan application permissions.
Tick the Enable box to activate the Leave Plan application.
Tick the View, Add, Change and Delete boxes for Leave Plan records permissions as required.
Select the Green Tick Button to save your changes.
Please reach out to our support team for assistance: raise an iHelp through Infusion.
Team Leave simplifies leave request management
Team Leave streamlines the process of reviewing employee leave requests for managers. Instead of navigating to each employee individually, you can access all leave requests in one centralised location. Whether there are a few or several requests, using Team Leave allows you to efficiently review and manage leave requests within Jemini, ultimately saving valuable time.
Leave events are listed by leave type (such as Annual Leave, Sick Leave, and so on). Within each category, the leave events are divided into To Do and Done. Leave events that are in To Do will likely need action from you (indicated by a blue-green card with pin icon) or from another manager responsible for reviewing the leave (indicated by a purple card with stopwatch icon). Leave events that are in Done indicate leave that has already been approved (indicated by a bright green card with thumbs up icon) or rejected (indicated by a red card with thumbs down icon).
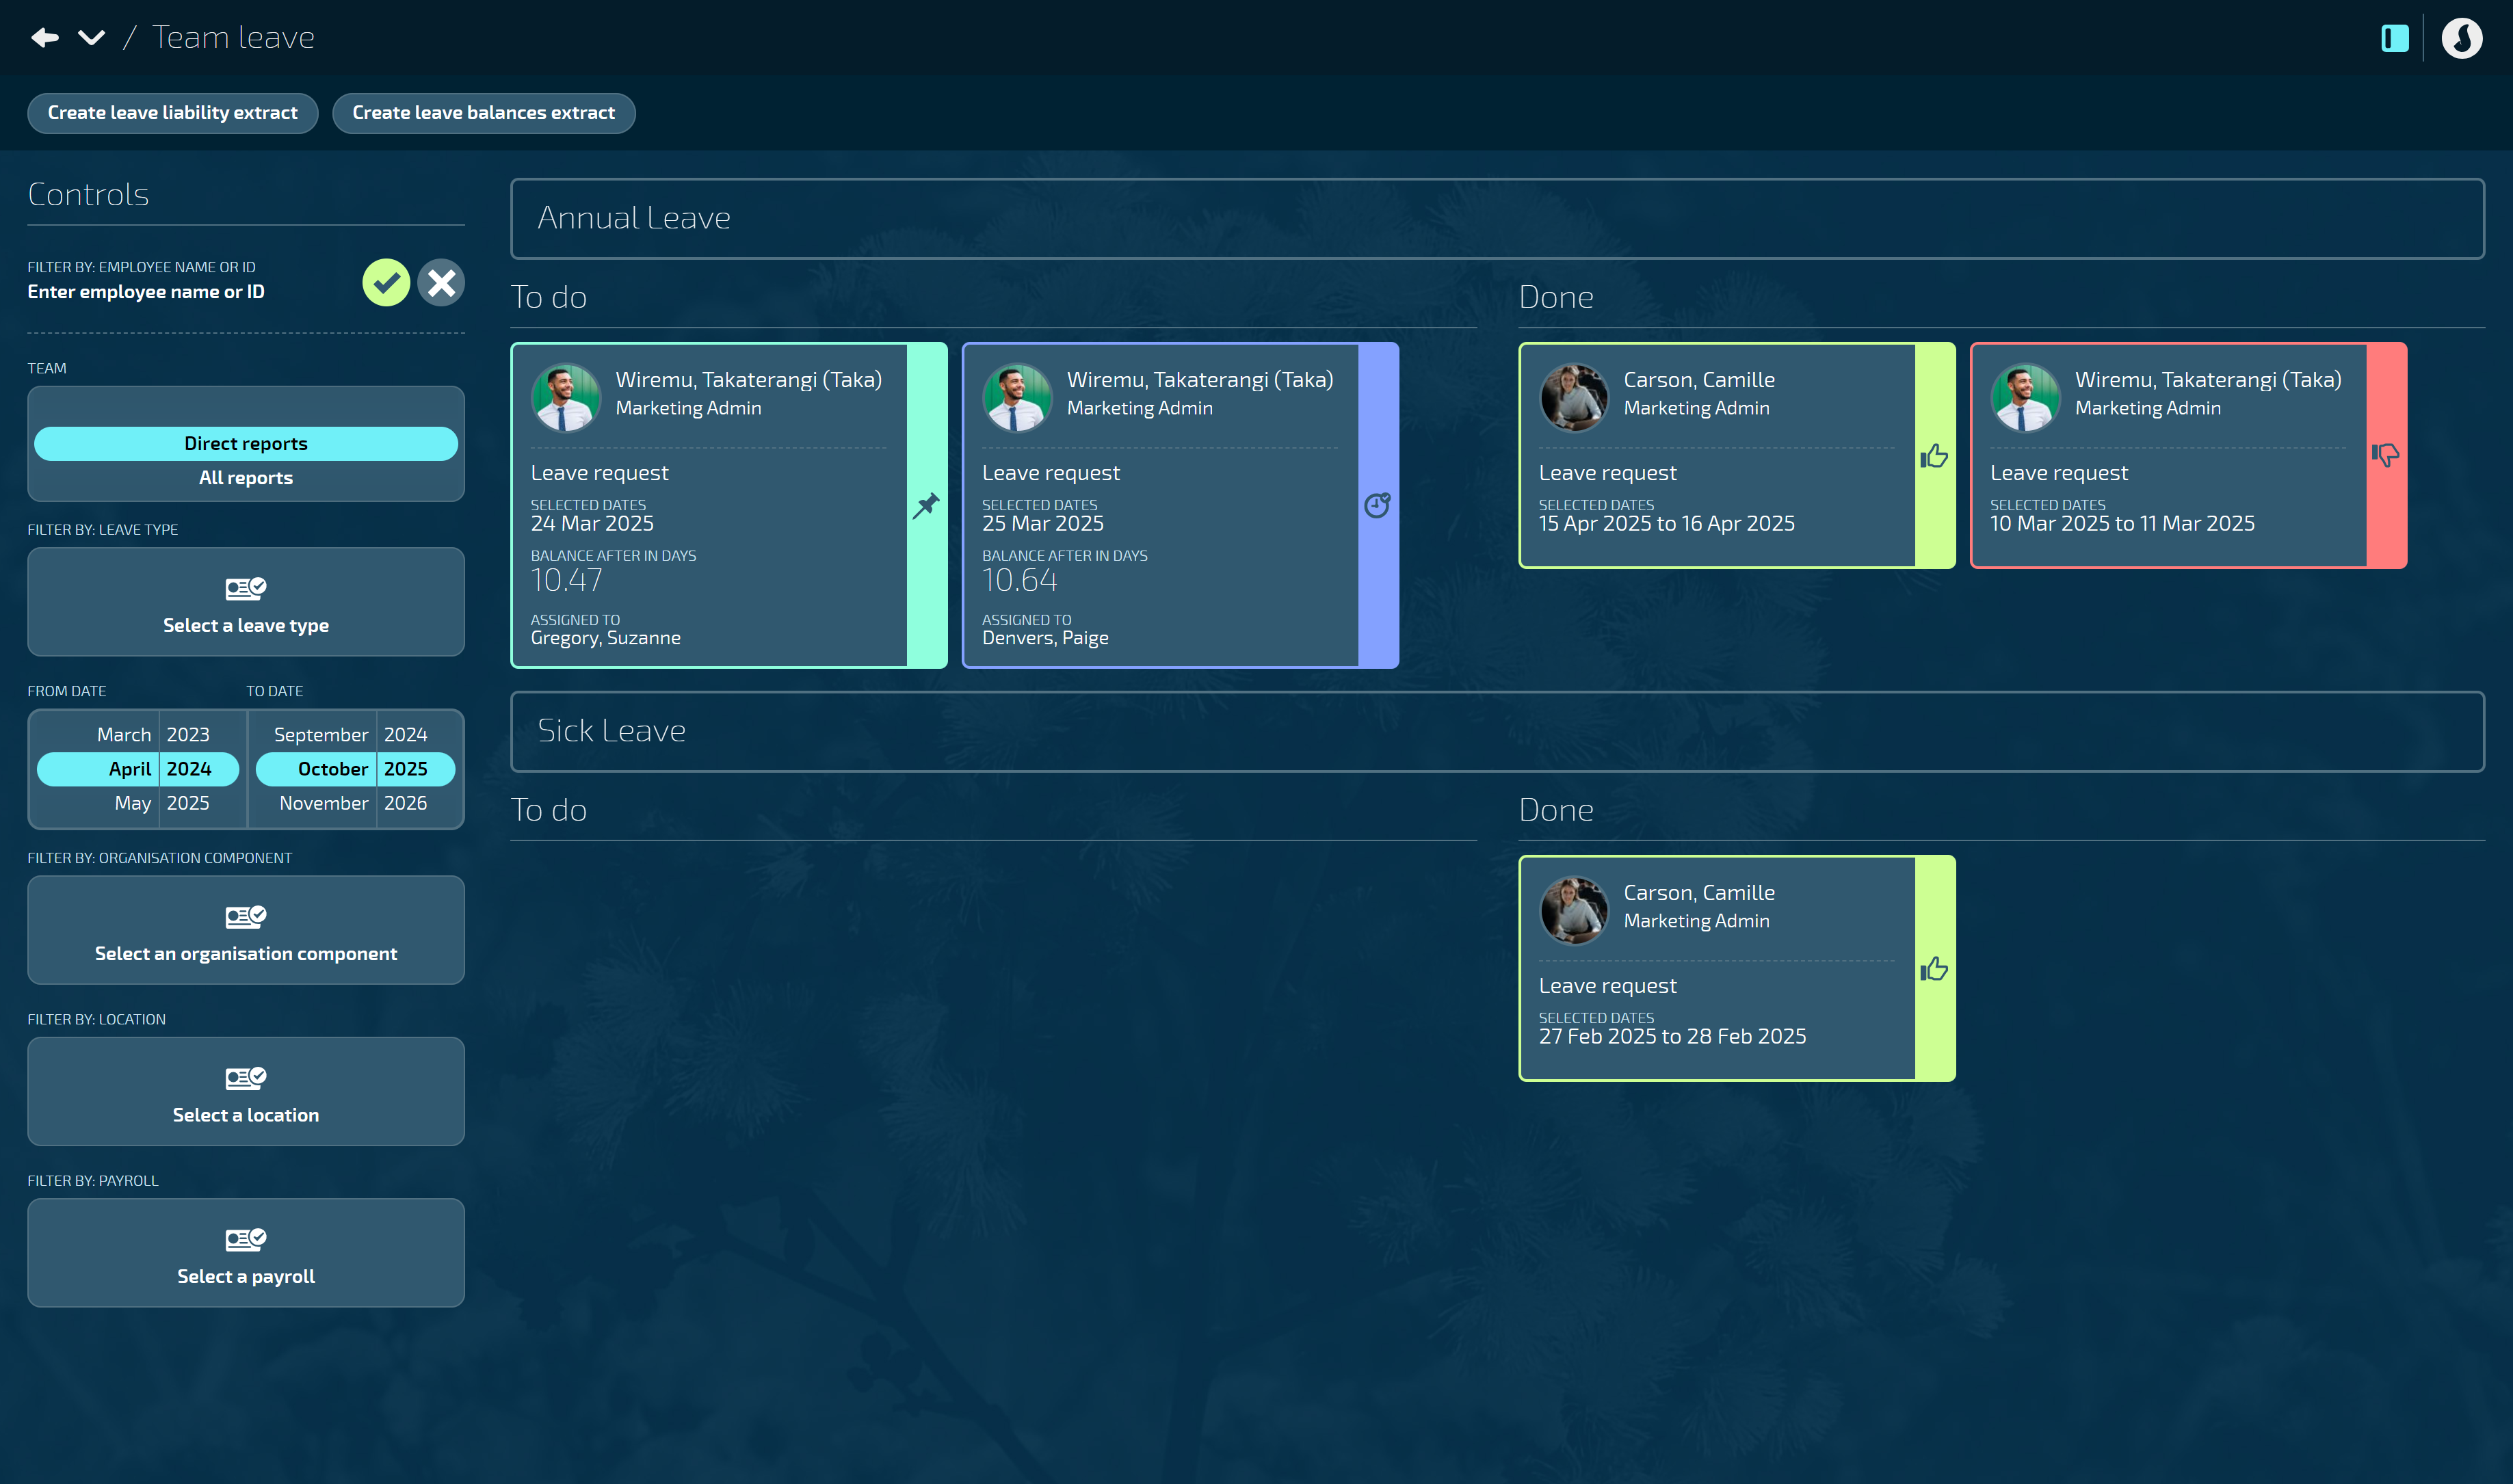
Using Controls: View types and filter options
Under Controls, you can filter by employee name or ID.
If you manage more than one team, you can select the TEAM you want to view.
FILTER BY LEAVE TYPE helps you review leave in groups such as annual leave or sick leave.
The dates default to the next six months. If you need to review leave events outside of this timeframe, adjust the roller dates accordingly.
Scroll the FROM DATE backwards to show historical requests.
Scroll the TO DATE forwards to show requests beyond six months.
If you’re part of a larger organisation, use filter options to view leave by ORGANISATION COMPONENT and LOCATION.
How to review a leave request
When you receive a leave request notification in your email inbox, you can open Jemini and navigate to Team Leave to review the request.
Go to PEOPLE > LEAVE > TEAM LEAVE to open the Team Leave view.
TIP
If the leave event you need to review isn't visible, it might be outside the next six months that the system defaults to. To view historical or future leave events, adjust the FROM DATE and TO DATE in Controls.
If you have a lot of results, you can refine your search using the additional filters available.
Select the leave event card to open the LEAVE EVENT panel.
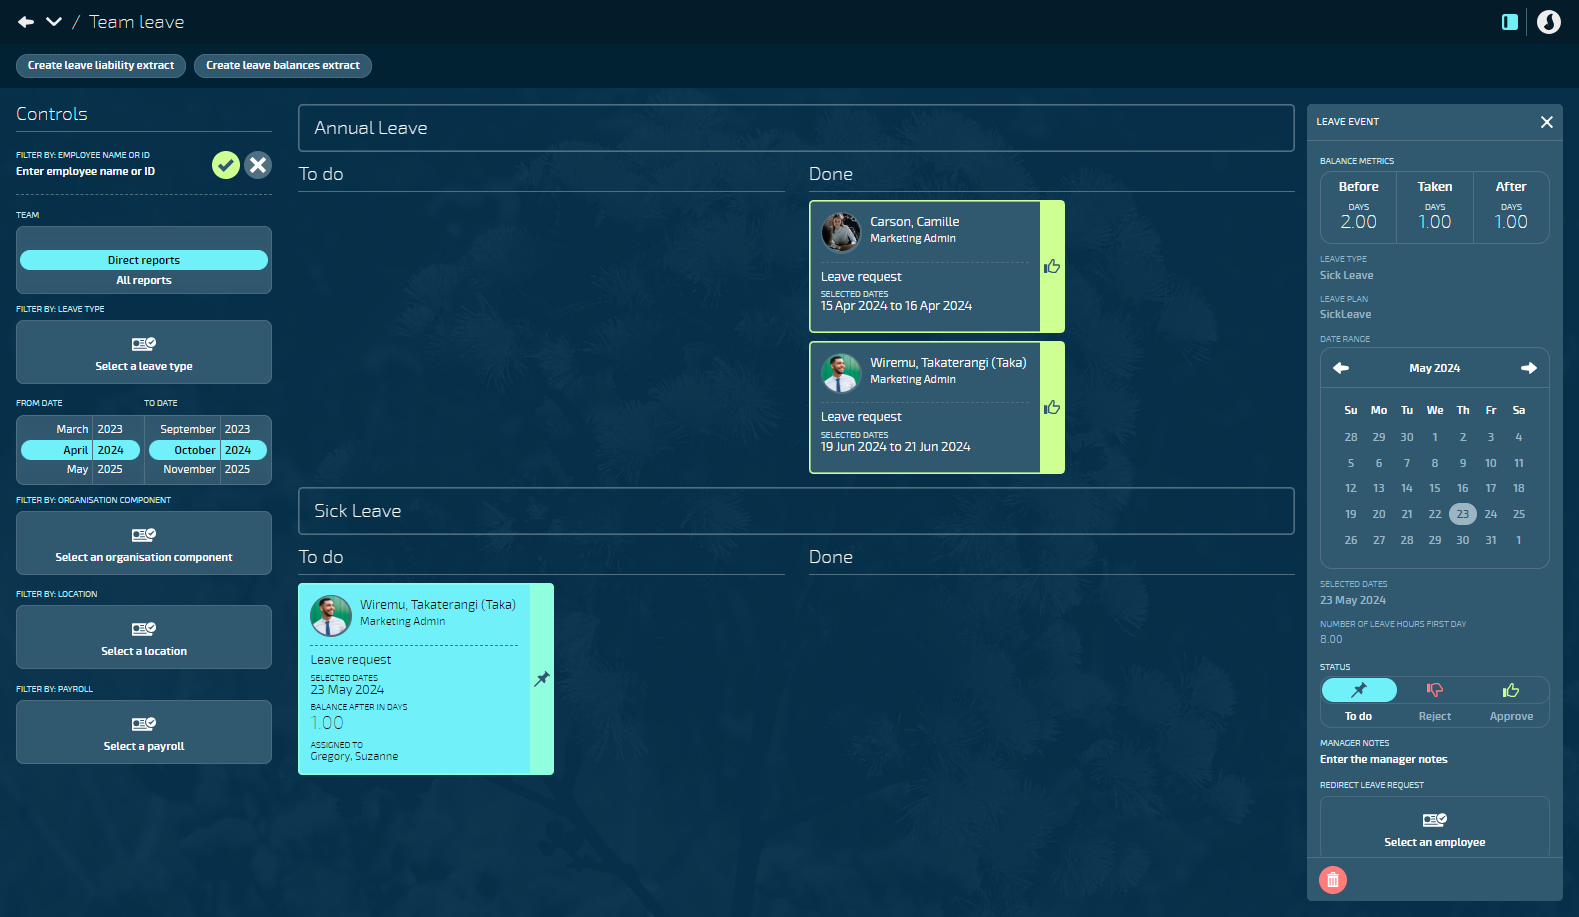
Review the details of the leave request, including BALANCE METRICS, LEAVE TYPE, LEAVE PLAN, DATE RANGE, SELECTED DATES, NUMBER OF LEAVE HOURS FIRST DAY, NUMBER OF LEAVE HOURS LAST DAY and EMPLOYEE NOTES
TIP
In the DATE RANGE, the date(s) the employee has requested will be highlighted in grey. If today's date is visible, it'll be coloured orange.
View and edit the STATUS. Here you can either Reject or Approve your employee's leave. Select the Red Thumbs Down Icon to reject the leave, or select the Green Thumbs Up Icon to approve the leave.
Enter notes into Manager Notes if needed.
(Optional) If you have the ability to redirect a leave request, you can do so by opening the Select an employee backpack then selecting the employee you want to redirect the leave to. More information on redirecting a leave request can be found in Approving or rejecting leave requests.
Select the Green Tick Button to save your changes. The leave card will move into Done.
TIP
If you've redirected the leave request to another employee to review, the card will remain in To Do with a purple border and stopwatch icon. The card will move to Done once they've approved or declined the leave.
TIP
Another way to approve or reject a leave request is by dragging the leave event card from To Do to Done. Approve (thumbs up) and reject (thumbs down) icons will appear for you to drop the card into.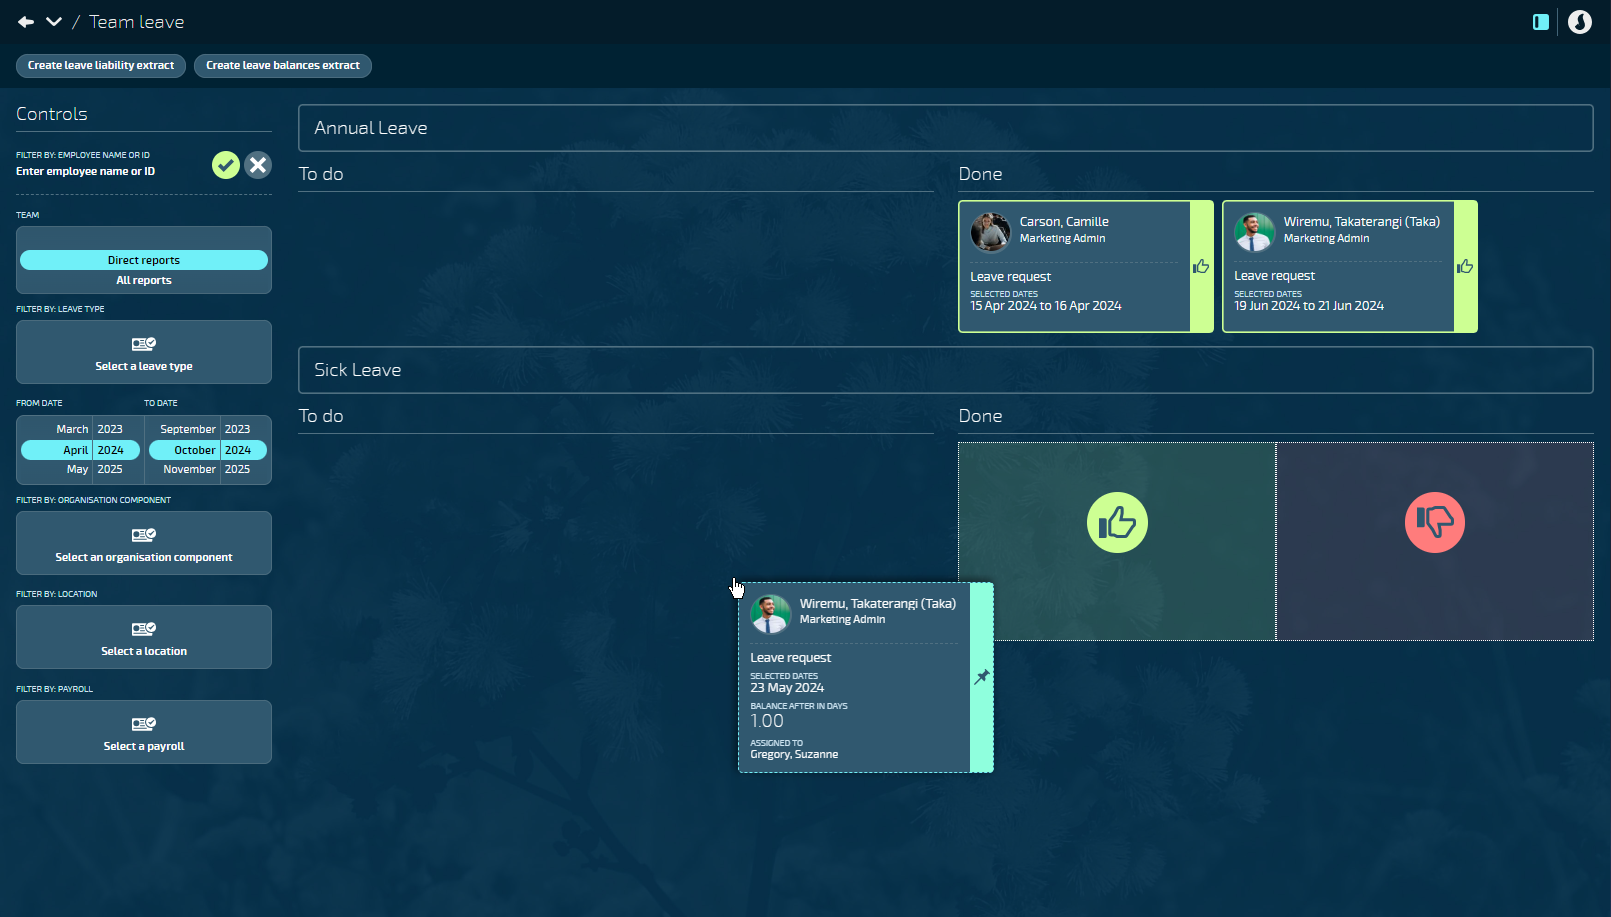
How to delete a leave request
If the employee has a change of plans or needs to revise their request, you can delete the request and create a new one if needed. This can only be done if the leave hasn't yet been processed in a pay cycle.
Go to PEOPLE > LEAVE > TEAM LEAVE to open the Team Leave view.
TIP
If the leave event you need to review isn't visible, adjust the FROM DATE and TO DATE in Controls to display the relevant timeframe for the leave event. You can also adjust the filters if you need to narrow down the results.
Select the leave event card to open the LEAVE EVENT panel.
Select the Delete Button if it's coloured red. If it's grey, the leave can't be deleted and you'll need to go to the employee application and reverse the employee's leave.
Read the Confirmation message and select Go ahead.
How to review a leave reversal request
Sometimes, you might receive a leave reversal request. A leave reversal corrects errors where an employee was paid for leave they didn't take. This might involve returning pay and crediting their leave balance.
You can follow the same steps above to review a leave reversal request.
TIP
For more on leave reversal requests, refer to How to reverse an employee's leave.