Navigation: People | Employees | 'Select Employee' | Action | Leave
Once leave plans are created in the Leave bubble, you can assign them to an employee using the Manage attached leave plan action, then perform other leave plan adjustment actions.
This guide explains how to perform the following actions:
Manage attached leave plans (including attaching or changing a leave plan)
In Jemini, employees' leave plans can be managed in the employee Leave application. Select the Action *** button in the top left corner and choose one of the actions.
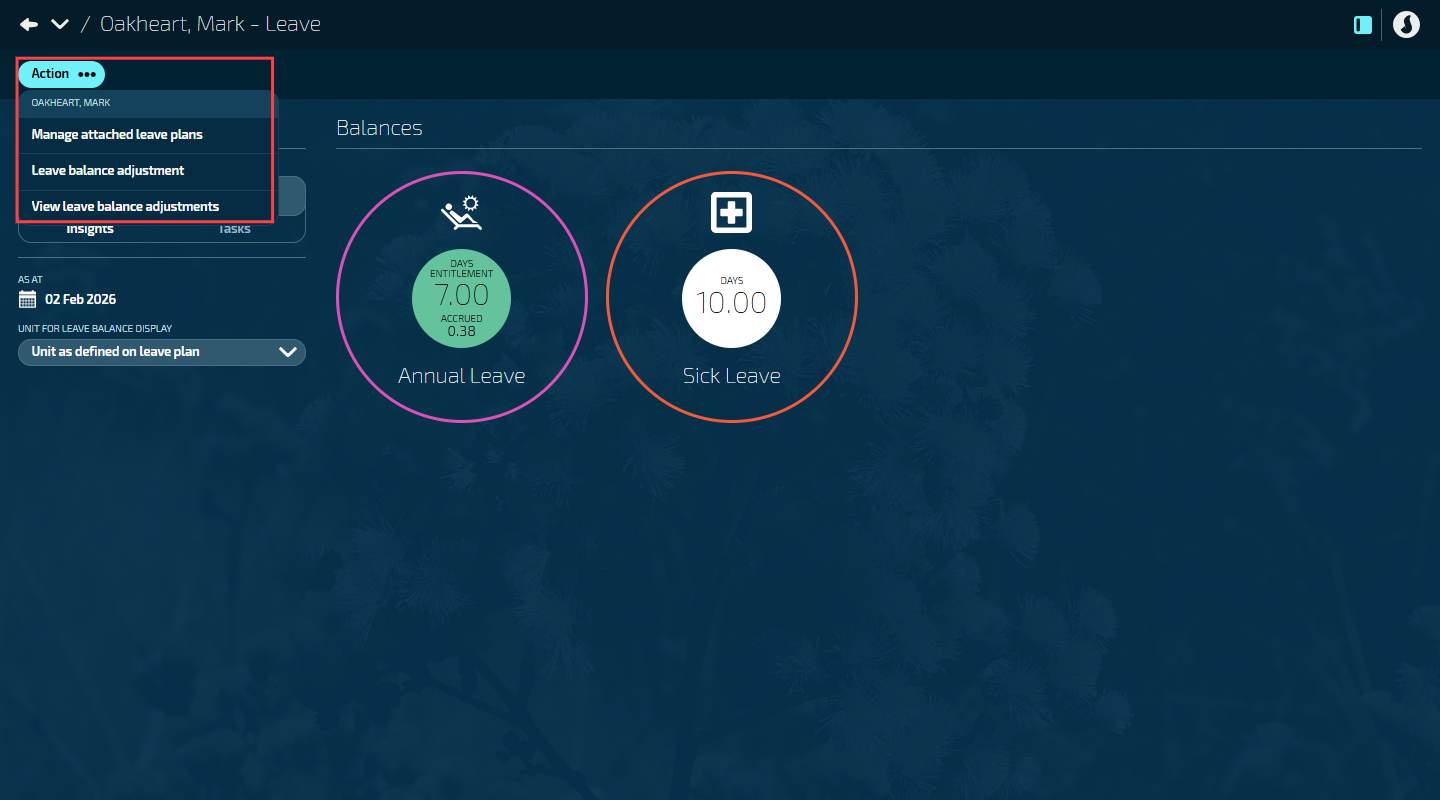
Manage attached leave plans
Leave plans are created, edited and deleted in the Leave plans bubble in PEOPLE > LEAVE.
Once leave plans are created, they can be attached to an employee. You can then edit or delete the leave plan at an employee level as needed.
Depending on how the leave plans were set up, employees might have some leave plans automatically attached. This will happen when the leave plan in LEAVE > LEAVE PLANS has Applicable to all set to Yes. If Applicable to all was set to No, you'll need to manually attach leave plans to the employee.
How to attach a leave plan to an employee
Go to PEOPLE > EMPLOYEES.
Select the employee you need to attach a leave plan to.
Go to ACTION > LEAVE to open the employee leave application.
Select Action ***.
Select Manage Attached Leave Plans to open the employee Leave Plans view.
Select Attach leave plans to open the ATTACH LEAVE PLANS panel.
Enter the START DATE. The date will default to the occupancy start date.
Select a leave plan by opening the LEAVE PLANS backpack and choosing one or more leave plans from the list.
TIP
Multiple leave plans can be attached to the employee profile at the same time as long as they all start on the same date.
Select the Green Tick Button to save and close the LEAVE PLANS backpack.
Choose the PAYMENT TIMING WHEN EMPLOYEE ON LEAVE.
The available options are 'A few days before leave is taken' or 'When Ordinary Pay would have been paid'.
Select the Green Tick Button to save and close the ATTACH LEAVE PLANS panel.
How to edit a leave plan attached to an employee
After some time, leave plans can stop being applicable to an employee. In this instance, you'll need to edit the leave plans attached to an employee by setting an end date. You can then choose a new plan to transfer their remaining balance or future leave requests into.
When the rules for a leave type change, it may happen that employees need to be moved to a different leave plan.
Example
All employees were on a 4-week Annual Leave plan, and the company has decided to switch to a 5-week Annual Leave plan starting from a specific date. In this case, open the 4-week leave plan attached to employees and set an end date. Then select the 5-week leave plan to transfer the remaining balance or future leave requests into. When the old leave plan ends and the new one starts, employees will start accruing leave on the new plan.
NOTE: If the old leave plan grants entitlement on the employee's anniversary date, you need to end it on that date and switch to a new plan that also uses the anniversary date for entitlements. If you don't do this correctly, the accrued leave won't carry over.
Go to PEOPLE > EMPLOYEES.
Select the employee that needs their leave plan edited.
Go to ACTION > LEAVE to open the employee leave application.
Select Action ***.
Select Manage Attached Leave Plans to open the employee Leave Plans view.
Select the leave plan card to open the LEAVE PLAN panel.
(Optional): Enter the END DATE. This will open the LEAVE PLAN TO MOVE BALANCE/FUTURE REQUESTS TO AT END DATE.
(Optional): Select a LEAVE PLAN TO MOVE BALANCE/FUTURE REQUESTS TO AT END DATE to open the LEAVE PLANS backpack and choose a leave plan from the list.
Select the Green Tick Button to save and close the LEAVE PLANS backpack.
(Optional): Change the PAYMENT TIMING WHEN EMPLOYEE ON LEAVE.
Select the Green Tick Button to save and close the LEAVE PLAN panel.
How to remove a leave plan attached to an employee
A leave plan can only be removed if it hasn't been processed in a payroll (this is indicated by the red Delete Button in the LEAVE PLAN panel).
Go to PEOPLE > EMPLOYEES.
Select the employee you need to remove the leave plan from.
Go to ACTION > LEAVE to open the employee leave application.
Select Action ***.
Select Manage Attached Leave Plans to open the employee Leave Plans view.
Select the leave plan card to open the LEAVE PLAN panel.
Select the Delete Button to remove the leave plan from the employee.
Leave balance adjustments
Leave balance adjustments can be used to change an employee's leave balance when the adjustment doesn't happen automatically. For example, you might need to adjust the leave balance when the employee is entitled to an additional day of Time in Lieu and there's no pay transaction for this.
Go to PEOPLE > EMPLOYEES.
Select the employee you need to adjust the leave for.
Go to ACTION > LEAVE to open the employee leave application.
Select Action ***.
Select Leave balance adjustment to open the LEAVE BALANCE ADJUSTMENT panel.
Select or confirm the DATE for the adjustment (defaults to today's date).
This determines when the adjustment takes effect in the employee's leave history.
The existing balance displayed reflects the balance at the selected date.
You can select past dates to adjust historical balances or future dates for planned adjustments.
Select the LEAVE PLAN to adjust the balance for.
The ENTITLEMENT UNIT and EXISTING BALANCE display as read-only.
Enter the NEW BALANCE.
The units match the ENTITLEMENT UNIT display.
Enter NOTES explaining the reason for this adjustment.
Select the Green Tick Button to save and close the LEAVE BALANCE ADJUSTMENT panel.
Read the Confirmation message and select Go ahead.
The employee's leave balances will update to show the new balance at the specified date.
View leave balance adjustments
All of the employee's leave balance adjustments, both manual and system adjustments, are listed in the Leave balance adjustments view. This view can be used to check the history of the employee.
Follow these instructions to find the leave balance adjustments:
Go to PEOPLE > EMPLOYEES.
Select the employee you need to view leave balance adjustments for.
Go to ACTION > LEAVE to open the employee leave application.
Select Action ***.
Select View leave balance adjustments to open the Leave balance adjustments view.
You may need to change the date range using the FROM DATE, TO DATE, and LEAVE PLAN rollers in Controls to match the timeframe and leave plan that you want to view leave balance adjustments for.
If leave plan adjustments have been made, they'll appear in a table on the right of the Controls.
The table displays:
The date the leave balance was adjusted.
The leave balance before the adjustment was made.
The leave balance after the adjustment was made.
The entitlement unit of the leave balance.
Whether it was a manual or system update.
Additional notes related to the adjustment.
You also have the option to download a report in .CSV format. Select Download report under the Controls.