Navigation: People | Leave | Leave Plans
Click or tap here to view permission settings
To give a user access to the Leave Plans bubble:
- Go to SYSTEM > SECURITY PROFILES.
- Select the Security Profile that requires access to the Leave Plans bubble.
- In Permissions, scroll down and expand LEAVE to find the Leave Plan application permissions.
- Tick the Enable box to activate the Leave Plan application.
- Tick the View, Add, Change and Delete boxes for Leave Plan records permissions as required.
- Select the Green Tick Button to save your changes.
Please reach out to our support team for assistance: Book a consultation.
This guide is for New Zealand leave plans only. A guide for Australian leave plans will be published later.
What's a leave plan?
A leave plan consists of chosen settings that establish rules for managing a particular type of leave, like annual leave, sick leave, bereavement leave, and so on.
Each leave type needs to be set up as a leave plan. You may need to create separate leave plans for the same leave type if different settings are required. For example, you might need to set up a leave plan for four weeks of annual leave and another for five weeks of annual leave.
Once a leave plan is set up, it can be attached to an employee who can then apply for leave through Your Jemini.
New Zealand leave types:
Leave types in a New Zealand payroll can include:
- ACC Leave
- Alternative Holiday
- Annual Leave
- Bereavement Leave
- Other
- Parental Leave
- Sick Leave
Other leave types, such as Long Service Leave, Leave Without Pay, or Unpaid Sick Leave can be set up by your Jemini consultant. For help, raise an iHelp through Infusion.
How to add a leave plan
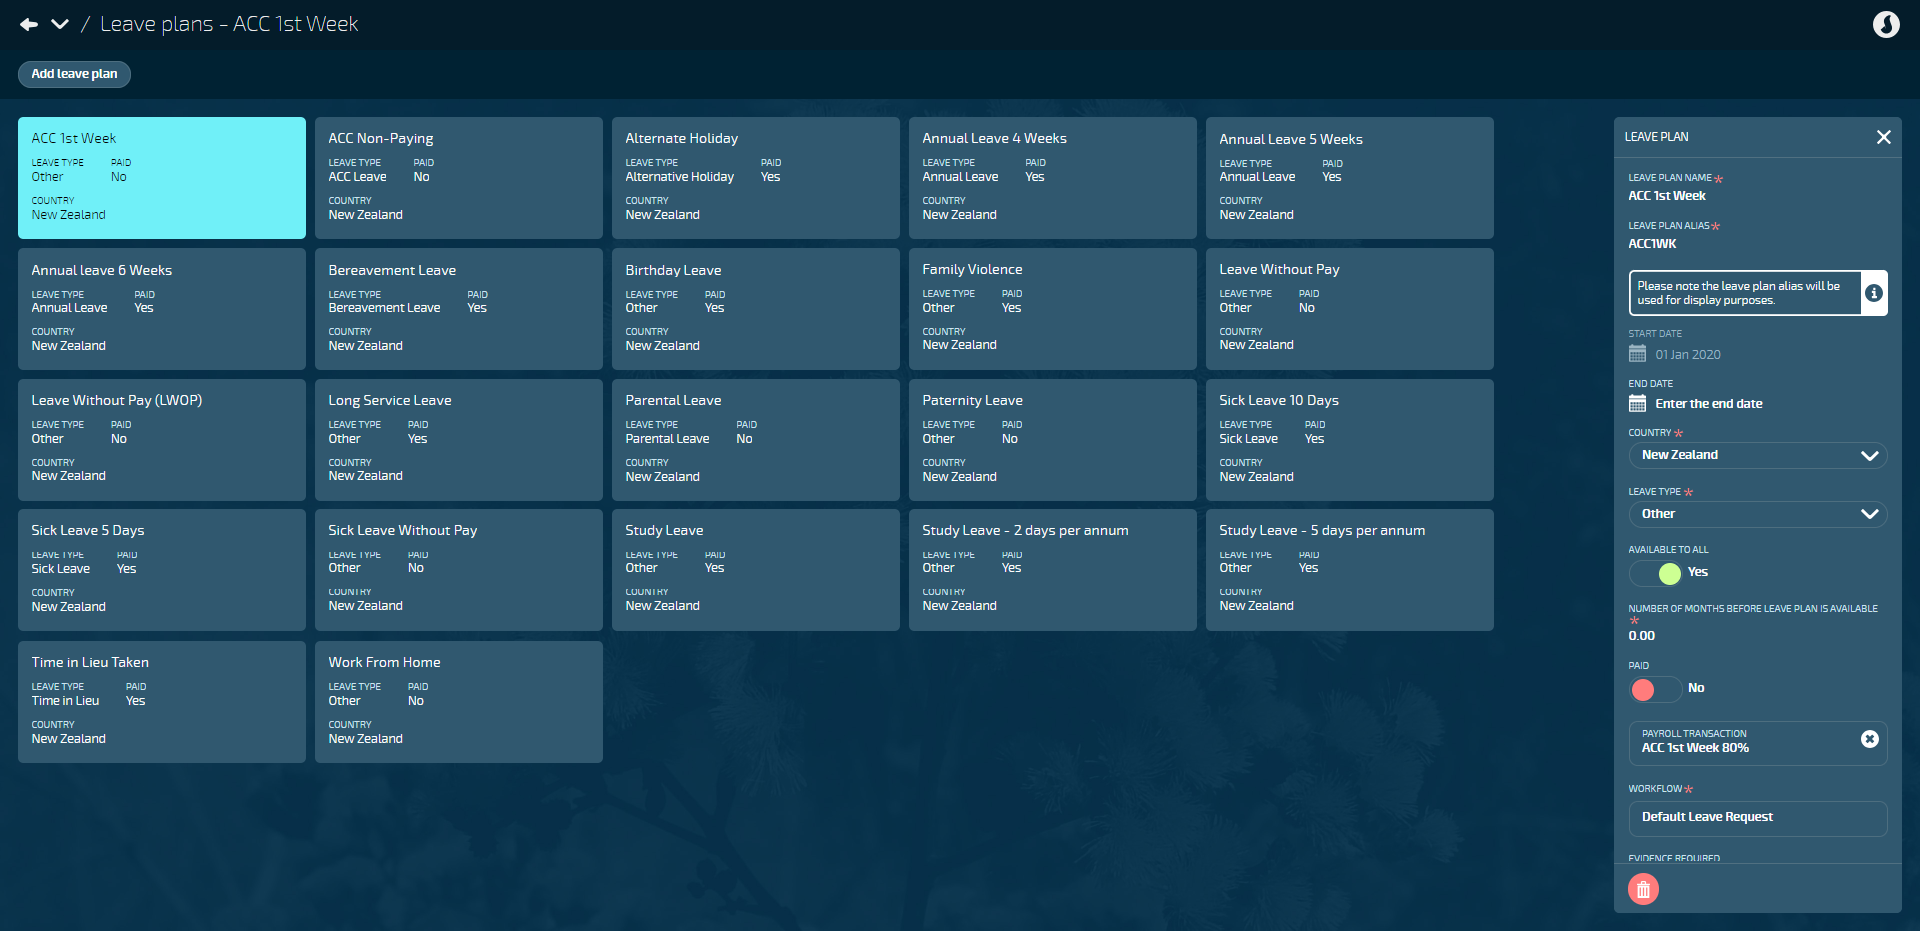
- Go to PEOPLE > LEAVE > LEAVE PLANS.
- Select Add leave plan to open the ADD LEAVE PLAN panel.
- Enter the LEAVE PLAN NAME.
- We suggest you use a name that briefly describes the leave plan's purpose. For example: Annual Leave 4 Weeks.
- Enter the LEAVE PLAN ALIAS.
- The leave plan alias can be used to enter a code or a short form of the leave plan name for reference purposes.
- Enter the leave plan's START DATE.
- The start date determines when leave plans can be attached to employees.
- (Optional): Enter the leave plan's END DATE.
- The end date gives you the option to make the leave plan unavailable for employees after a certain period.
- Choose New Zealand as the COUNTRY that the leave plan applies to.
- Leave plans are country-specific.
- The LEAVE TYPE setting will appear once the COUNTRY is chosen.
- Choose the LEAVE TYPE.
- The leave type you choose will set some of the next steps to their default setting.
- Set AVAILABLE TO ALL to Yes or No.
- If you select Yes, the leave plan will automatically be attached to all employees. You'll also need to specify the number of months before the leave plan becomes available (see next step).
- If you select No, you'll need to manually attach the leave to individual employees.
- Enter the NUMBER OF MONTHS BEFORE LEAVE PLAN IS AVAILABLE.
- This setting will be visible if you've set AVAILABLE TO ALL to Yes.
- Specifying the months will allow the system to automatically apply the leave plan to employees at the appropriate time. For example, in New Zealand, an employee can only use bereavement leave six months after their commencement date. If this option is set to '6.00', the employee will only get the leave plan automatically attached after six months of employment.
- Set PAID to Yes or No.
- If you select Yes:
- Leave rates will be calculated as usual.
- The PAY TRANSACTIONS backpack in the next step will become mandatory (as indicated by the red asterisk: *).
- If you select No:
- The AWE divisor will be decreased for annual leave rates when the leave taken exceeds one week.
- The PAY PUBLIC HOLIDAYS WHEN ON THIS LEAVE setting will become visible.
- If you select Yes:
- Open the PAY TRANSACTIONS backpack to choose a pay transaction from the list.
- If you've set PAID to Yes, adding a pay transaction will be mandatory (as indicated by the red asterisk: *).
- If you've set PAID to No, only add a pay transaction if you want to see the leave transaction on the employee pay mode and payslip.
- Open the WORKFLOWS backpack to choose a workflow from the list: Default Leave Request or Leave Request with Approval Level).
- If you choose Default Leave Request, any leave request generated from the leave plan will be sent to the employee's manager for approval.
- If you choose Leave Request with Approval Level, you'll then need to select the APPROVAL LEVEL.
- This option requires an approval level to be set up on the job level of the positions. If an approval level can't be found, the leave request will be sent to the manager.
- Set EVIDENCE REQUIRED to Yes or No.
- If you select Yes:
- The employee will be required to upload evidence as an attachment to their leave request.
- Evidence will only be required if the EMPLOYEE CAN REQUEST THIS LEAVE setting below is set to Yes.
- You'll also need to specify the number of days absent after evidence is required (see next step).
- If you select No:
- The employee is not required to provide evidence.
- If you select Yes:
- Enter the NUMBER OF DAYS ABSENT AFTER EVIDENCE IS REQUIRED.
- This setting will be visible if you've set Evidence required to Yes.
- The employee will need to upload evidence after the number of days specified in this setting
- An error will appear if the employee didn't upload any evidence when creating the leave request and the leave is more than the number of days entered here.
- Set PAY PUBLIC HOLIDAYS WHEN ON THIS LEAVE to Yes or No.
- This setting will be visible if you've set PAID to No.
- It's mainly used for employees on long-term leave without pay. Whenever there is a public holiday in the date range, the public holiday payment won't be added to Pay Mode, and so the employee won't get paid for the public holiday.
- Set EMPLOYEE CAN REQUEST THIS LEAVE to Yes or No.
- Set to Yes to allow an employee to request the leave themselves.
- Set to No if the leave needs to be set at management level.
- Set HAS A BALANCE to Yes or No.
- Set to Yes for the leave plans that have a balance.
- When set to Yes, the Entitlement Rules and Balance Configuration settings will become visible.
- Set the Entitlement Rules (you may need to select the Downward Arrow icon to open this section):
- Choose when ENTITLEMENT GRANTED.
- This defines when the main entitlement is given. Options are listed below.
- Set SHOW ENTITLEMENT AND ACCRUED AS SEPARATE BALANCES TO EMPLOYEE to Yes or No.
- This setting is visible if Anniversary date is chosen as the ENTITLEMENT GRANTED.
- It allows the user to set if they want the employees to see the entitlement plus accrued balance as their entitlement or if they want to display this as two separate amounts
- Enter the PERCENTAGE TO PAY FOR ACCRUAL ON TERMINATION.
- This setting is visible if Anniversary date is chosen as the ENTITLEMENT GRANTED.
- The standard percentage to pay for accrual on termination is 8%, but if you decide to give the employee a higher leave entitlement, you may also want to pay the employee a higher percentage on termination, which can be entered here.
- Enter the ENTITLEMENT AMOUNT.
- Once you've entered a number here, you can choose the ENTITLEMENT UNIT in the next step. For example, if the entitlement is for four weeks, enter '4' here and set the unit to 'Weeks'.
- Choose the ENTITLEMENT UNITS.
- This setting directly correlates with the ENTITLEMENT AMOUNT in the previous step.
- Options are Days, Hours, and Weeks.
- Enter the DURATION IN YEARS.
- This setting is visible if Service Duration is chosen as the ENTITLEMENT GRANTED.
- It determines how many years an employee needs to work before they become eligible for the entitlement.
- Set HAS A SUB-ENTITLEMENT to Yes or No.
- Set to Yes to unlock a sub-entitlement section where you can define the sub-entitlement conditions. Learn more about sub-entitlements here.
- Set to No to continue with only the main entitlement settings.
- Enter NUMBER OF ANNIVERSARY DATES WHERE THE EMPLOYEE RECEIVES THIS ENTITLEMENT.
- This setting is visible if Anniversary Date is chosen as the ENTITLEMENT GRANTED and HAS A SUB-ENTITLEMENT is set to Yes.
- If the employee is entitled to the leave plan for a limited duration, enter the number of anniversary dates that this entitlement will be valid for before the sub-entitlement becomes available.
- Enter NUMBER OF ENTITLEMENT DATES WHERE THE EMPLOYEE RECEIVES THIS ENTITLEMENT.
- This setting is visible if Accrued Annually is chosen as the ENTITLEMENT GRANTED and HAS A SUB-ENTITLEMENT is set to Yes.
- If the employee is entitled to the leave plan for a limited duration, enter the number of entitlement dates that this entitlement will be valid for before the sub-entitlement becomes available.
- Select Sub-entitlements to open the SUB-ENTITLEMENTS panel and define the conditions.
- This setting is visible if HAS A SUB-ENTITLEMENT is set to Yes.
- For help with defining the sub-entitlement conditions, refer to What are sub-entitlements?.
- Move to next step when sub-entitlement conditions are set.
- Choose the BALANCE CALCULATION RULE.
- Currently, there's only one available option to select, but additional calculation rules for balance calculation may be added in the future.
- Set CARRY OVER TOTAL BALANCE to Yes or No.
- If you select Yes, the balance will be carried over every time a new entitlement kicks in.
- If you select No, the maximum balance, as entered in the next step, will be carried over.
- Enter MAXIMUM CARRY OVER BALANCE.
- The amount you enter here will be the maximum balance to carry over when a new entitlement kicks in if the CARRY OVER TOTAL BALANCE is set to No.
- Choose when ENTITLEMENT GRANTED.
- Set the Balance Configuration (you may need to select the Downward Arrow icon to open this section):
- (Optional) Set the Balance colour scheme:
- When you select Balance colour scheme, the BALANCE COLOUR SCHEME panel will open and you can set colours to indicate the varying ranges of leave balances.
- Learn more in Balance Colour Scheme.
- Move to next step when balance colour scheme conditions are set
- Choose the DISPLAY UNIT FOR LEAVE BALANCES.
- Your choice here sets the default unit for displaying leave balances.
- Employees will have the option to change the unit when they view their leave.
- Enter MINIMUM BALANCE TO REMAIN WHEN REQUESTING LEAVE.
- If an employee's balance falls below this amount when requesting leave, they'll receive an error.
- Managers will receive a warning but can still submit the leave request on behalf of the employee if necessary.
- Set SHOW BALANCE TO EMPLOYEE to Yes or No.
- Set to Yes if you want the employee to see their balance when they view their leave in Your Jemini.
- Set to No if you only want managers and administrators to see the employee's balance.
- Set PAY OUTSTANDING BALANCE AT TERMINATION to Yes or No.
- This setting is visible when the selected leave type doesn't require the balance to be paid on termination.
- Set to Yes to pay out the full balance to the employee when they terminate.
- Set to No to retain the balance when the employee terminates, without making a payout.
- (Optional) Set the Balance colour scheme:
- Select Green Tick Button to save and close the panel.
'Entitlement Granted' options
- Accrued Annually: The entitlement is accrued over the course of a year
- Accrued on Occassion: This entitlement will not automatically accrue, but will be based on specific actions like Time in Lieu, for example.
- Anniversary date: The entitlement is granted as a lump sum at the anniversary date of the leave plan. The employee will have an entitlement and accrued balance.
- Immediately: The entitlement is granted as a lump sum at the start of the leave plan.
- Service duration: The entitlement is granted as a lump sum after the defined duration.
Examples of common leave plan scenarios
If you'd like to see some examples of how a leave plan is set up based on different leave types, you can refer to Common leave plan scenarios.
How to attach a leave plan to an employee
Employees' leave plans can be attached to employees in the employee application.
To learn more about attaching leave plans and managing leave in the employee application, refer to Intro to Employee Leave.