Navigation: People | Employees | Employee | Action | Work Pattern
What's the employee Work Pattern for?
The employee Work Pattern bubble is typically accessible to HR and Payroll users.
When an employee is first set up in Jemini, they'll need to be linked to an Occupancy record which will determine their Agreed Working Week. Doing so will tell Jemini how many hours an employee will work per week, but it won't specify which days they'll typically work.
This is where the Work Pattern comes in. It makes sure that Jemini accurately calculates and pays employees for the correct hours on the right days, including when they take leave.
For example, if a work pattern is set up for Monday to Friday, 8 hours per day, and an employee takes leave from Friday to Tuesday, Jemini will know not to count Saturday and Sunday as leave days.
Assigning a Work Pattern to an employee is useful because:
- It helps Jemini automatically apply leave on the correct days.
- It's beneficial for employees who have rotating schedules that change each week.
A few more points about Work Patterns
- If multiple employees share the same work pattern, we recommend you first create the work pattern in the Work Patterns catalogue in People > Work Patterns. Learn more in Intro to Work Patterns (Catalogue).
- Jemini can function without work patterns, but a work pattern must be linked to an employee to calculate their leave accurately or if they have alternating shift work.
- Work patterns are date effective, helping you plan ahead and add future work patterns to replace current ones at a later date.
How to add a Work Pattern
There are multiple work pattern types. You can choose a work pattern from the Catalogue or create an Employee specific one. You can also create a Weekly pattern format or one with Custom days.
- The Catalogue holds pre-set work patterns. Learn more in Intro to Work Patterns (Catalogue).
- Employee specific work patterns can be created specifically for an employee if their work pattern doesn't match what's available in the catalogue.
- The Weekly format is best for schedules that remain consistent week after week or month after month.
- The Custom days format is more suitable for complex patterns with days on and days off that don't repeat on a weekly, fortnightly, or monthly basis.
How to add a Work Pattern from the catalogue with Weekly pattern format
Create a weekly work pattern by choosing one from the catalogue.
- Go to People | Employees | Employee | Action.
- Select WORK PATTERN to open the WORK PATTERN panel. Current, forecast or historical work patterns might be visible if they were added previously.
- Select Add a work pattern record (or Update work pattern record) to open the ADD WORK PATTERN panel.
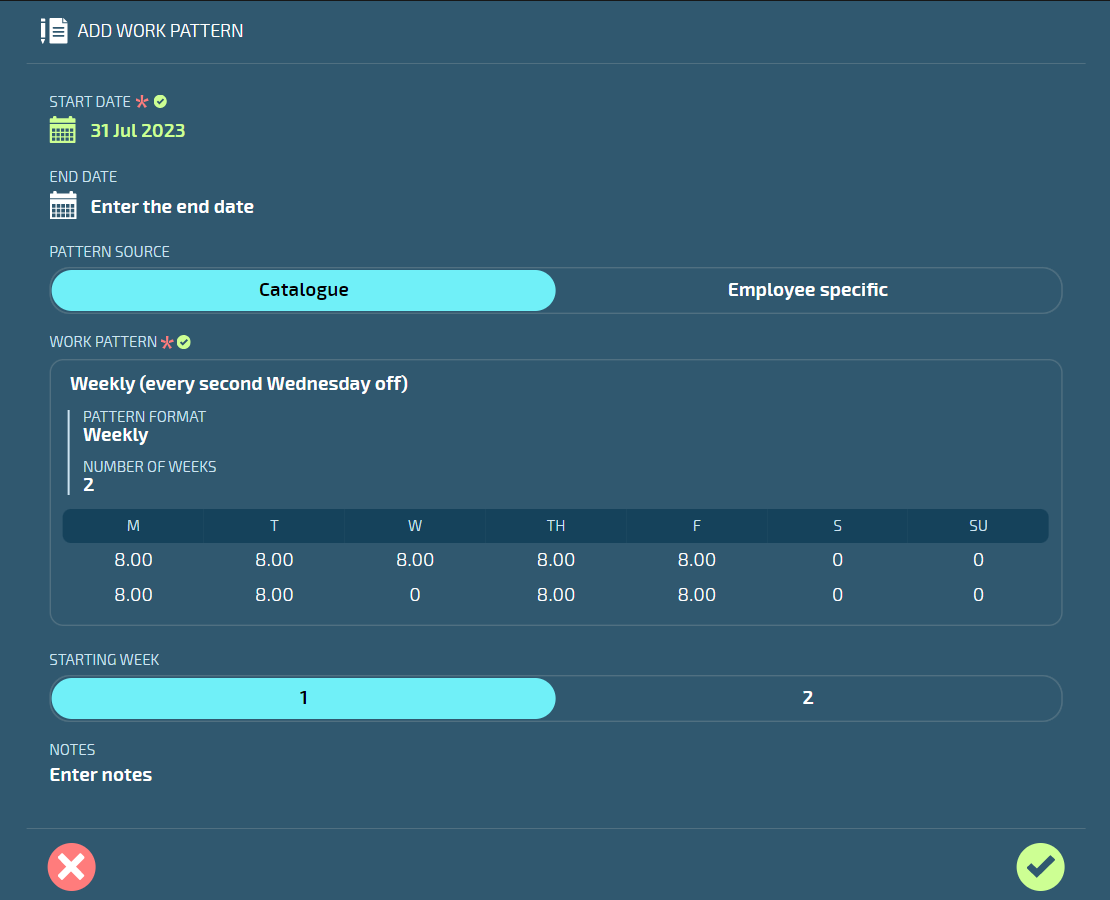
- Enter the work pattern START DATE.
- (Optional): Enter the END DATE.
- Select Catalogue as the PATTERN SOURCE.
- Select a work pattern to open the WORK PATTERN backpack.
- From the backpack, choose a work pattern that has Weekly as the PATTERN FORMAT.
- Select the STARTING WEEK (if you've selected a work pattern that has more than one week).
- (Optional): Enter NOTES related to the employee's work pattern.
- Select the Green Tick Button to save and close the ADD WORK PATTERN panel.
- The work pattern will be added to the CURRENT or FORECAST section of the WORK PATTERN panel depending on the start date you entered in step 4.
- Select X icon to save and close the WORK PATTERN panel.
How to add a Work Pattern from the catalogue with Custom Days pattern format
Create a work pattern with custom days by choosing one from the catalogue.
- Go to People | Employees | Employee | Action.
- Select WORK PATTERN to open the WORK PATTERN panel. Current, forecast or historical work patterns might be visible if they were added previously.
- Select Add a work pattern record (or Update work pattern record) to open the ADD WORK PATTERN panel.
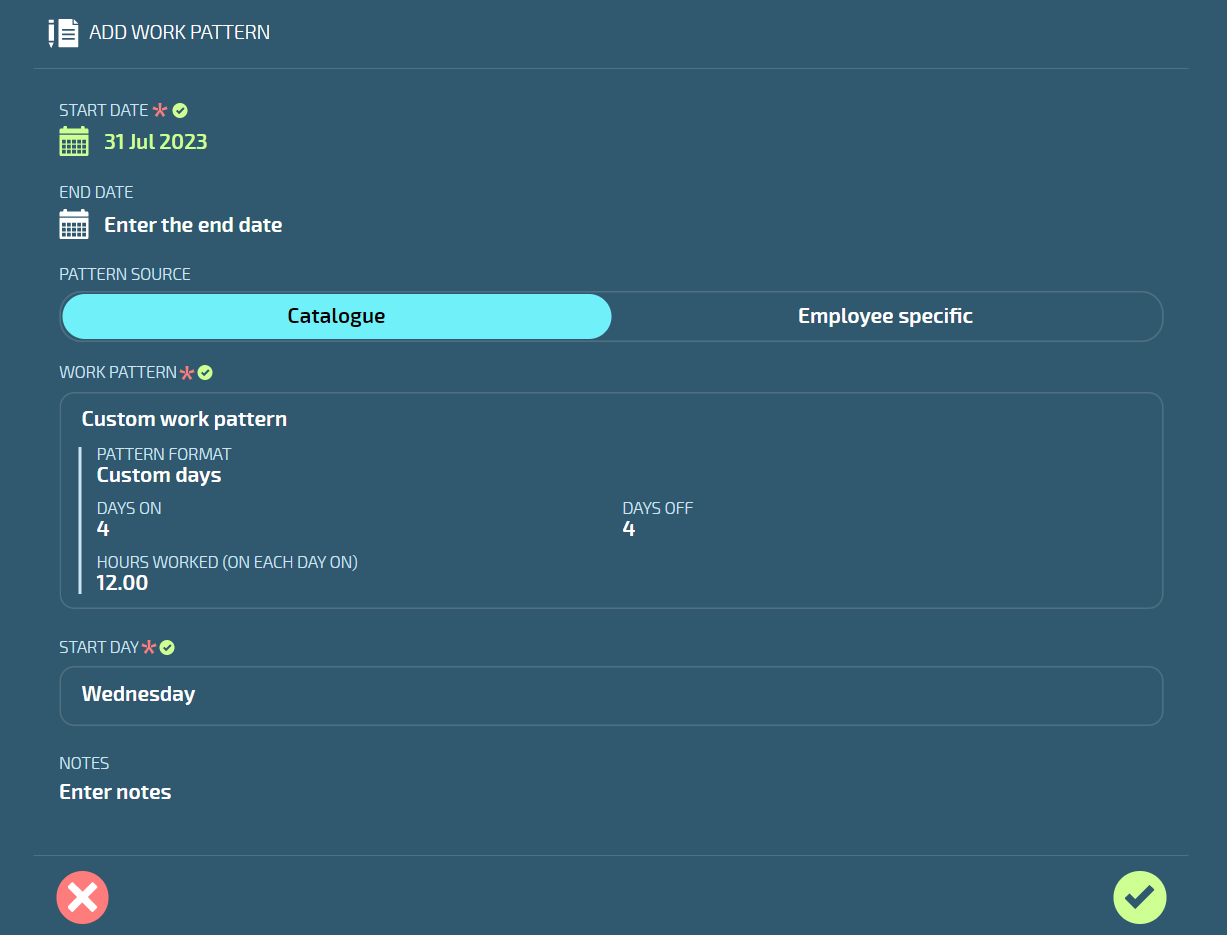
- Enter the work pattern START DATE.
- (Optional): Enter the END DATE.
- Select Catalogue as the PATTERN SOURCE.
- Select a work pattern to open the WORK PATTERN backpack.
- From the backpack, choose a work pattern that has Custom days as the PATTERN FORMAT.
- Select the START DAY. This is the first day of the employee's 'days on' after the work pattern start date. For example, if the work pattern START DATE is 31 July 2023 (a Monday) but the employee's first DAY ON is 2 August 2023 (a Wednesday), you'll need to select Wednesday as the START DAY. See screenshot of ADD WORK PATTERN panel below.
- (Optional): Enter NOTES related to the employee's work pattern.
- Select the Green Tick Button to save and close the ADD WORK PATTERN panel.
- The work pattern will be added to the CURRENT or FORECAST section of the WORK PATTERN panel depending on the start date you entered in step 4.
- Select X icon to save and close the WORK PATTERN panel.
How to add an employee specific Work Pattern with Weekly pattern format
Create a weekly work pattern specific to the employee.
- Go to People | Employees | Employee | Action.
- Select WORK PATTERN to open the WORK PATTERN panel. Current, forecast or historical work patterns might be visible if they were added previously.
- Select Add a work pattern record (or Update work pattern record) to open the ADD WORK PATTERN panel.
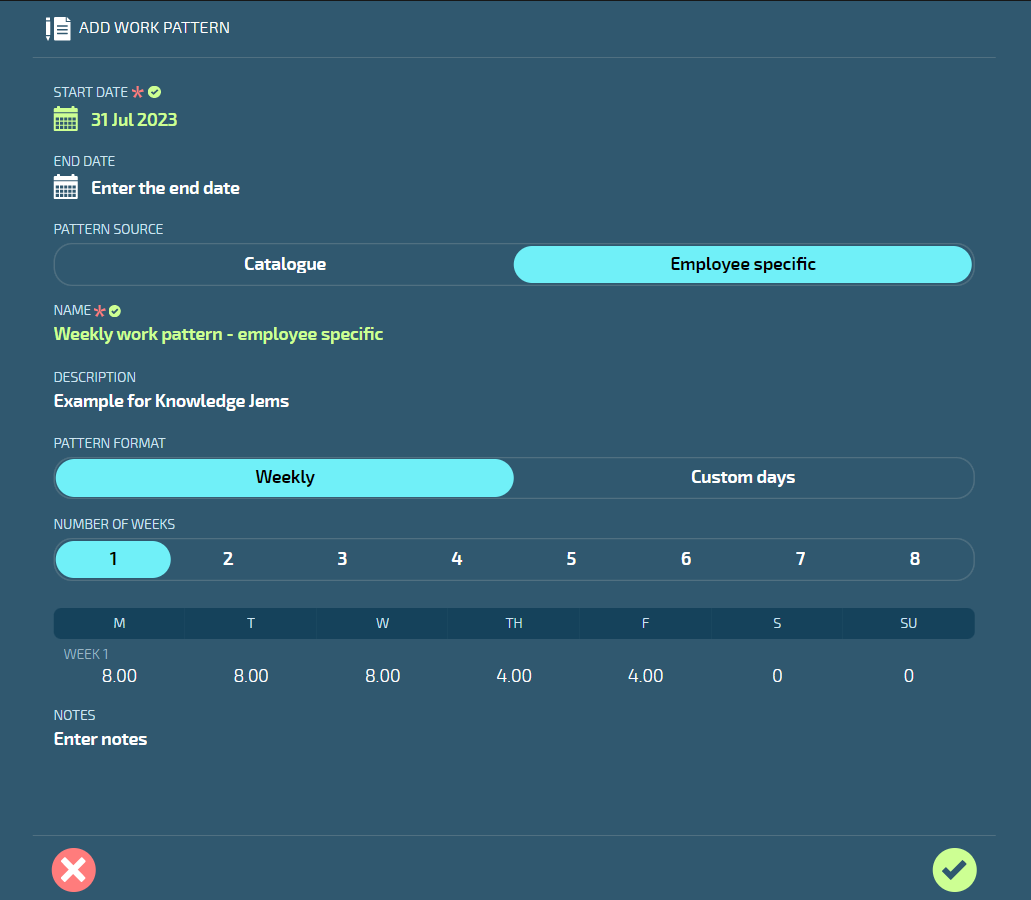
- Enter the work pattern START DATE.
- (Optional): Enter the work pattern END DATE.
- Select Employee specific as the PATTERN SOURCE.
- Enter the NAME of the new work pattern.
- (Optional): Enter the DESCRIPTION.
- Select Weekly as the PATTERN FORMAT.
- Select the NUMBER OF WEEKS the work pattern would apply. For example, select more than one week if an employee works a certain pattern one week and a different pattern another week.
- Enter the number of hours the employee will work each day each week.
- Select the STARTING WEEK (if you've selected more than one week).
- (Optional): Enter NOTES related to the employee's work pattern.
- Select the Green Tick Button to save and close the ADD WORK PATTERN panel.
- The work pattern will be added to the CURRENT or FORECAST section of the WORK PATTERN panel depending on the start date you entered in step 4.
- Select X icon to save and close the WORK PATTERN panel.
How to add an employee specific Work Pattern with Custom Days pattern format
Create a work pattern with custom days that's specific to the employee.
- Go to People | Employees | Employee | Action
- Select WORK PATTERN to open the WORK PATTERN panel. Current, forecast or historical work patterns might be visible if they were added previously.
- Select Add a work pattern record (or Update work pattern record) to open the ADD WORK PATTERN panel.
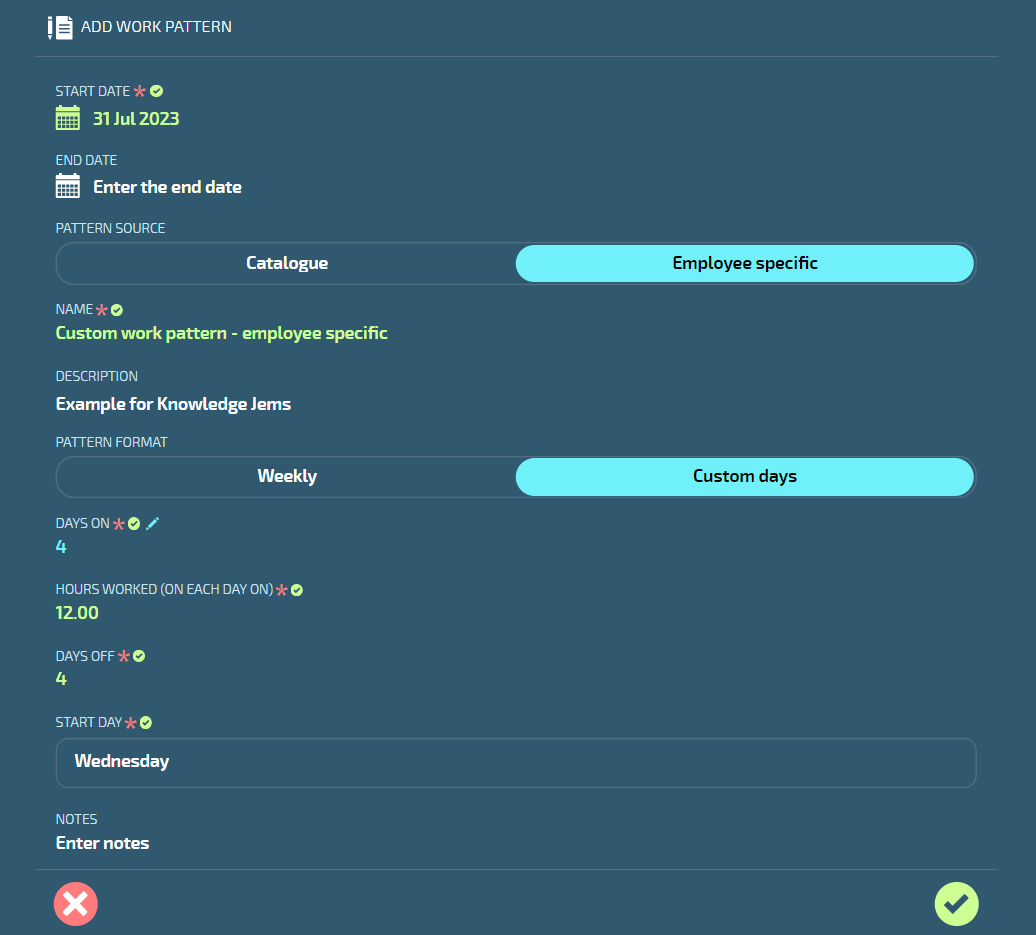
- Enter the work pattern START DATE.
- (Optional): Enter the work pattern END DATE.
- Select Employee specific as the PATTERN SOURCE.
- Enter the NAME of the new work pattern.
- (Optional): Enter the DESCRIPTION.
- Select Custom days as the PATTERN FORMAT.
- Enter DAYS ON.
- Enter HOURS WORKED (ON EACH DAY ON).
- Enter DAYS OFF.
- Select the START DAY. This is the first day of the employee's 'days on' after the work pattern start date. For example, if the work pattern START DATE is 31 July 2023 (a Monday) but the employee's first DAY ON is 2 August 2023 (a Wednesday), you'll need to select Wednesday as the START DAY. See screenshot of ADD WORK PATTERN panel below.
- (Optional): Enter NOTES related to the employee's work pattern.
- Select the Green Tick Button to save and close the ADD WORK PATTERN panel.
- The work pattern will be added to the CURRENT or FORECAST section of the WORK PATTERN panel depending on the start date you entered in step 4.
- Select X icon to save and close the WORK PATTERN panel.
How to edit a Work Pattern
A work pattern can be edited if it hasn't yet been processed in a pay cycle.
- Go to People | Employees | Employee | Action.
- Select Work Pattern to open the Work Pattern panel. The current work pattern and any forecast or historical work patterns will be visible.
- Select the work pattern you want to edit to open the ADD WORK PATTERN panel
- Edit the details as required.
- Select the Green Tick Button to save and close the ADD WORK PATTERN panel.
- Select X icon to save and close the WORK PATTERN panel.
If a pay cycle has already been processed, the current work pattern's details will be greyed out and you'll only be able to edit the end date. If you want to edit other details, you'll need to add a new work pattern, which will automatically apply an end date to the current work pattern. The work pattern will switch over when the new work pattern start date is reached.
How to delete a Work Pattern
A work pattern can be deleted if it hasn't yet been processed in a pay cycle.
- Go to People | Employees | Employee | Action.
- Select Work Pattern to open the Work Pattern panel. The current work pattern and any forecast or historical work patterns will be visible.
- Delete the work pattern by selecting the Delete Button.
- Select Go ahead to confirm that you want to delete the work pattern.
If a pay cycle has already been processed, the work pattern's Delete Button will be greyed out and you won't be able to delete the work pattern. Instead, add a new work pattern, which will automatically apply an end date to the current work pattern. The work pattern will switch over when the new work pattern start date is reached.