Navigation: People | Lifecycle | Onboarding
What are Onboarding Steps?
Steps are use to structure the workflow. They give the tasks clear start and end dates with deadlines for assignees to work towards. Examples of a step could be 'Pre-employment', 'First day', 'First week', 'First month', and so on. You can create as many steps as you need to.
Tasks are assigned to each step. For example, you can have a 'Read policies' task in a 'Pre-employment' step or a 'Watch training video' task in a 'First week' step.
An example of an onboarding scenario: A step is needed for tasks that the assignee needs to complete within the first week of employment. The step will be triggered on the commencement date and the assignee will have 7 days to complete the tasks.
How to set up Onboarding Steps
- Go to People | Lifecycle | Onboarding.
- Select Catalogue in the Controls.
- Select Workflow in the Controls.
- Select the workflow you wish to add steps to. The workflows are listed under the Controls, and the first workflow in the list will be selected by default.
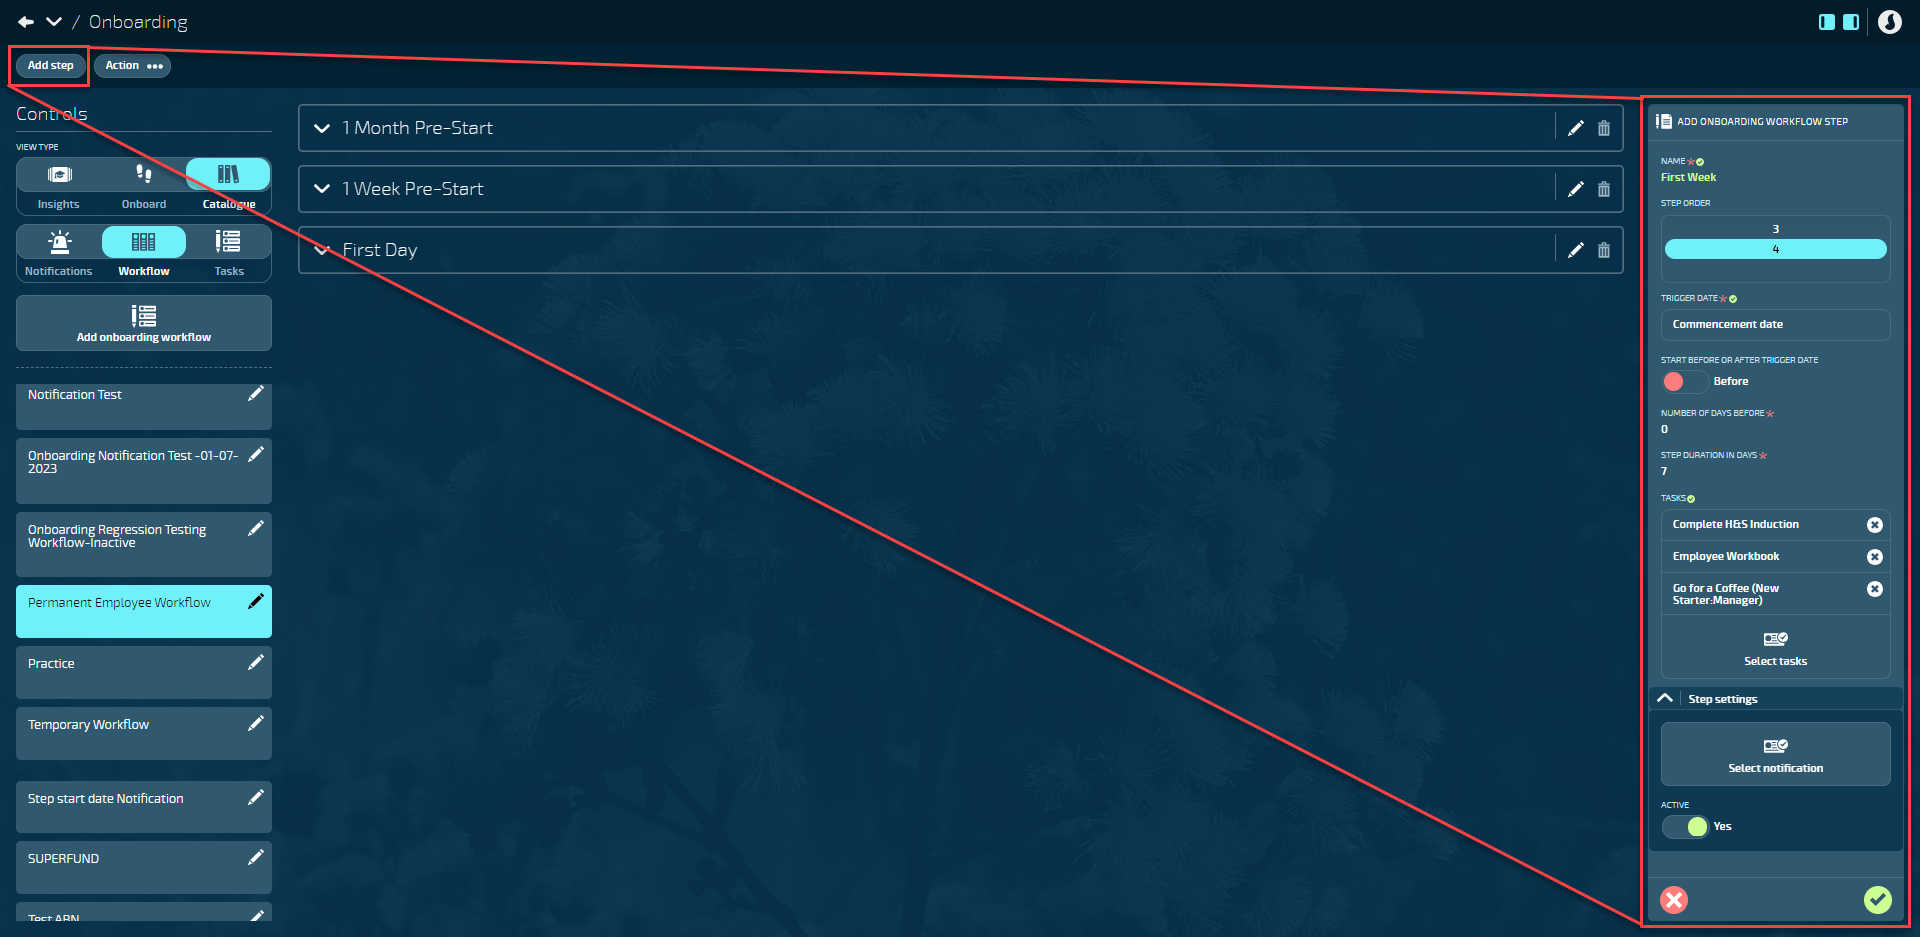
- Select Add step. This will open the ADD ONBOARDING WORKFLOW STEP panel.
- Enter the NAME of the step. The name should describe the onboarding stage that the step represents, like 'First Week'.
- Select the STEP ORDER. The number of steps will change as you add more steps to the workflow. For example, if you've already added three steps to the workflow, number four will be preselected.
- Select the TRIGGER DATE. This is the date or scenario that the step will use to trigger the process, which includes sending notifications and tasks to assigned users.
- Set the START BEFORE OR AFTER TRIGGER DATE to Before or After. If you want the start date to be the same day as the trigger date, you can choose either option.
- Enter the NUMBER OF DAYS BEFORE or NUMBER OF DAYS AFTER. This is the number of days before or after the trigger date. The notifications or tasks will be sent or activated on the date that you enter.
- Enter the STEP DURATION IN DAYS. The duration is how long the step will last for before sending warning messages to the assigned user or position establishment if they haven't completed their tasks.
For example, if the tasks in the step need to be completed in the first week of employment, enter 0 for the NUMBER OF DAYS BEFORE or NUMBER OF DAYS AFTER, and 7 for the STEP DURATION IN DAYS.
- (Optional): Select tasks from the ONBOARDING TASK backpack that you want to assign to this step. Alternatively, you can drag and drop tasks into the step after you've created it. Learn how to set up onboarding tasks.
- In Step Settings: (Optional) Select notification to choose the notifications to automatically send to the assigned user or position establishment. Learn how to set up onboarding notifications.
- Step settings: Set ACTIVE to Yes or No depending on whether you want to make the step visible yet. If you're still setting up steps, you may want to keep them deactivated until you're ready to start assigning the workflow to new starters.
- Select the Submit icon to save and close.
How to add Tasks to Steps
Once you've created Onboarding Steps, you can drag additional tasks into the step from the workflow view.
- Go to People | Lifecycle | Onboarding.
- Select Catalogue in the Controls.
- Select Workflow in the Controls.
- Select the workflow that you want to add tasks to from the list of workflows under Controls. The first workflow in the list will be selected by default.
You should be able to see your previously created steps at this point.
- Open the step you wish to add tasks to by selecting the downfacing arrow icon next to the step's name.
- Choose a task from the Onboarding Tasks list on the right.
Filter the tasks by name to find the task quickly.
- Drag the chosen task into the step and let go when the dotted purple outline appears.
- Continue to drag tasks into the steps as required.
You can rearrange the order of tasks by dragging and dropping them within a step. This allows you to prioritize certain tasks and encourage employees to complete them in a specific sequence. The order you set will be maintained when the workflow is assigned to an employee.
Editing Steps
As your business evolves, it's normal for your onboarding workflow to change as well. You can add or remove tasks from steps without affecting the tasks of employees who have already completed onboarding. You can also edit the commencement date ranges, names, and descriptions of steps. However, there are a few things to keep in mind:
- Changes to start dates will only affect employees who are assigned the workflow in the future.
- Changes to descriptions and names will be immediately applied to employees who are currently going through the workflow.
- Added or removed tasks will only impact employees who are assigned this workflow in the future.
How to edit Onboarding Steps
- Go to People | Lifecycle | Onboarding.
- Select Catalogue in the Controls.
- Select Workflow in the Controls.
- Select the workflow with the steps you wish to edit (the workflows are listed under the Controls).
- Select the Edit icon in the step's header. This will open the ONBOARDING WORKFLOW STEP panel.
- Edit the information within the step as required.
- Select the Submit icon to save and close.