Navigation: Pay | Payroll Transaction Configuration
Set up applicabilities to define payment rules
An applicability is attached to a payroll transaction to determine the value that's paid to the employees through conditions set within the applicability. It allows you to customise how various pay components, such as allowances, deductions, overtime, or bonuses, are applied based on specific criteria.
The applicability contains information such as:
the calculation rule
the accumulators that the transaction dollar amount will feed
any default values
which employees can use this transaction
any third party bank payment information
TIP
When defining an applicability, you'll see that certain settings are unique to particular transaction types.
Can I have more than one applicability attached to a transaction?
Different applicabilities can be created for each transaction if you have more than one payroll or one location. For example, you might have different requirements for casual employees versus permanent employees. Or for Auckland employees versus Wellington employees.
Note only one current applicability is allowed per payroll or location. However, the applicabilities are date effective so you can have current, forecast and historical records. If a value for an applicability changes over time, a new applicability can be created for the same transaction. If it matches the payroll or location of a previous applicability, the previous applicability will automatically be given an end date.
There are five calculation types
Every applicability has different requirements depending on the type of transaction it's connected to. Also, the configuration steps for each applicability will vary depending on the calculation type you select.
Fixed Value
Fixed values allow you to pay employees a fixed amount. For example, you may want to give all employees a fixed value bonus of $1000 at the end of the year, regardless of their salary or position.Calculation Rule
Calculation rules determine the way the system will automatically calculate transactions, such as annual leave, to make sure your employees are being paid correctly.The calculation rules vary depending on the transaction type and whether the payroll is in Australia or New Zealand.
Not all transaction types have 'Calculation Rule' as an option to select in the applicability.
To learn more about calculation rules, refer to Calculation Rule Configuration.
Rate Code
Rate codes are a way to pay an employee varying amounts based on specific rules, such as shift work or higher duties, without adjusting their pay rate.Percentage
The Percentage calculation type is only available for mandatory after-tax deduction, voluntary after-tax deduction, and on cost transaction types.Range table
Range tables are used for range-based deductions and allowances. These tables are created in Pay Core & Range Tables.
How to add an Applicability
TIP
The following instructions will teach you the fundamental steps to add an applicability. However, keep in mind that the settings will vary depending on the transaction type, country, and calculation type.
If any of the steps you need are missing from these instructions, check the table below to view the extra settings depending on the transaction type or country. View the table.
If you need help with adding an applicability, please raise an iHelp through Infusion.
Go to Pay > Payroll transaction configuration.
Select the transaction you need to add the applicability to. This will open the applicability view.
Select Add applicability to open the APPLICABILITY panel. There are two ways to do this:
If no applicabilities exist in a transaction, you can select the Add applicability button in the centre of the applicability view.
If applicabilities do exist in a transaction and you want to add a new one, select the Add button in the top left corner, then Add applicability from the drop-down list.
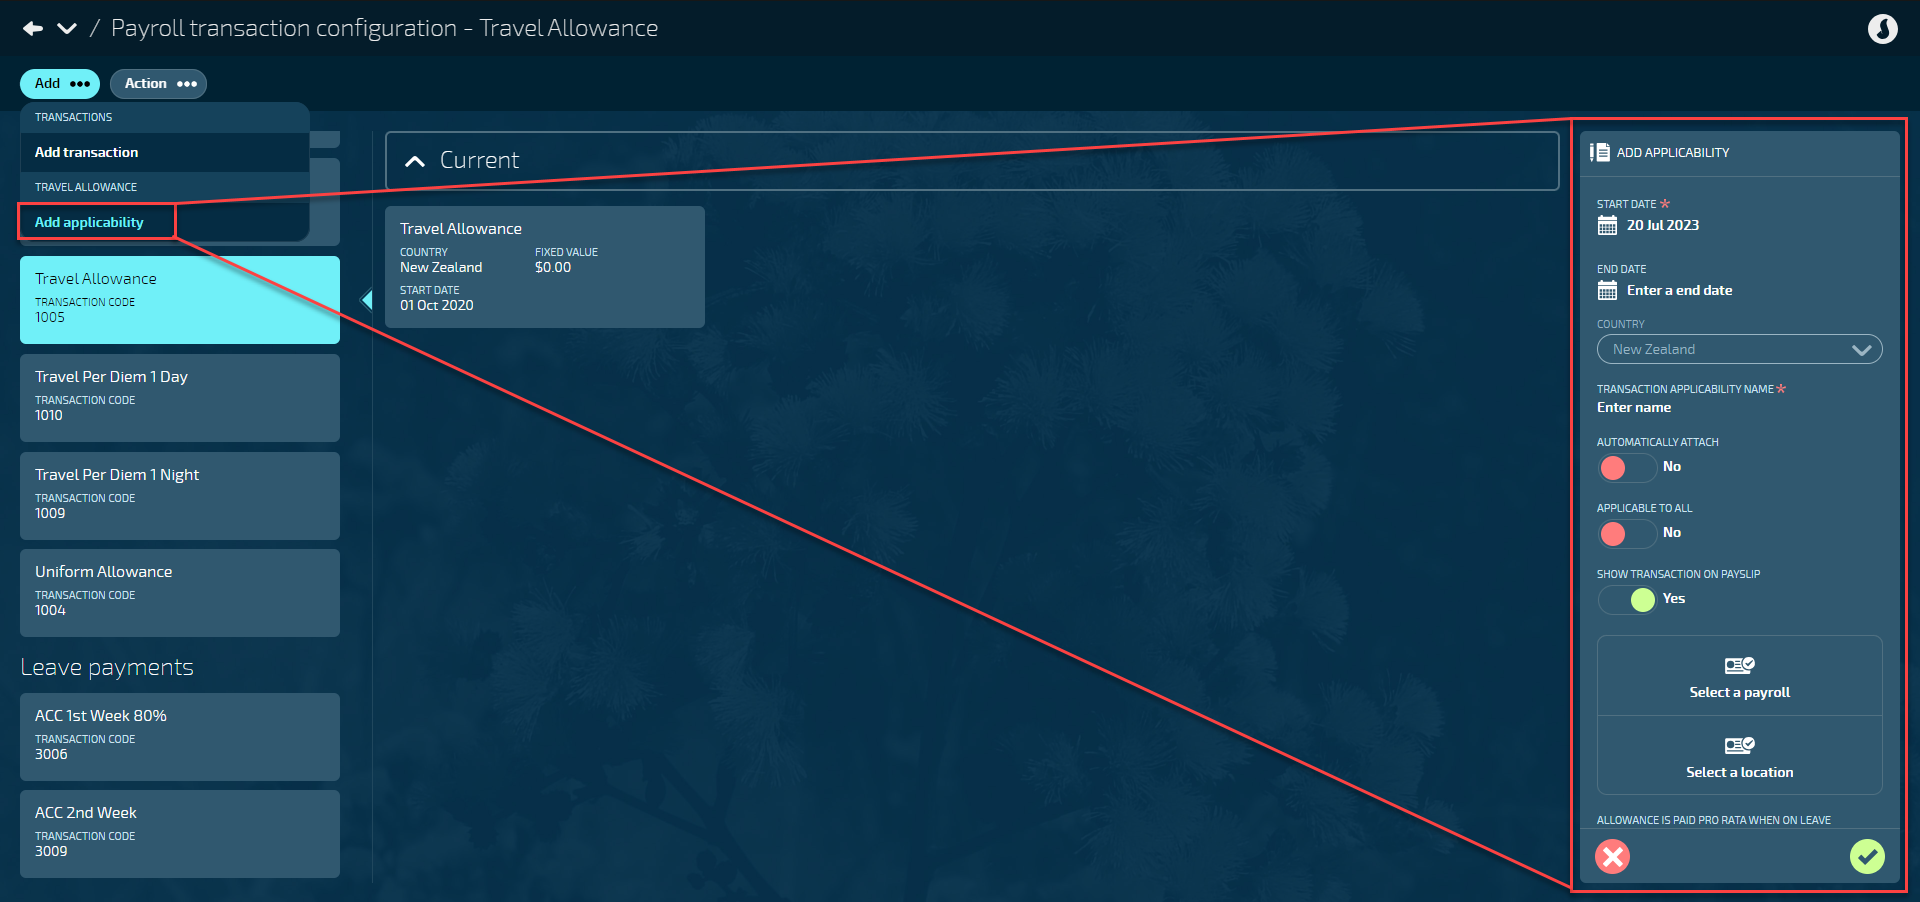
Enter the START DATE. The applicability will be available from the start date specified on the transaction.
If the transaction has no other applicabilities added, the start date will default to the transaction's start date.
If the transaction already has an applicability added (and it has the same payroll or location), the new applicability's date will default to today's date or the end date of the previous applicability.
(Optional) Enter the END DATE.
If entered, the applicability will be available until the specified end date.
Choose the COUNTRY.
If the country has already been specified in the transaction settings, this field will be pre-selected.
The applicability will only be available for employees in the selected country.
You'll need to create separate applicabilities if you have payrolls in both Australia and New Zealand.
Enter the TRANSACTION APPLICABILITY NAME.
The name specified here is only displayed on the applicability cards.
If you have more than one applicability attached to a transaction, you can use the name to identify each one.
Set AUTOMATICALLY ATTACH to Yes or No. (This setting isn't available for leave payment or employer super transactions).
Setting to Yes means that every employee who matches the specified conditions (payroll and location) will automatically have the transaction added to every pay between the start and end date of the applicability. Note, the below step, CALCULATION TYPE IS EMPLOYEE SPECIFIC, will be hidden if AUTOMATICALLY ATTACH is set to Yes.
Setting to No means you will need to go into individual pay modes to apply the transaction manually.
Set APPLICABLE TO ALL to Yes or No.
Setting to Yes means all payrolls can receive the transaction. Note, the below backpacks, Select a payroll and Select a location, will be hidden if APPLICABLE TO ALL is set to Yes.
Setting to No means only certain payrolls can receive the transaction. You'll need to select the payrolls (or locations) from the backpacks (see two steps below).
Set SHOW TRANSACTION ON PAYSLIP to Yes or No.
Typically, this will be set to Yes, but the option to set it to No is available if you want to simplify or hide transactions on the employee's payslip.
Select a payroll from the PAYROLLS backpack or Select a location from the LOCATIONS backpack.
The payrolls and locations are what the transaction will be applied to.
These backpacks will be visible if the above step, APPLICABLE TO ALL, is set to No.
They'll be hidden if APPLICABLE TO ALL is set to Yes.
Set CALCULATION TYPE IS EMPLOYEE SPECIFIC to Yes or No. (This setting isn't available for leave payments, termination, employer super, or non-paying transactions. The setting will be visible if the above step, AUTOMATICALLY ATTACH, is set to No and hidden if set to Yes).
When set to Yes, the CALCULATION TYPE setting is removed and must be determined at the employee level.
When set to No, you'll need to choose the CALCULATION TYPE in the next step, which will apply to all employees with that transaction.
Choose CALCULATION TYPE. Additional settings will appear depending on the calculation type you choose. (Some calculation types aren't available for all transaction types. For example, a calculation rule or percentage can't be selected for taxable allowances).
If Fixed Value is selected:
Enter the FIXED VALUE.
If Calculation Rule is selected:
Choose the CALCULATION RULE from the drop-down list.
Additional settings may appear depending on the chosen calculation rule. For example, ‘NZ Leave Pay’ will ask you to enter the PAY MULTIPLIER.
For more on calculation rules, refer to Calculation Rule Configuration.
If Percentage is selected:
Enter the PERCENTAGE.
If Rate Code is selected:
Select rate code from the RATE CODE backpack.
Set the MULTIPLY RATE BY HOURS WORKED to Yes or No.
Enter the DEFAULT RATE.
If Range Table is selected:
Select range table from the RANGE TABLE backpack.
Choose the STAT REPORT SETTING.
If you want to include the transaction that's connected to this applicability in the Quarterly Statistics Paginated report (found in Pay > Reporting), select one of the following: Commission & Bonuses, Ordinary Time, or Overtime.
By default, the setting is configured as Do not include in stat report.
(Australian payrolls only) Select the STP SUPER TYPE from the STP SUPER TYPE backpack.
This setting allows you to select a single Single Touch Payroll (STP) code.
Choose the TAX TREATMENT INDICATOR.
The available options will vary depending on the country:
New Zealand payroll: Choose either Normal or Extra Pay. If you choose Extra Pay, you'll also need to set ACC EARNERS' LEVY IS $0.00 FOR EXTRA PAY to Yes or No. (The ACC EARNERS' LEVY IS $0.00 FOR EXTRA PAY setting is for payments which are ACC Levy exempt, such as Redundancy).
Australian payroll: Choose Normal, Backpay/Commission/Bonus, ETP Cap Only, ETP Cap/Whole of income cap comparison, Marginal tax, or Lump Sum A tax.
Select an accumulator from the ACCUMULATORS backpack (you can select more than one).
There are some accumulators that must be attached to an applicability – these will be preselected and can't be changed.
Others will be preselected and you'll have the option to remove them, depending on how your business is set up.
Go to Accumulator Configuration to learn more.
Select the Green Tick Button to save and close panel.
TIP
Missing a step in the instructions above? Check the table below to view the extra settings depending on the transaction type or country.
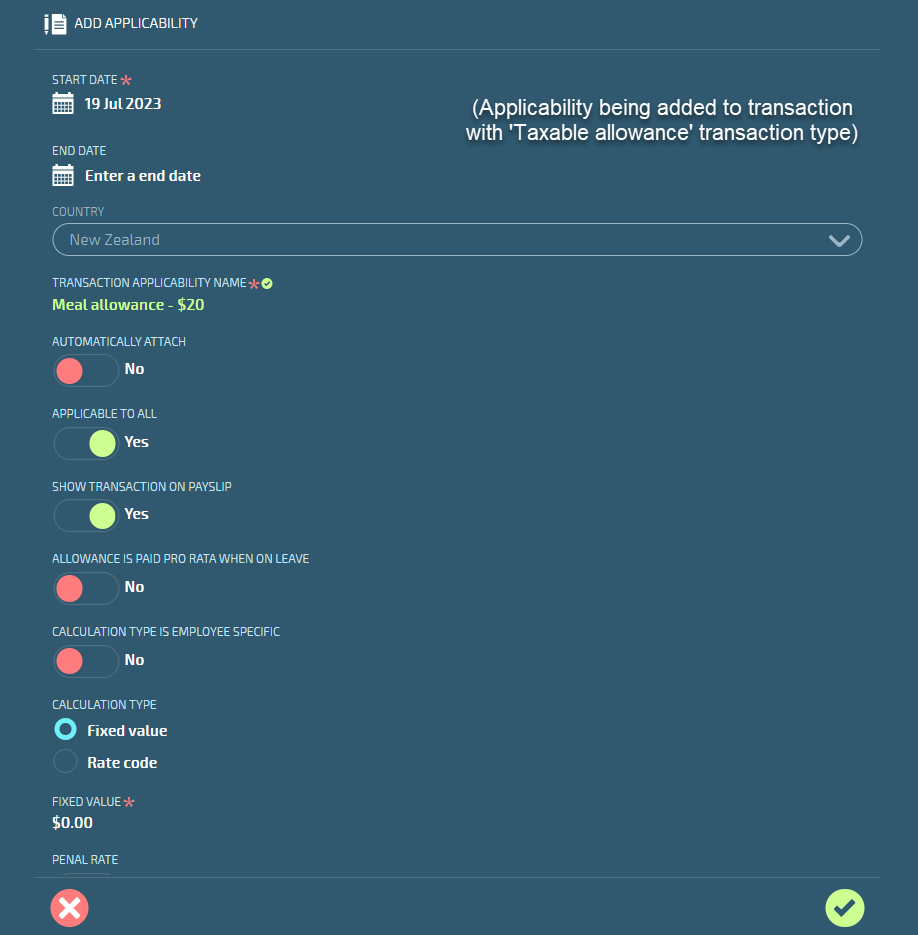
Extra settings depending on transaction type
This table shows the different options you can choose for each type of transaction. For example, if you add an applicability to a transaction for taxable allowances, you'll need to complete settings like ALLOWANCE IS PAID PRO RATA WHEN ON LEAVE, along with the settings in the instructions above.
Setting name | What to do | Is the setting country specific? | Which transaction types have this setting? |
|---|---|---|---|
ALLOWANCE IS PAID PRO RATA WHEN ON LEAVE |
| No. |
|
PENAL RATE | The penal rate setting in Jemini is for the purposes of the Holidays Act when paying BAPS leave.
For more information, refer to Employment New Zealand website. | Yes. |
|
STP LEAVE TYPE | Select Single Touch Payroll (STP) leave type:
| Yes. |
|
STP ALLOWANCE TYPE | Select Single Touch Payroll (STP) allowance type:
| Yes. |
|
PAYMENT TYPE FOR STP AND LSL | Select Single Touch Payroll (STP) and Long Service Leave (LSL) payment type:
| Yes. |
|
STP LUMP SUM TYPE | Select Single Touch Payroll (STP) lump sum type:
Tips for Lump Sum transaction setup:
| Yes. |
|
ETP CODE | Select Employment Termination Payment (ETP) code:
You'll need this for all Australian termination payments so they're taxed correctly and reported properly to the ATO. | Yes. Australia only. |
|
STP SALARY SACRIFICE TYPE | Select Single Touch Payroll (STP) salary sacrifice type:
| Yes. |
|
STP DEDUCTION TYPE | Select Single Touch Payroll (STP) deduction type:
| Yes. |
|
PROTECTED NET EARNINGS APPLY TO THIS DEDUCTION |
| No. |
|
CHILD SUPPORT DEDUCTION |
| No. |
|
THIRD PARTY PAYMENT |
| No. |
|
PAYMENT DETAILS ARE DEFINED AT EMPLOYEE LEVEL |
| No. |
|
CONSOLIDATE PAYMENTS FOR THIS TRANSACTION IN DIRECT CREDIT FILE? |
| No. |
|
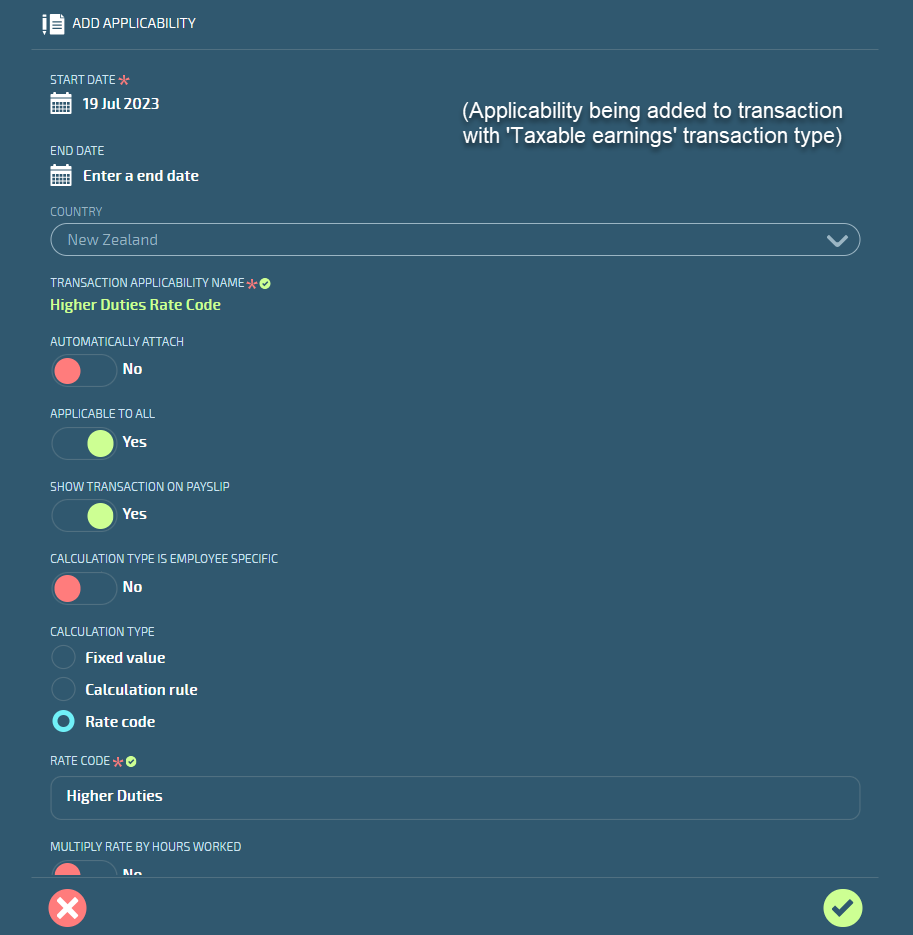
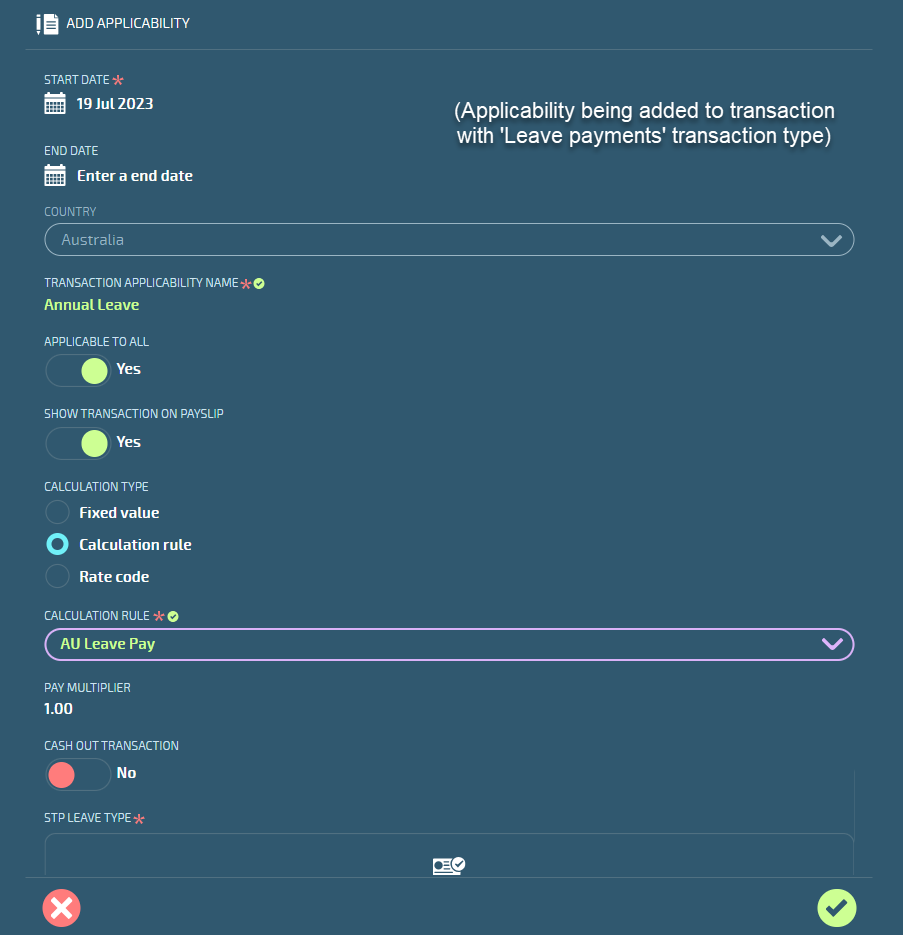
Examples of applicability records with different calculation types
|
|
|
How to edit an applicability
If you need to edit an applicability, you can do so before it's been processed in a pay cycle. You'll need to create a new one if it's already been processed.
IMPORTANT
Once the pay cycle process has reached the direct credit point, the applicability can no longer be edited, as it will interfere with processed calculations.
You may be able to edit an applicability during the pay cycle process before the direct credit file is generated, but you'll need to recalculate the pay if any changes are made to make sure they're included in the pay.
Go to Pay > Payroll transaction configuration.
Select the transaction with the applicability you want to edit.
Select the applicability record to open the APPLICABILITY panel.
Edit the fields as required. Some fields aren't editable and will be greyed out.
Select Green Tick Button to save and close panel.
How to delete an applicability
Just like editing an applicability, you can only delete an applicability if it hasn't been processed in a pay cycle. Otherwise, it will interfere with previous pay calculations.
Go to Pay > Payroll transaction configuration.
Select the transaction with the applicability you want to edit.
Select the applicability record to open the APPLICABILITY panel.
Select the Delete Button.
Read the confirmation message, then select Go ahead.