Navigation: Pay | Payroll transaction configuration
Note for system administrators
Click or tap here to view permission settings
To give a user access to the Payroll Transaction Configuration bubble:
Go to System | Security profiles.
Select the Security Profile that requires access to the Payroll Transaction Configuration bubble.
In Permissions, scroll down and expand PAYROLL and PAYROLL CONFIGURATION to find the Payroll Transaction Configuration application permissions.
Tick the Enable box to activate the Payroll Transaction Configuration bubble.
Tick the View, Add, Change and Delete boxes for Payroll Transaction Applicability and Payroll Transaction Configuration records permissions as required.
Select the Green Tick Button to save your changes.
Please reach out to our support team for assistance: raise an iHelp through Infusion.
Payroll Transaction Configuration lets you control employee pay calculations
When setting up a payroll in Jemini, you and your Jemini consultant will need to configure transactions so Jemini can accurately calculate your employees' pay correctly. When you attach a transaction to an employee, Jemini works out what to pay them based the settings you configure.
In the Payroll Transaction Configuration bubble, you can:
View your existing transactions.
Add, edit, or delete transactions.
Configure how each transaction works.
Some transactions come with Jemini and you can't change them. These have a Jemini system icon. Others might already be set up by your Jemini consultant. You can also create your own transactions. Learn how below in How to add a payroll transaction.
When you add a transaction, you'll choose the type (like allowances or leave payments) and set up how Jemini should calculate it.
Payroll transactions need applicabilities
Once you create a transaction, you need to add applicabilities to it.
An applicability tells Jemini how much to pay employees and which employees can receive the transaction.
When you add the transaction to an employee's pay, Jemini uses the applicability settings to work out the amount.
More information on applicabilities: What's an Applicability?
How to add a payroll transaction
Go to Pay > Payroll transaction configuration.
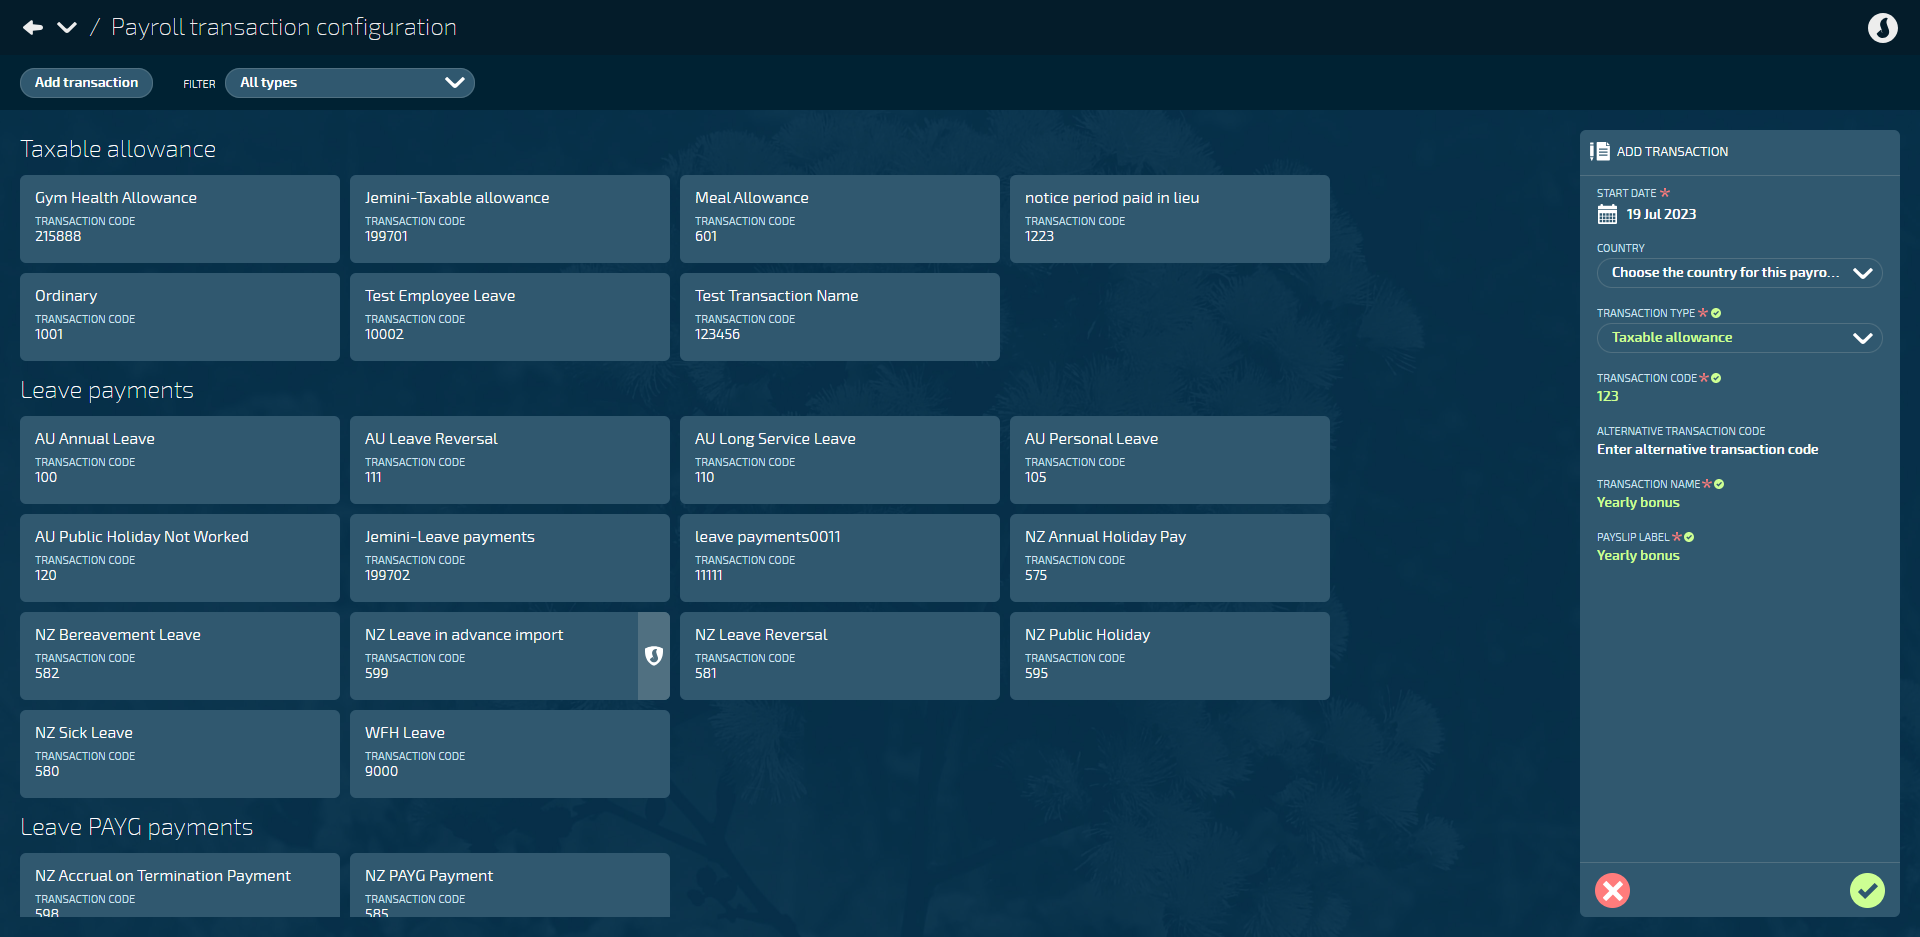
Select Add transaction to open the ADD TRANSACTION panel.
Enter the START DATE, which will determine when the applicabilities can be applied.
Optional: Choose the COUNTRY. This will specify the country for which the applicabilities are created. If no country is chosen, you'll need to specify it when you create the applicabilities.
Select the TRANSACTION TYPE. You can find information about the transaction types below.
Enter the TRANSACTION CODE. This code must be numerical. The system uses the code to identify and process transactions.
Optional: Enter the ALTERNATIVE TRANSACTION CODE. If you use a third party that has different transaction codes, you can enter them here.
Enter the TRANSACTION NAME. This will help you identify the transaction among others.
Enter the PAYSLIP LABEL. This will be displayed on the employee's Pay Mode and payslip.
For some transaction types, you might see the option to set IMPORT YTD DATA TRANSACTION to Yes or No. When set to Yes, any year-to-date earnings calculated before the payroll active date can be imported into Jemini using this transaction. Year-to-date data will be taken into account when transactions are calculated after the payroll active date.
Select the Green Tick Button to save and close the panel.
Once you've added the transaction, you'll need to add one or more applicabilities to it. The applicability determines when and how the transaction is applied to an employee's pay. Learn how to add an applicability.
How to edit a transaction
If you need to edit a transaction (for example, to update the transaction code), you can do so before it's been processed in a pay cycle.
IMPORTANT
Once the pay cycle process has reached the direct credit point, the transaction can no longer be edited, as it will interfere with processed calculations.
You may be able to edit a transaction during the pay cycle process before the direct credit file is generated, but you'll need to recalculate the pay if any changes are made to make sure they're included in the pay.
Go to Pay > Payroll transaction configuration.
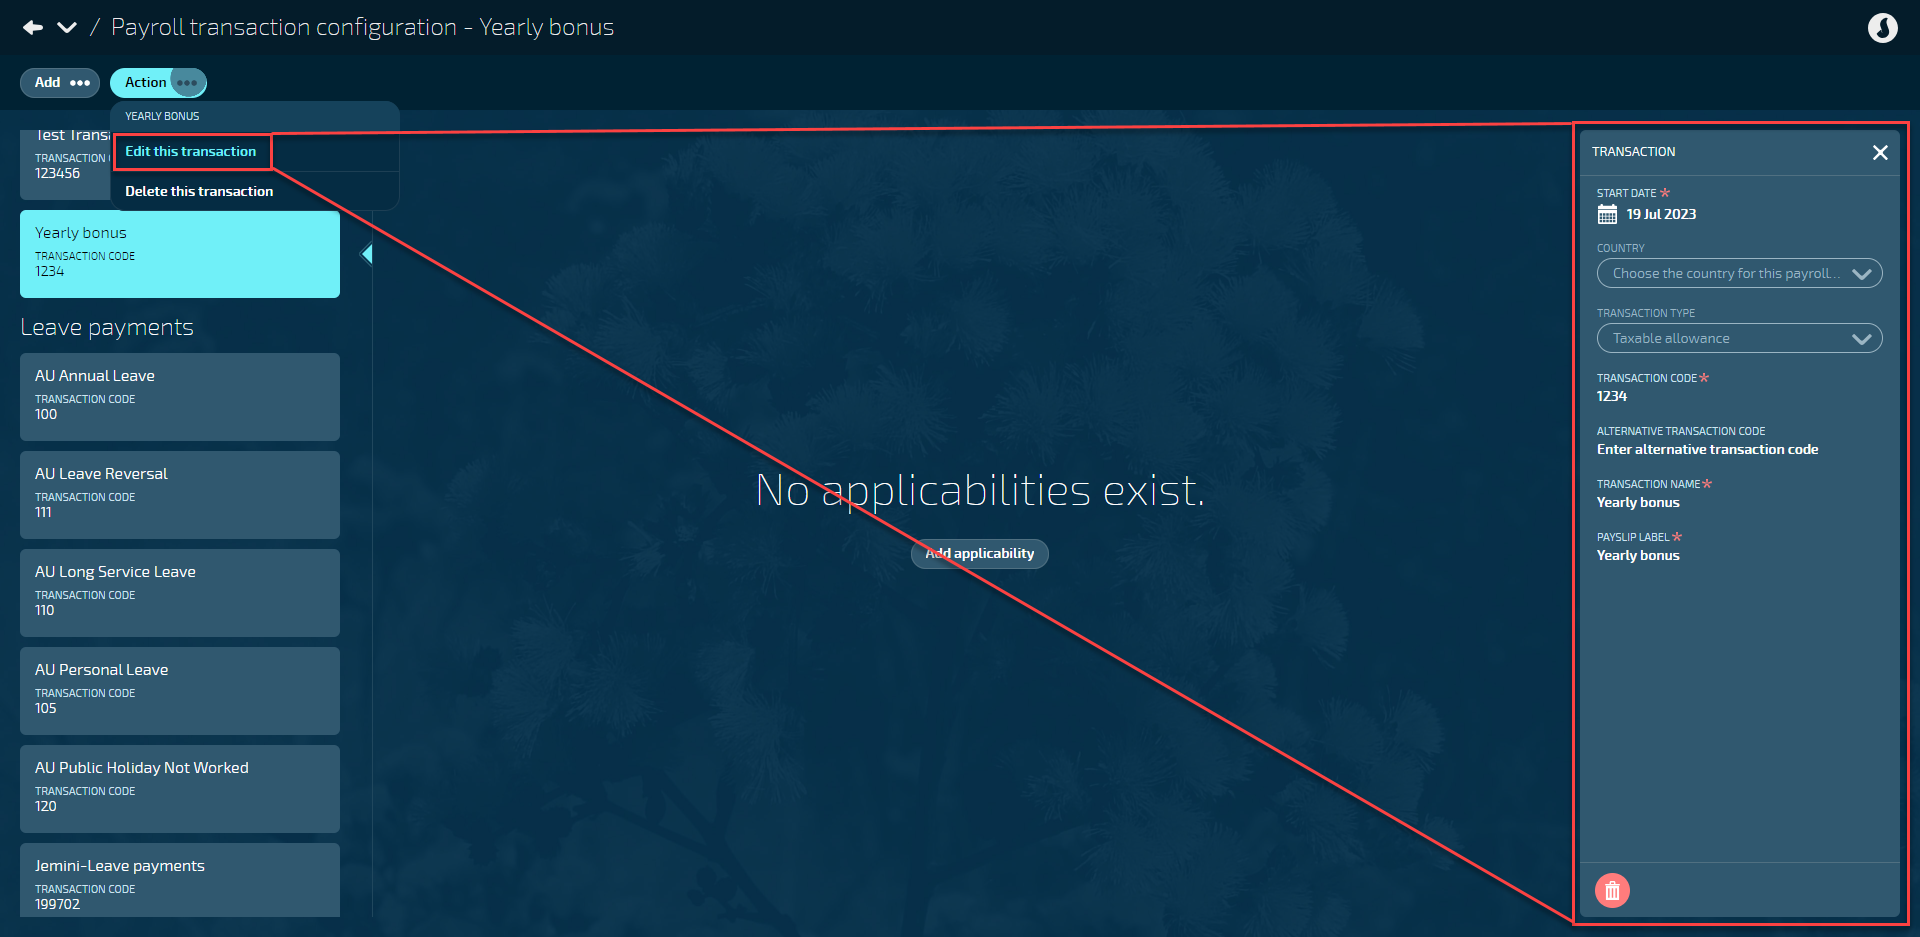
Select the transaction you want to edit.
Select Action.
Select Edit this transaction to open the TRANSACTION panel.
Edit the fields as required. Some fields aren't editable and will be greyed out.
Select Green Tick Button to save and close panel.
TIP
If you want to make changes to the applicability (for example, location), you'll need to add a new applicability rather than edit the previous one. To edit an applicability, refer to Applicability Configuration.
How to delete a transaction
Just like editing a transaction, you can only delete a transaction if it hasn't been processed in a pay cycle. Otherwise, it will interfere with previous pay calculations. Additionally, you can only delete a transaction if it doesn't have applicabilities attached to it.
Go to Pay > Payroll transaction configuration.
Select the transaction you want to delete.
Select Action.
Select Delete this transaction.
Select Go ahead when the confirmation message appears.
TIP
To delete an applicability, refer to Applicability Configuration.
What are the transaction types?
When adding a transaction, you'll need to pick a transaction type, which defines the nature of the transaction.
Transaction types can be sorted into three categories of transactions:
Payments
Deductions
Non-paying/Disbursements
Payments
Transaction type name | NZ or AU | What is it? |
|---|---|---|
Taxable Allowance | Both | Quantity or fixed amount based transactions such as shift allowance, bonus payments and commission. Also used for taxable expense payments. |
Taxable Earnings | Both | Hourly-based payments, such as ordinary time and overtime. |
Leave Payments | Both | Refers to any transaction used to pay employees for the time they take off from work, including annual leave, sick leave, and public holiday leave. |
Leave PAYG Payments | NZ only | PAYG (Pay As You Go) could be better described as "pay as you earn leave". It's for casual employees who don't receive regular annual leave. Instead, they get an extra 8% added to their pay to make up for it. This includes payments such as Casual Holiday pay and Holiday pay on termination. |
Non-taxable Allowance | Both | A tax-exempt allowance on top of an employee's salary or wages to cover costs such as meals, clothing and travel. Certain requirements must be met for these allowances to be considered tax-exempt. |
Non-taxable Reimbursements | Both | Similar to a non-taxable allowance, except that the reimbursement is provided after the expenses have already been incurred by the employee. |
Lump Sum | AU only | Used for Australian payroll lump sum rules. New Zealand lump sum payments need to be set up as Taxable Allowances. |
Termination | Both | Termination payments made to employees when their employment ends, such as final pay, payment in lieu of notice, and unused leave entitlements. |
Deductions
Transaction type name | NZ or AU | What is it? |
|---|---|---|
Pre-Tax Deductions | Both | Deduction from an employee's pay before tax calculations are processed, such as Salary Sacrifice. |
Tax Deductions | Both | Deduction from an employee's pay that are subject to taxes. This includes PAYE(which covers ACC contributions and similar deductions), student loan deductions (SLCIR, SLBOR, and special deduction rates), and tax adjustments. |
Mandatory After-Tax Deductions | Both | Deduction that must be made after tax is deducted, such as Child Support and KiwiSaver Employee. Protected Net Earnings can only be applied to these deductions. |
Voluntary After-Tax Deductions | Both | Deduction that can be made after tax (employee chosen), such as union fees and social clubs. |
Non-Paying/Disbursements
Transaction type name | NZ or AU | What is it? |
|---|---|---|
Employer Super | Both | It's where the employer contribution to KiwiSaver or ESCT belongs. |
Non-Paying Transaction | Both | Used to adjust an employee's leave, including accruals, leave credits and debits, and ADP days counters. For example, if you wanted to cash-up a week of an employee's annual leave, you would normally pay the amount for the annual leave transaction. Then, instead of manually adjusting an employee's leave in their leave plan, you could create a non-paying transaction that has the rules built in to tell Jemini to deduct a week off their pay. RFBA (Reportable Fringe Benefit Amount) – Australia only: Non-paying transactions also record fringe benefit amounts for STP reporting. Unlike other transactions, RFBA transactions don't pay employees. They record the grossed-up value of a fringe benefit so it's reported to the ATO. If an employee has a company car, for example, you'd set up an RFBA non-paying transaction with a Taxable FBT or Exempt FBT accumulator to categorise the benefit for STP. |
Net Pay | Both | Net pay transactions are system generated. They're used to record the amount that goes into an employee's account after all the allowances and earnings are paid and all mandatory tax deductions are made. |
How payroll transactions are connected to employee pay
If transactions are set up to be automatically attached or applicable to all (configured in applicability settings), Jemini will follow the rules set in the applicability to connect to an employee's pay where appropriate.
When you set up an employee's essentials, pay rate, work pattern, tax details, and so on, Jemini will know which transactions to apply to the employee. When you pay the employee, it will calculate their pay based on the rules set in the applicability.
Transactions related to leave need to be connected to a leave plan, which is then connected to an employee. Learn more in How to connect a transaction to a leave plan below.
Transactions that aren't automatically attached need to be connected to an employee's pay mode. For example, these types of transactions can be bonuses and allowances. Learn more in How to connect additional transactions to an employee's pay mode below.
How to connect a transaction to a leave plan
Each leave plan needs a corresponding payroll transaction. For example, an Annual Leave plan would need an Annual Holiday Pay transaction.
To learn more about setting up a leave plan, go to Intro to Leave Plans.
The basic steps to attach a transaction to a leave plan are as follows:
Go to People | Leave | Leave Plans.
Select Add leave plan to open the ADD LEAVE PLAN panel.
Add the leave plan details, such as LEAVE PLAN NAME and COUNTRY.
When the COUNTRY is selected, you can then Select a pay transaction.
Select a transaction from the PAYROLL TRANSACTIONS list.
Finish adding leave plan details.
Select Green Tick Button to save and close panel.
Once the leave plan is set up, it can be attached to an employee. Once it's attached to an employee, Jemini will know which calculation rules to apply when processing an employee's leave.
How to connect additional transactions to an employee's pay mode
When an employee's pay mode is set up, all the default transactions will be added to their pay mode automatically. Some transactions, however, need to be added manually.
To learn more about adding a payroll transaction to an employee, go to Intro to Pay Mode.
The basic steps to attach a transaction to an employee's pay are as follows:
Go to People | Employees.
Select the employee that you want to add a transaction to.
Go to Action | Pay Mode.
Under Controls, make sure the correct PAY PERIOD is selected (the default selection is the current pay period).
Select the PAY CYCLE you want to edit.
Select Add Transaction.
Select a payroll transaction.
Select a payroll transaction from the list (use the search or filter functions to narrow down the list).
Enter the details as required (each transaction type will have different buttons to select and fields to enter).
Select Green Tick Button to save and close panel.
The transaction will be added to the employee's pay cycle.