Initial access and setup
Who can benefit from this guide?
HR staff responsible for establishing employment positions and position charts. This includes hiring, managing staff, and future staffing needs, such as promotions or replacements.
Employees and managers who can view the Position Chart but not edit it may find some of the quick tips at the bottom of this article helpful.
System Administrators: Open to view permission settings
For a user to successfully manage Positions Jemini, they’ll need access granted for:
Position application and records
Position Chart application and records
To grant them access:
Go to System > Security profiles.
Select the Security Profile that needs access to the Positions bubble.
In the Permissions table, scroll down and expand COMPANY CONFIGURATION and POSITIONS to find the Position and Position Chart application and records permissions.
Tick the Enable box to activate the Positions bubble.
Tick the View, Add, Change, and Delete boxes for Position and Position Chart records permissions as needed.
Select the Green Tick Button to save your changes.
You’ll also need to configure application settings before users can use the Position Chart effectively:
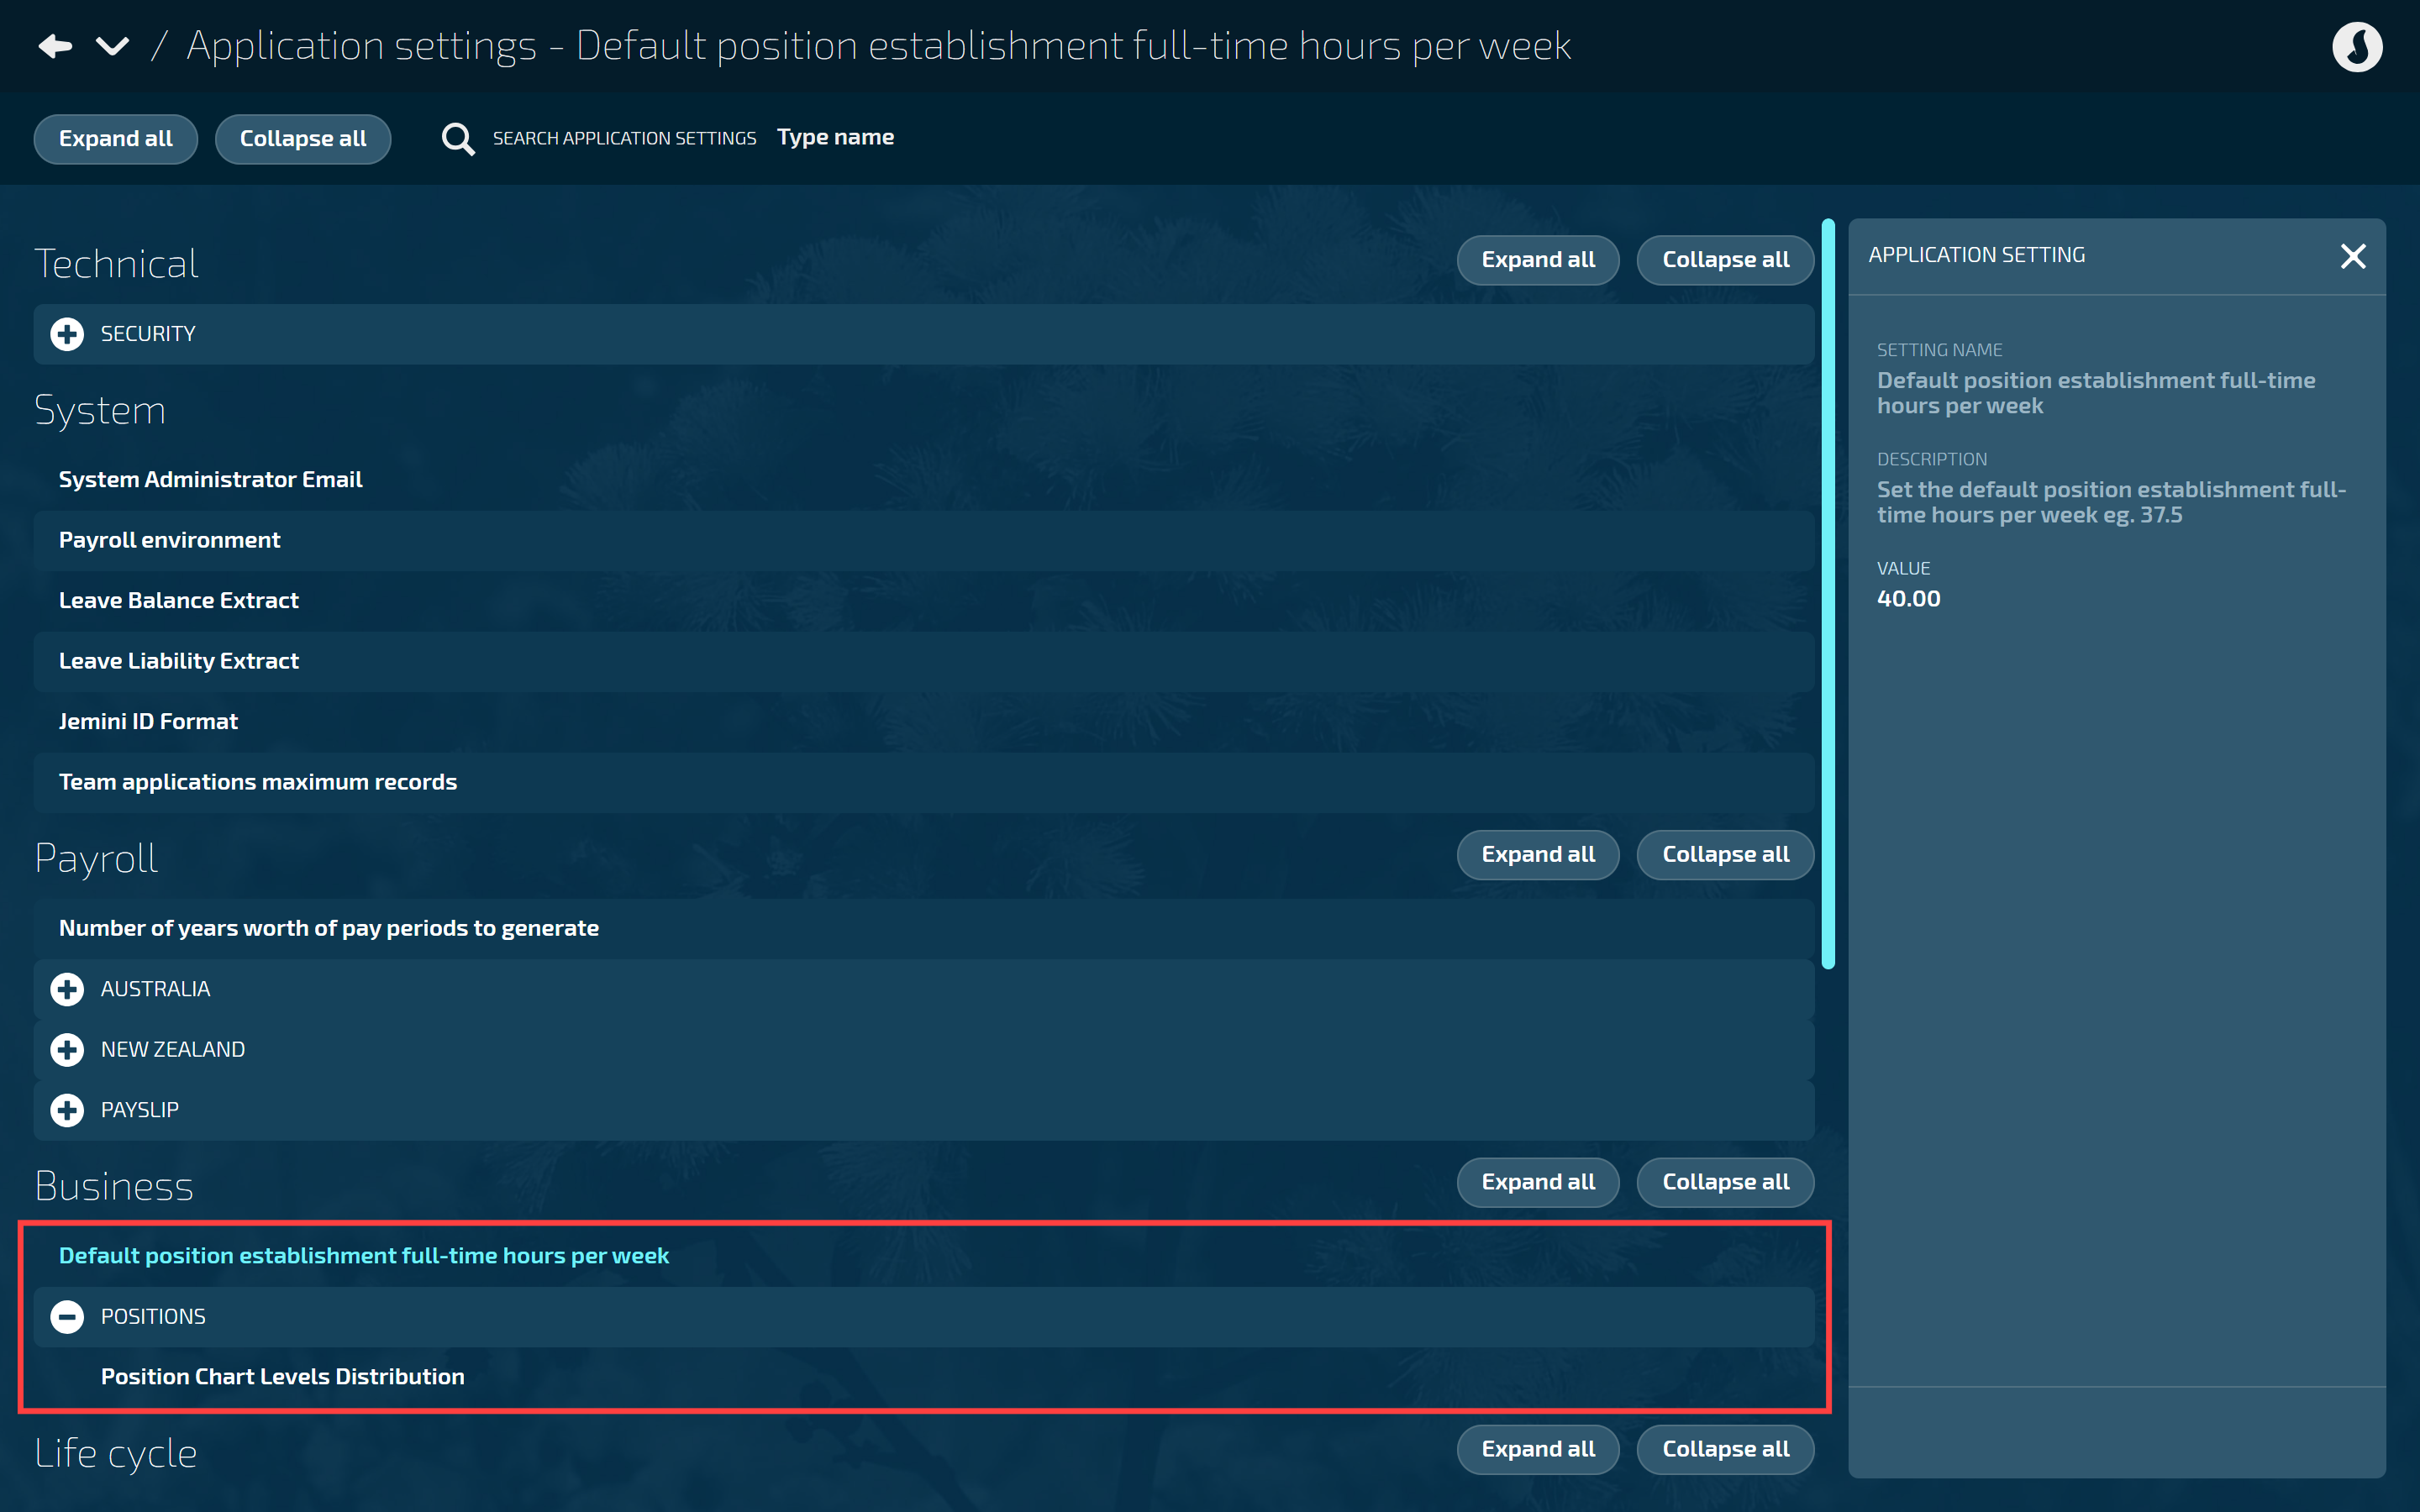
Go to System > Application settings.
Select Default position establishment full-time hours per week to open the APPLICATION SETTING panel.
Enter the VALUE for the default position establishment full-time hours per week.
This setting is essential for calculating employees' FTE (Full-Time Equivalent) and part-time percentages.
If the default full-time hours per week is set to 40, all employees will have a 40-hour work week. Full-time employees will have an FTE of 1, and part-time employees will have an FTE of 0.5.
Position establishments will automatically be set to 40 hours, but you can edit this if needed.
Select the Green Tick Button.
Next, select Positions under Business to expand that section.
Select Position Chart Levels Distribution to open the APPLICATION SETTING panel.
Enter the VALUE for the displayed levels of the position chart.
This sets yets the maximum number of levels that display in the chart.
Options are:
‘x up’ – display x levels up and rest down
‘even’ – display same up and down
‘x down’ – display x levels down and the rest up
‘x’ must be a numeric value.
Select the Green Tick Button.
If you need help, reach out to our support team: raise an iHelp through Infusion.
.png)
Quick links to how-to guides
If you’re already familiar with the Positions Catalogue and Position Chart and want to jump straight into the instructions, follow these links:
How to add, edit, and delete Positions in the Positions Catalogue
How to add, edit, and delete Postion Establishments in the Position Chart
Otherwise, scroll down to Choosing the best configuration approach to learn more. You’ll also find Quick tips for viewing the position chart and adding position establishments and an introduction to the Position Chart for Visio* report.
Choosing the best configuration approach
In Jemini, Positions has two bubbles called Positions Catalogue and Position chart.
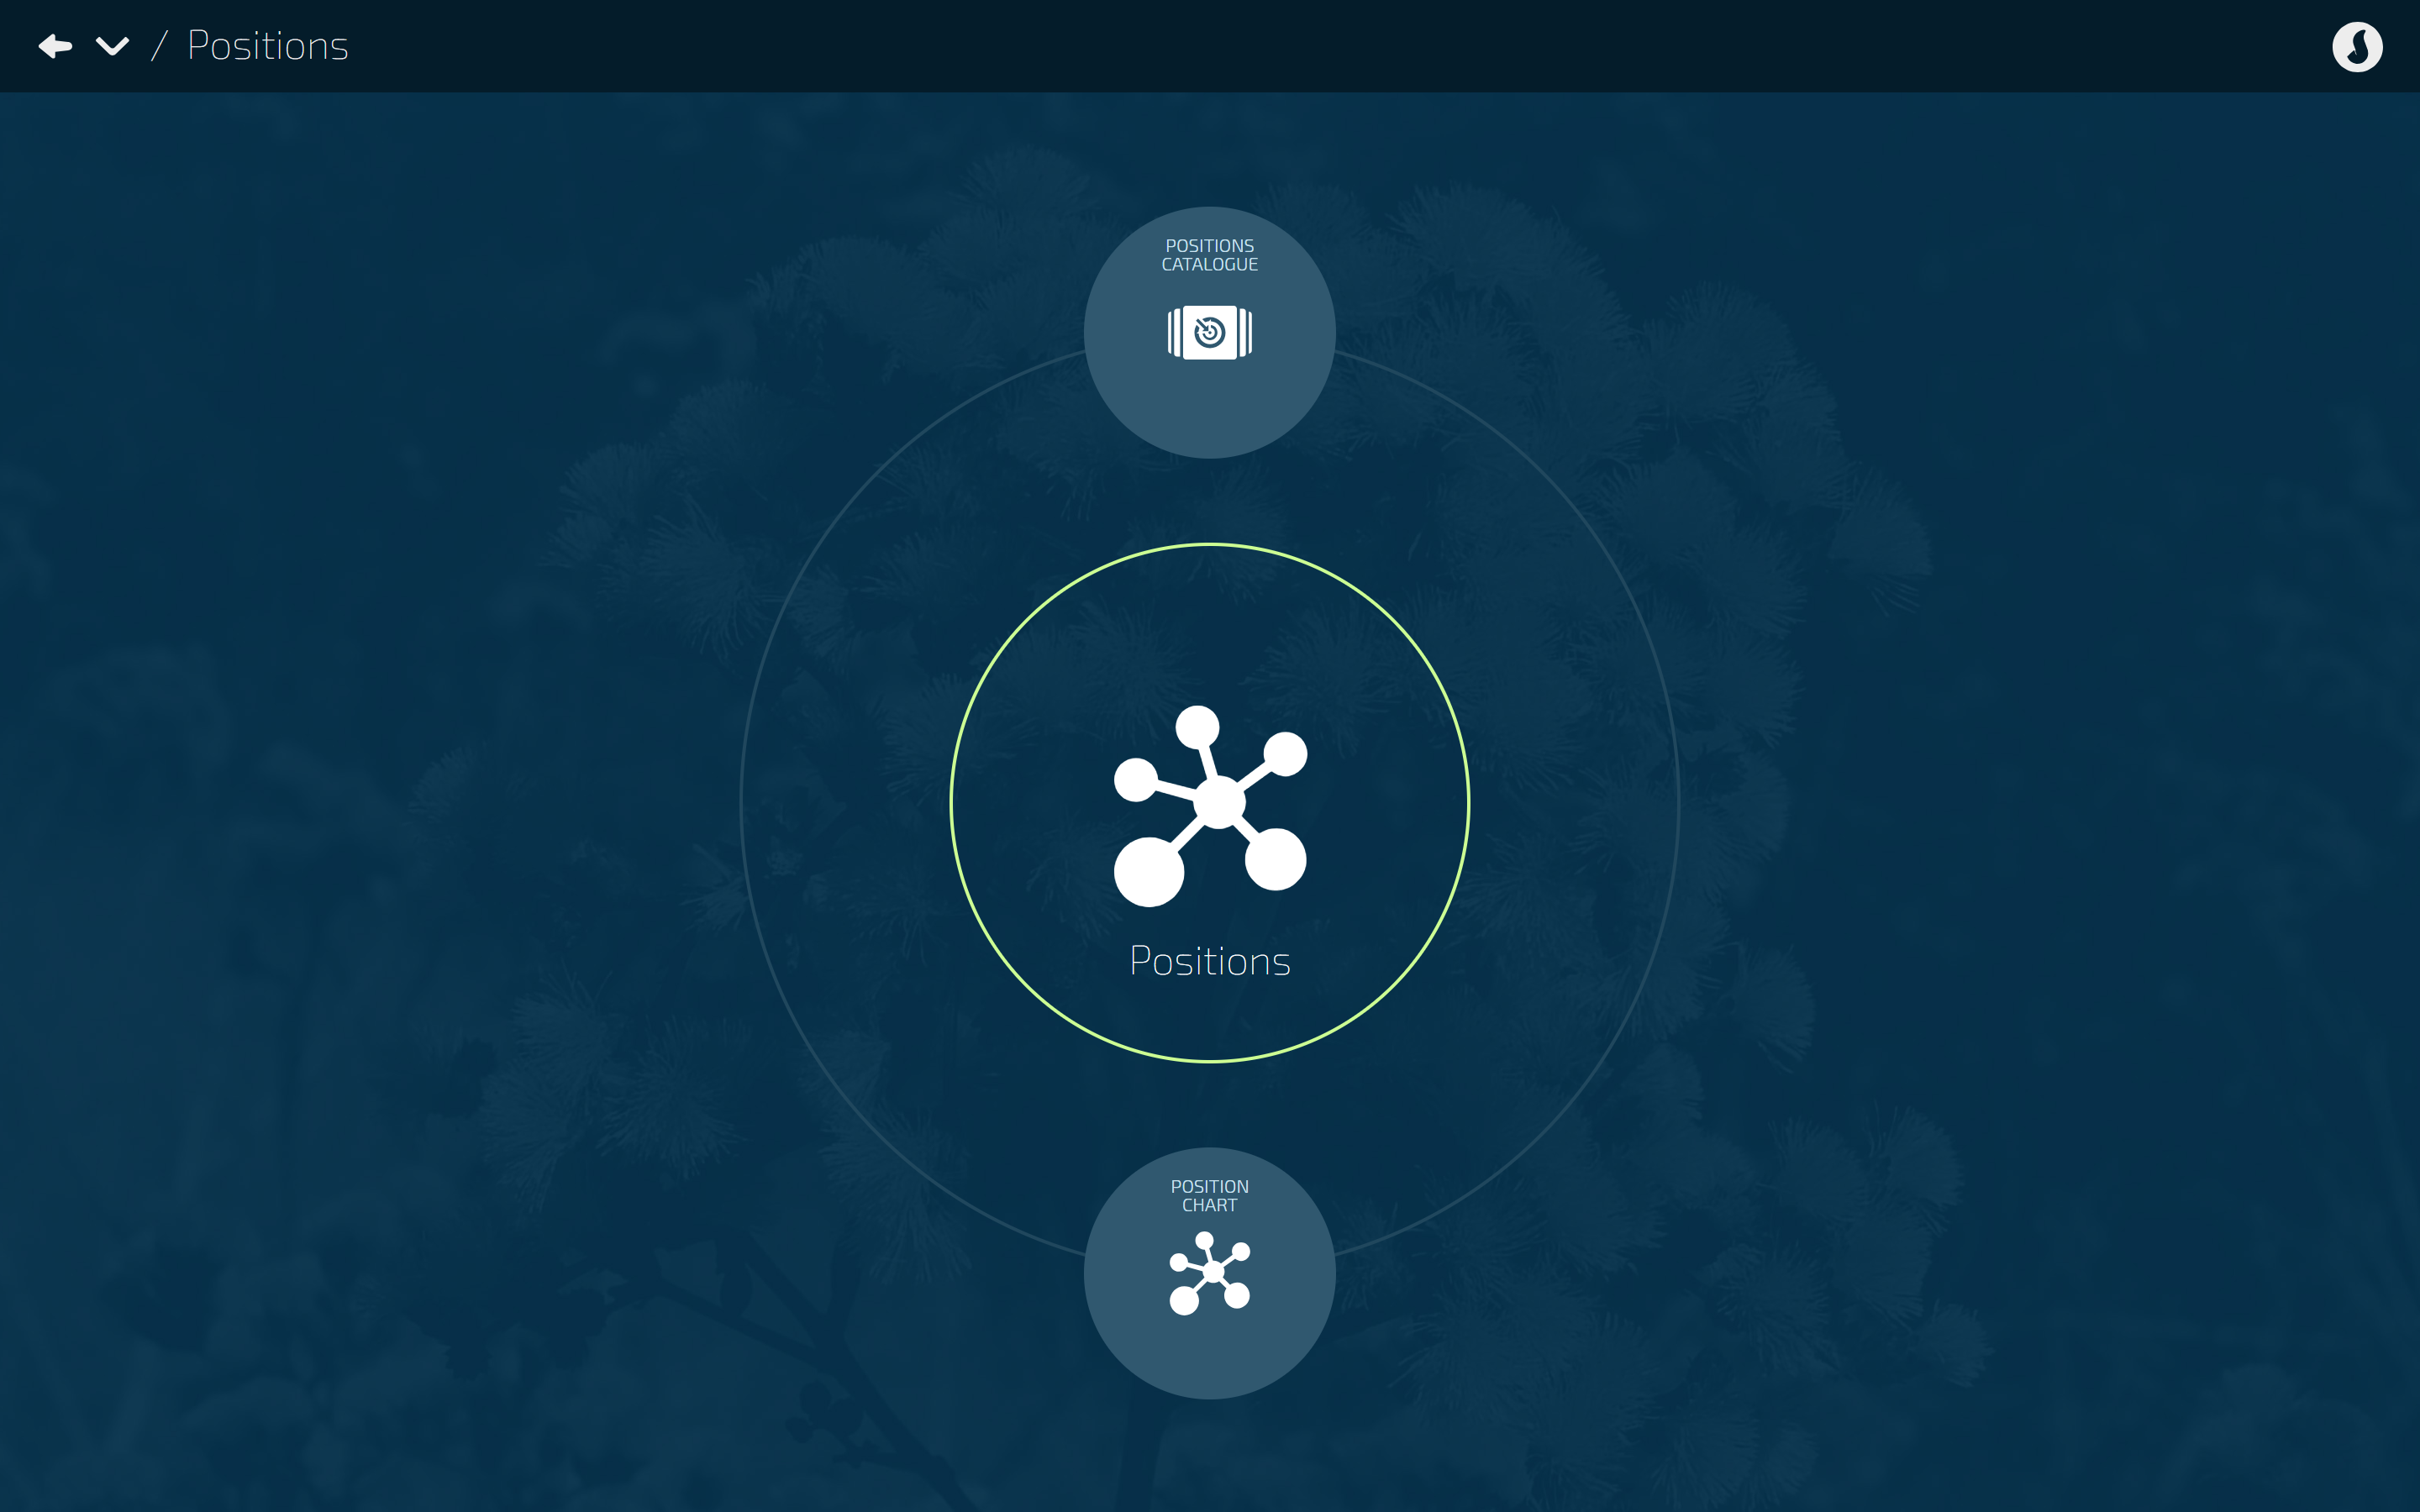
Positions are first created in the Position Catalogue, serving as “templates” for future use. Each position in the catalogue can be used to create one or more ‘position establishments’.
Position establishments are different instances of the position template that appear on the Position Chart. They’re likely to have subtle differences from each other, including position title, reporting lines, location, organisation component, full-time hours, and so on.
Occupancies are used to assign employees to fill the positions in your Position Chart. The position establishments represent the workstation (as described in Positions - Getting Started), while the occupancies represent the person sitting at the workstation. This means the position templates and position establishments need to exist before someone can occupy them.
Creating position “templates” in the Positions Catalogue
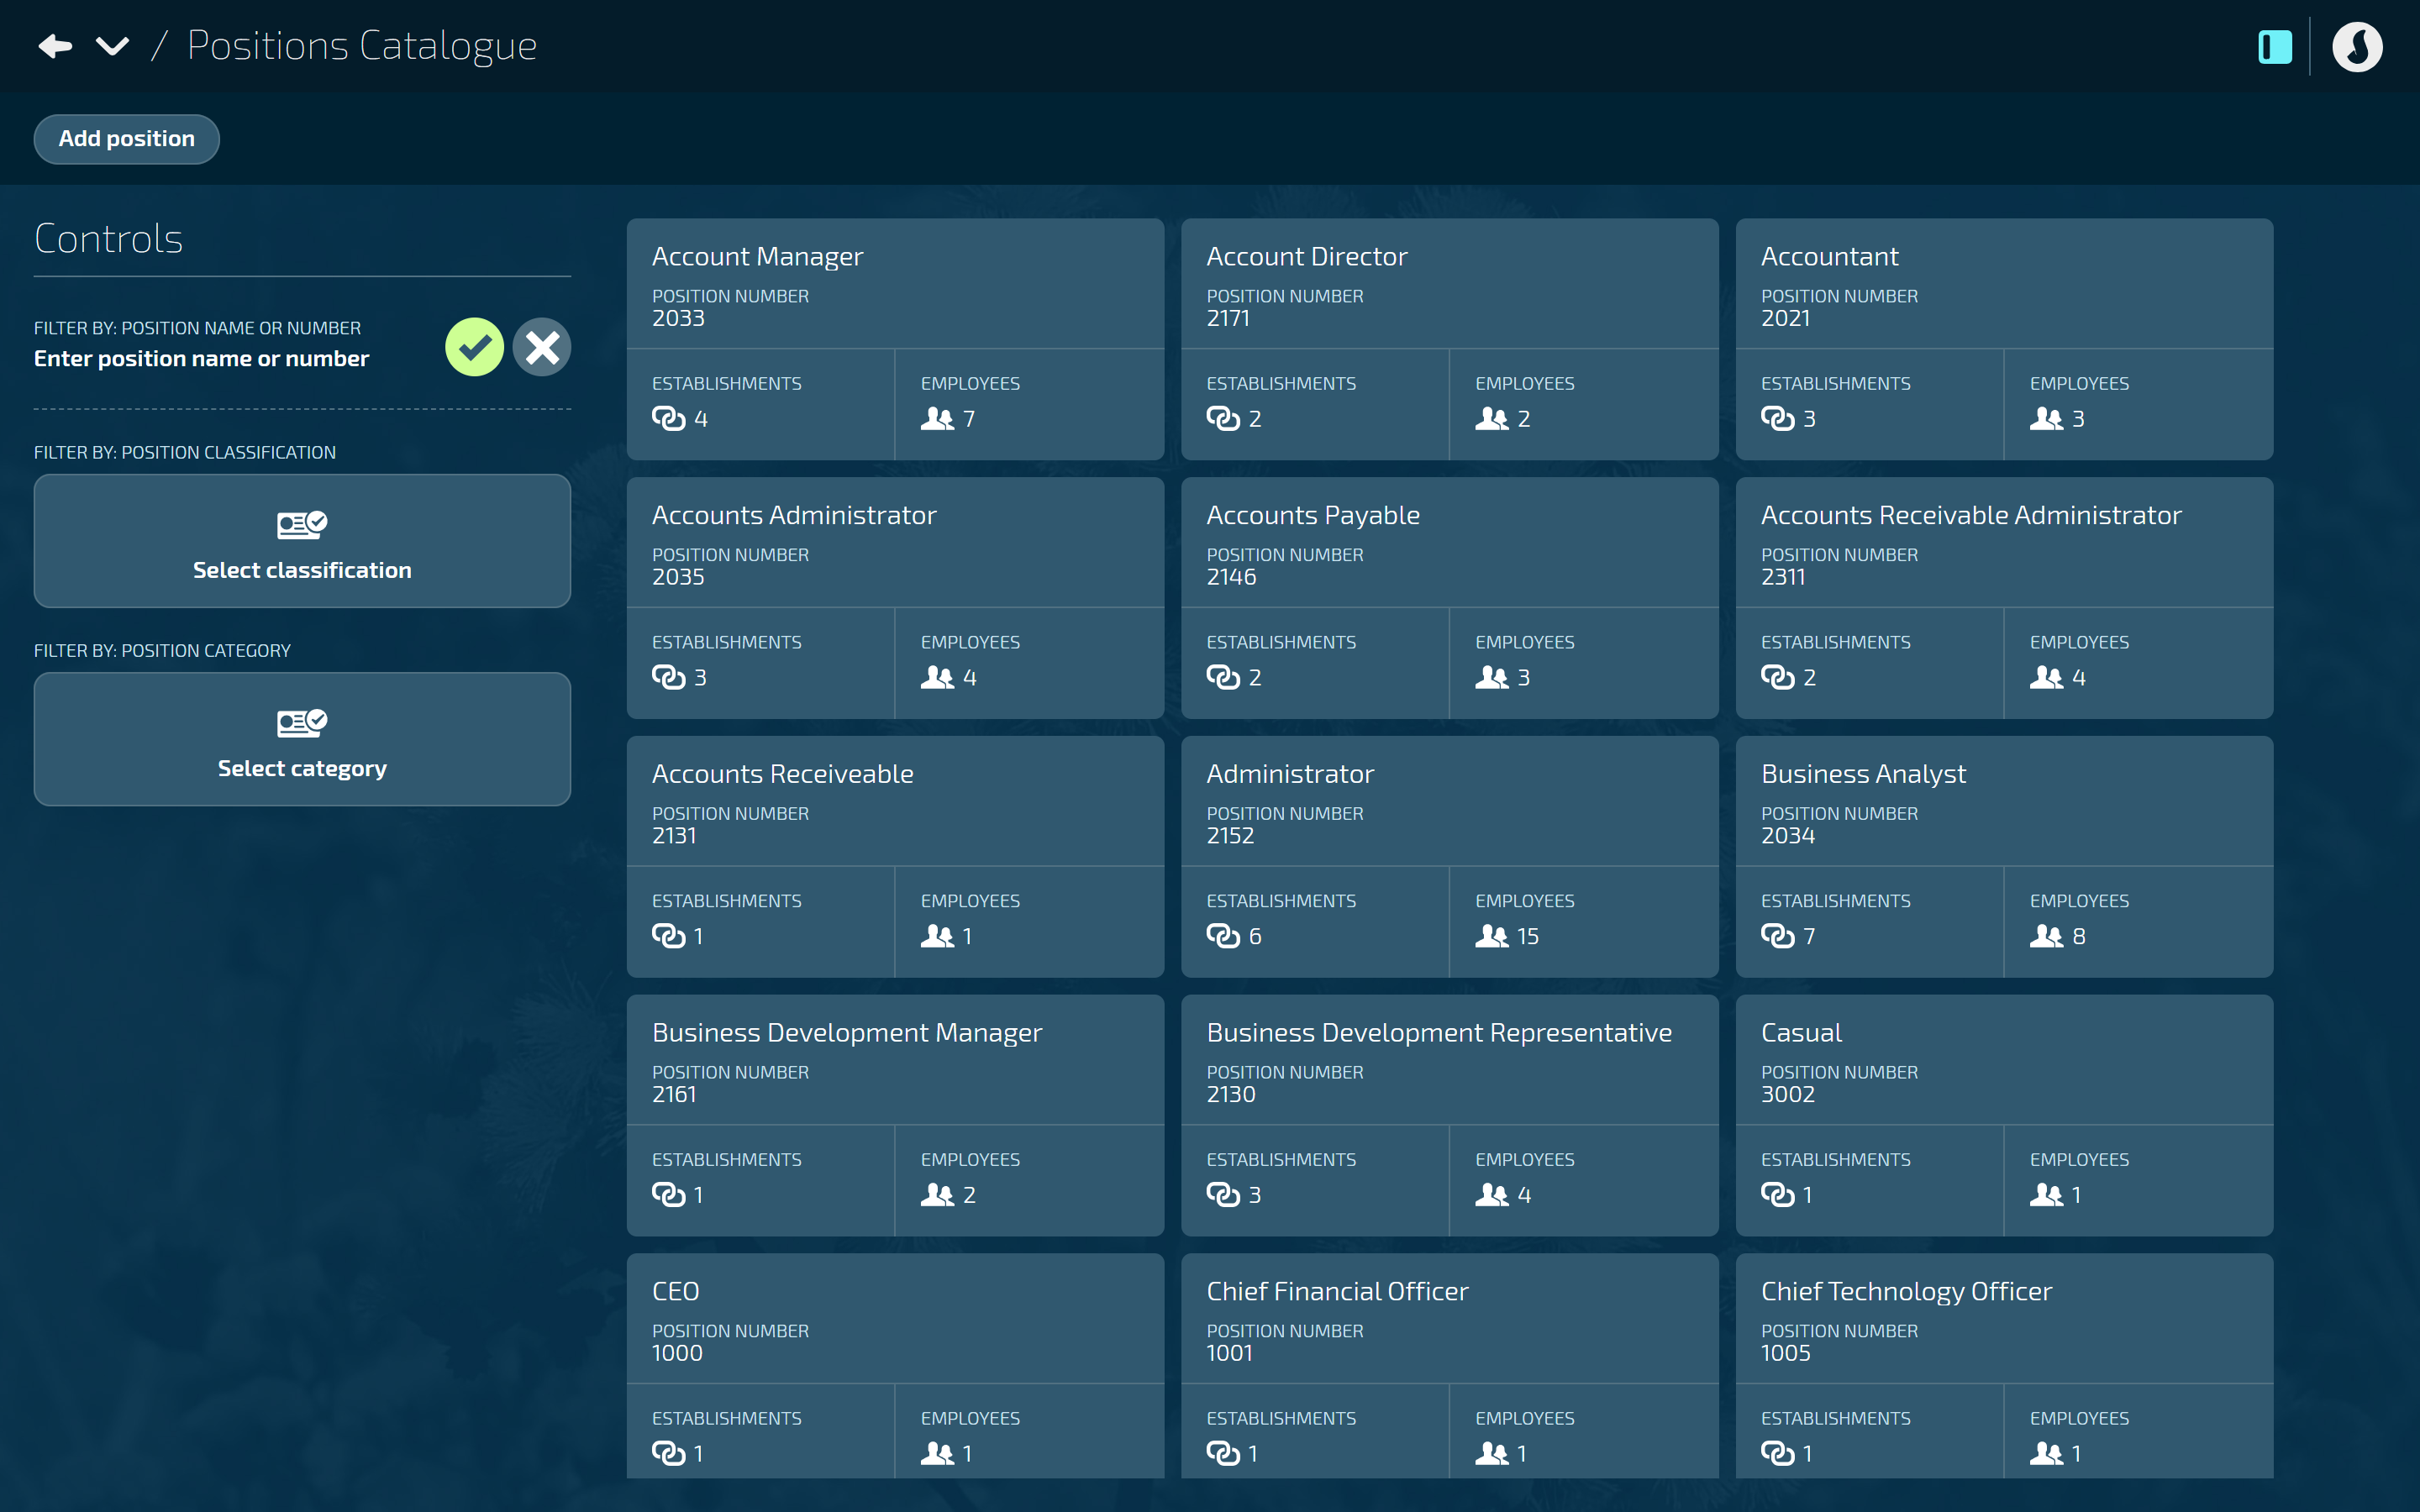
Positions are first created in the Position Catalogue. These are essentially “templates” so that you have a base to create position establishments from. Each position template can be used as the template to create multiple ‘Position Establishments’.
Position establishments are different instances of the ‘Position’ template that appear on the position chart. They are likely to have subtle differences from each other. These differences could include position title, reporting lines, location, organisation component etc, full-time hours etc.
Key points
Positions are created in the Position Catalogue.
They’re used as a “template” to create multiple position establishments that are similar.
These position “templates” help save you time when creating multiple position establishments with similar attributes.
Scenarios
A new position template needs to be created in any of the following scenarios:
1. You’re setting up a new employee in Jemini and a suitable position template does not already exist.
2. An existing employee is moving into a new position and a suitable position template does not already exist (for example: promotions, transfers, and restructures).
To learn how to set up Positions, refer to How to add, edit, and delete Positions in the Positions Catalogue.
Creating position establishments in the Position Chart
.png)
Position establishments in Jemini are single or multiple instances of a position “template” that appear on the Position Chart. All position establishments are created using a position template (created in the Positions Catalogue) and are likely to have subtle differences, such as position title, reporting lines, location, organisation component, and full-time hours.
The start date of a position establishment must be the same or later than the position establishment it reports to, meaning a manager’s position must exist before their direct reports. Jemini is a date-effective system, so any changes to a position establishment should be date-stamped by creating a new record on the existing establishment. This helps track changes over time.
Scenarios for creating a new position establishment
New hires:
A position establishment for the new hire’s position does not already exist in Jemini.
A position establishment already exists, but the new hire will have direct reports, and the existing establishment currently has multiple occupancies (more than one person in the
position establishment). The new hire will need a new position establishment to separate it from the existing one with multiple occupancies.
Transfer/Promotion/Restructure:
An existing employee is moving to a new position, and a suitable establishment does not exist in Jemini.
An existing employee is moving to a new position, and direct reports need to report to a new establishment that does not yet exist.
Scenarios for updating a position establishment
New hires:
A new hire with direct reports that are currently reporting elsewhere.
In this case, create a new dated record on the direct reports' establishment to update the reporting line.
Transfer/Promotion/Restructure:
An existing employee is moving to a new role with direct reports currently reporting elsewhere.
In this case, create a new dated record on the direct reports' establishment to update the reporting lines.
Direct reports of one position need to report to a different position.
In this case, create a new dated record on the direct reports' establishment to update the reporting lines.
Other updates:
The position title of an existing position needs updating to something slightly different..
In this case, create a new dated record on the establishment for the updated title.
The location for the position is changing.
In this case, create a new dated record on the establishment for the updated location.
The position is moving under a different organisation component.
In this case, create a new dated record on the establishment for the updated component.
The number of employees funded to fill the position is changing.
In this case, create a new dated record on the establishment for the updated FTE (Full-Time Equivalent).
TIP
If the occupant of the position will have different duties and responsibilities, we recommend creating a new position establishment and updating their occupancy record to reflect a move into a new role. If the organisation no longer needs the old position, you can end date it.
To learn how to set up Positions Establishments, refer to How to add, edit, and delete Postion Establishments in the Position Chart.
Quick tips for viewing the Position Chart and adding position establishments
If you’re an HR or system administrator with full access, you can view the position chart for present, future, and past dated positions to manage them effectively. You can also add, edit. and delete position establishments in the chart.
Employees with access to the Position Chart in Your Jemini can view the reporting lines to better understand organisation’s position structure and hierarchy, but only for the current date. The ‘As at’ roller is disabled in Your Jemini. However, they can still navigate around the chart, including using the controls to centre on specific position establishments or employees.
To view the Position Chart:
Change the ‘as at’ date roller to view past or future position establishments
The Position Chart is date effective, so position establishments added at a later date will not exist on the chart if you move the date roller to an earlier date. In this video, the Biology Teacher position establishment was created on 25 March 2025, which is later than the other existing position establishments. When the date roller in the controls is changed to an earlier date, the Biology Teacher card disappears from the Position Chart. When the roller is changed to a future date, the card reappears. This function is useful for planning future positions.
Navigate around the chart manually using the sliders and buttons
To add a position establishment:
First, select the new position establishment’s line manager or team member
Select the position establishment or employee that the new position will be reporting to. To do this:
In Controls, under CENTRE POSITION ESTABLISHMENT OR EMPLOYEE, select the POSITION ESTABLISHMENT or EMPLOYEE from their backpack.
Use the Search function to filter your results if needed.
The ‘reports to’ position establishment in the position chart should now be outlined in light blue.
Next, drag and drop a position into the position chart
Once the position establishment is selected, you can drag and drop a position into the chart to create a new position establishment that is either a team member or a direct report of the selected position. Two dotted squares will indicate where you can drop the card.
For detailed instructions, refer to How to add, edit, and delete Position Establishments in the Position Chart.
Download Position Chart to Microsoft Visio
.png)
The Position Chart for Visio* report in Jemini is designed to let you import your position chart data into Microsoft Visio. You’ll need access to Microsoft Visio to do this.
This feature allows you to interact directly with your position chart in the Visio appicaiton and also to print it out if needed.
To export your position chart data from Jemini:
Go to Business > Reporting.
Open the Position Chart for Visio* report.
Select the As At Date you would like the position chart data for.
This is useful due to Jemini’s date-effectiveness, allowing you to specify a version of the position chart from the past, present, or future.
Select other parameters as required.
Select View report.
Select Export, then Microsoft Excel (.xlsx).
The file will download to your computer as a Microsoft Excel workbook.
Once you have your file, open Microsoft Visio, select the Organisation Chart wizard, and follow the steps to import your file and format the chart with the desired fields and data.
If you need help setting up or would like to learn more, please raise an iHelp through Infusion.
