What you’ll find in this guide
Accessing the Positions Catalogue
Go to Business > Positions > Positions Catalogue to open the application.
TIP
Navigation may vary depending on the permissions set in your security profile. For example, if you only have access to the Positions Catalogue and not the Position Chart, your navigation will become Business > Positions Catalogue.
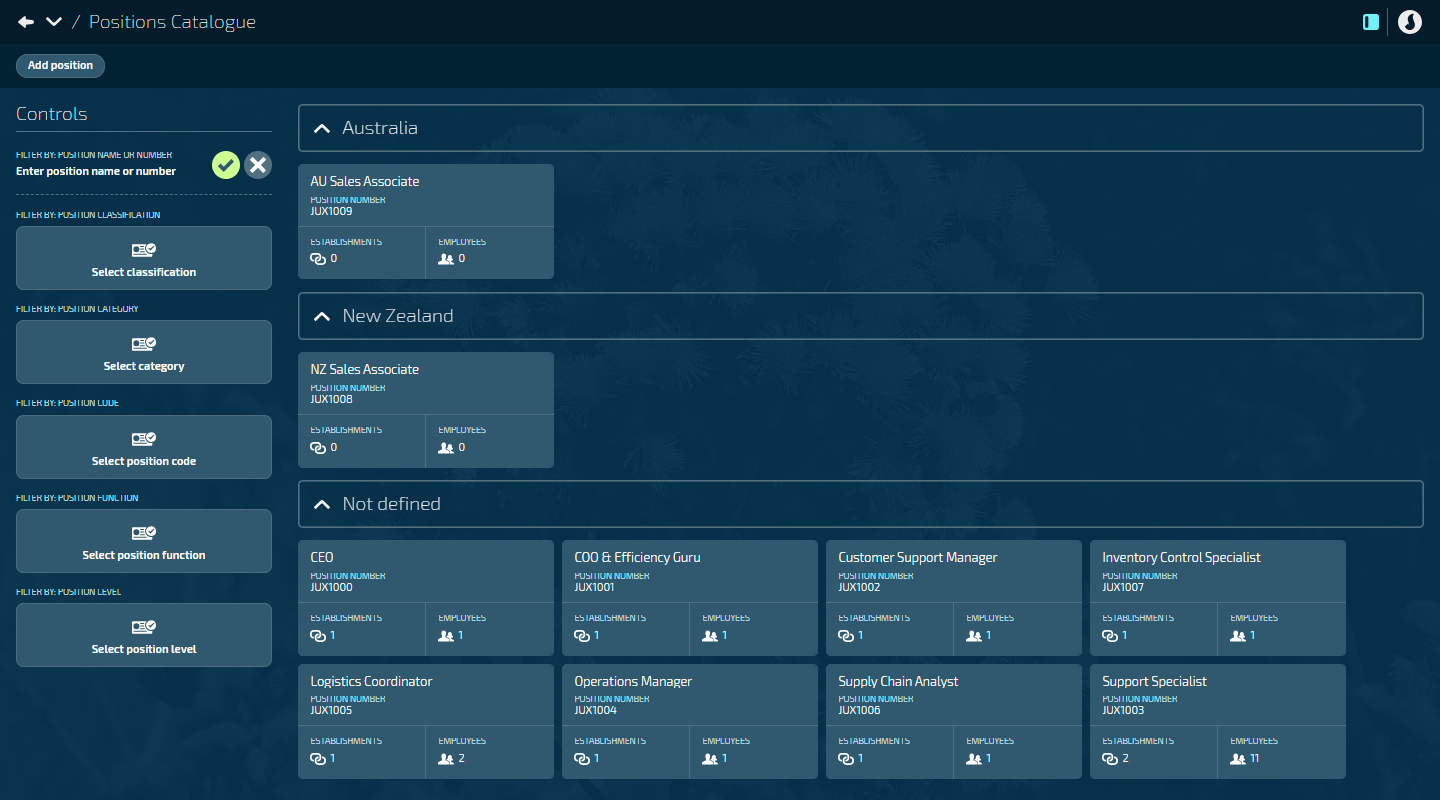
Position cards display in the catalogue grouped by country (Australia, New Zealand, or Not defined).
TIP
Country grouping is a new feature introduced in Version 32.2. Positions created before the 32.2 release aren't country-defined and will appear under ‘Not defined’. When you create a new position after the 32.2 release, you'll need to select the country it belongs to.
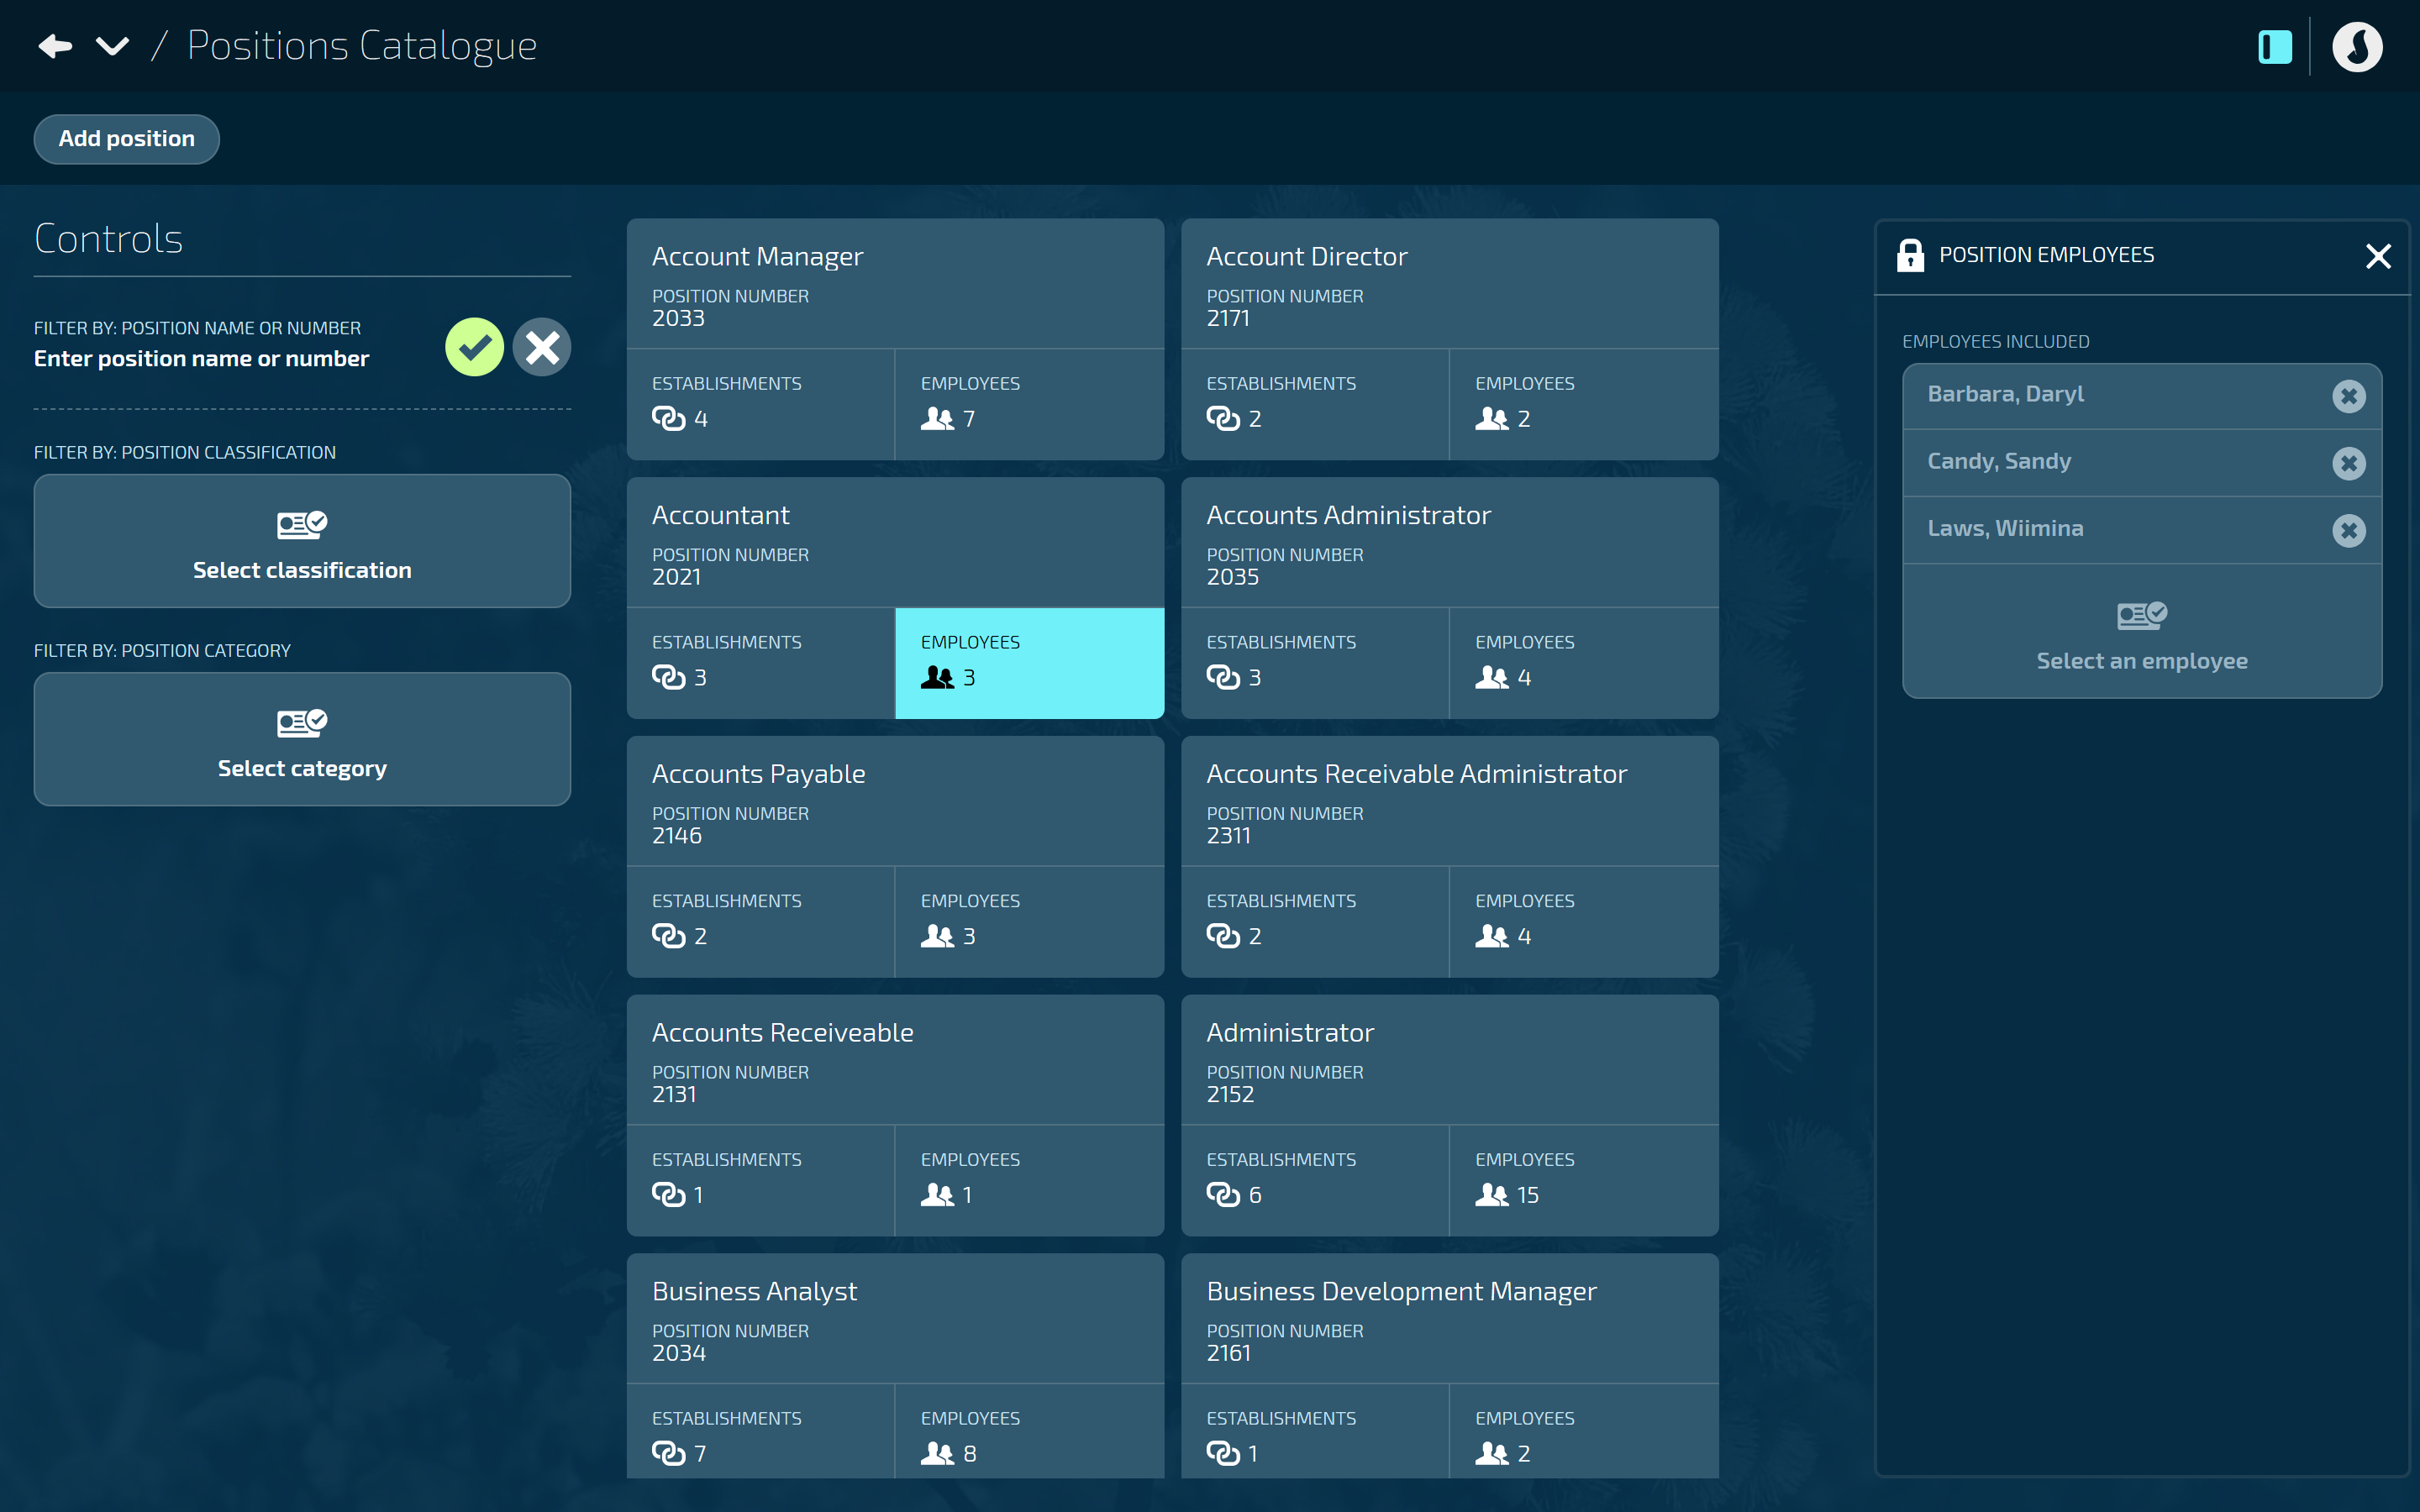
Each card shows the position number, number of establishments, and number of employees occupying the position.
Filter positions using Controls:
Search by position name
Filter by position classification
Filter by position category
Filter by position code (OSCA for Australia, NOL for NZ)
Filter by position function
Filter by job level
How to add a Position
Go to BUSINESS > POSITIONS > POSITIONS CATALOGUE.
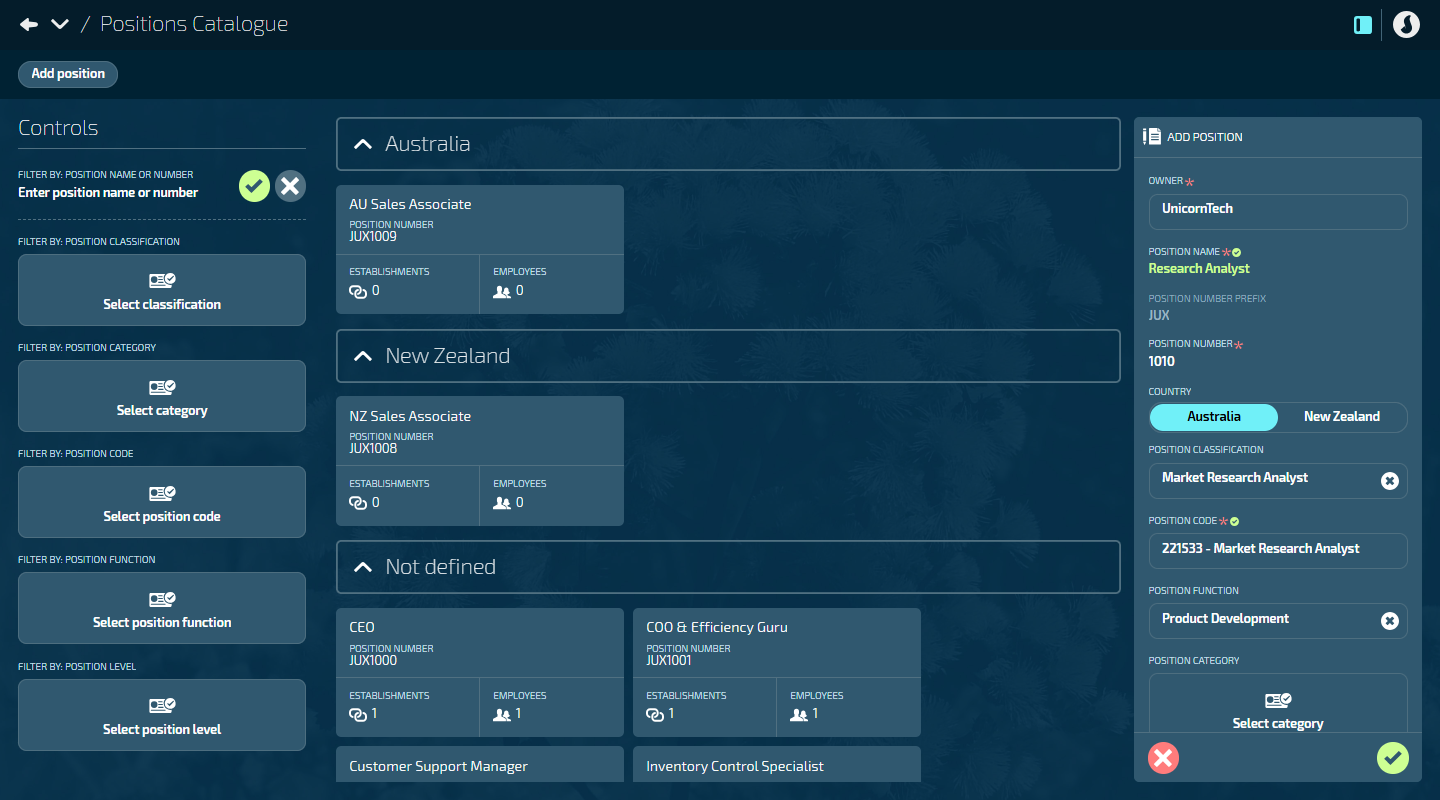
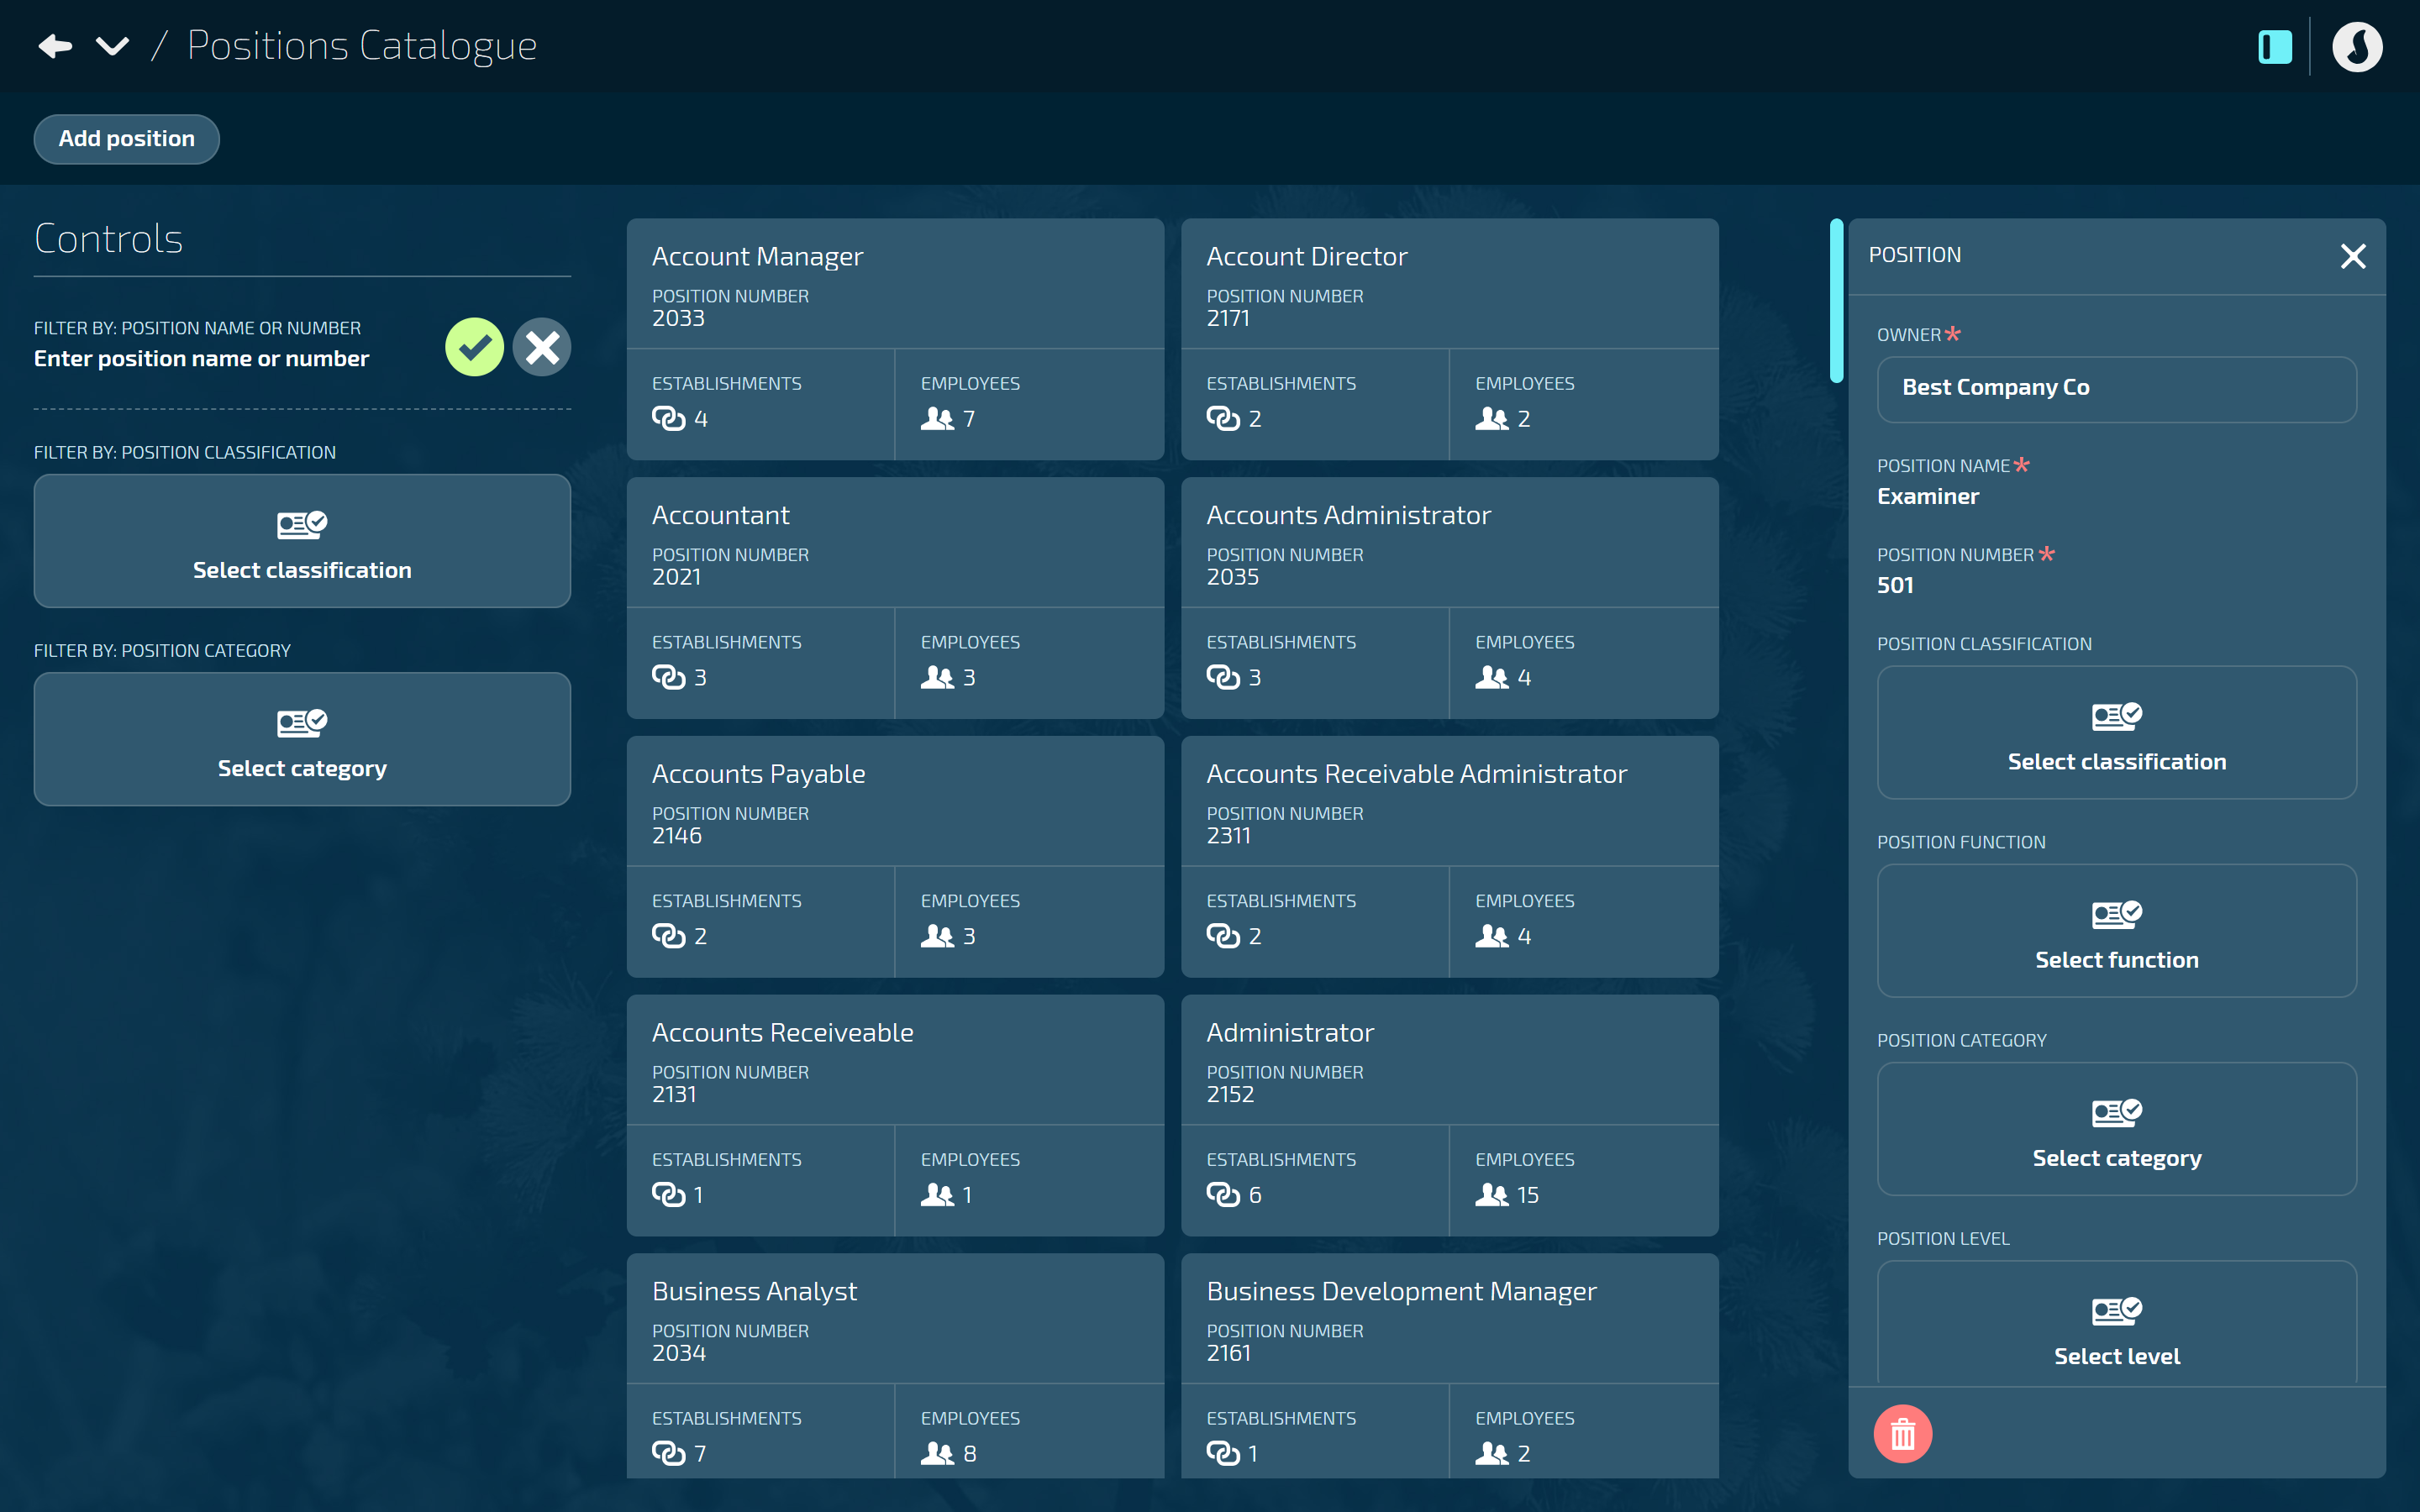
Select Add position to open the ADD POSITION panel.
Select an OWNER.
To understand what an owner is, refer to How to add Owner Organisation Components.
Enter the POSITION NAME.
For example, “Accountant”.
TIP
This name doesn’t need to match the position title that will be created in the position establishment from this ‘template’. It's mainly used to help you identify the position in the catalogue.
Enter the POSITION NUMBER.
The position number is a unique identifier for the position.
This section might be filled in already if your organisation has autonumbers set up.
TIP
Autonumbers are set up in Business Core Tables and assigned to Owner Organisation Components. Any position connected to an Owner with assigned autonumbers will automatically receive a position number. These may or may not be editable, depending on your organisation’s settings.
If autonumbers are set up, a POSITION NUMBER PREFIX might also be assigned. This is a unique identifier for any Owners using the same autonumber core table.
Select COUNTRY.
Options: Australia or New Zealand
Australian positions require Position Code and Position Level.
New Zealand positions have no mandatory requirements.
You can only set the country when creating a new position. You can't change it later.
(Optional) Select a POSITION CLASSIFICATION from the backpack.
By default, the backpack contains the ANZSCO (Australian and New Zealand Standard Classification of Occupations) list. Your organisation can customise this list in Business > Business Core Tables.
Use classifications to filter your list of positions in the Positions Catalogue. They’re also useful for reporting purposes.
(Mandatory for Australia/Optional for New Zealand) Select a POSITION CODE from the backpack.
Australian positions: Select from OSCA (Occupancy Standard Classification Australia) codes. This list is from the Australian Bureau of Statistics and is the official occupation classification codes for WGEA (Workplace Gender Equality Agency) reporting.
NZ positions: Select from NOL (National Occupation List) codes (optional). This list is from Stats NZ.
(Optional) Select a POSITION FUNCTION from the backpack.
Records the main duty or job that this position performs.
The list is unique to your organisation and managed in Business > Business Core Tables.
Use the position function for filtering and reporting purposes.
(Optional) Select a POSITION CATEGORY from the backpack.
Use categories to group positions in any way that suits your organisation (you can select multiple).
The list is unique to your organisation and managed in Business > Business Core Tables.
Use the position category for filtering and reporting purposes.
(Optional) Select a JOB LEVEL from the backpack.
Ranks how senior the position is in the organisation or industry.
Jemini includes preloaded job levels, but your organisation can customize the list in People > People Core Tables.
Use job level for reporting, like identifying remuneration options. It doesn't determine benefit eligibility or affect reporting structure.
TIP
Job Level was previously called Position Level. A new Position Level field (introduced in version 32.2) is below.
(Mandatory for Australia/Optional for New Zealand) Select a POSITION LEVEL from the backpack.
Australian positions: Select standardised management levels for gender equality reporting.
New Zealand positions: Optional setting for tracking your organisational hierarchy.
Manage the list in the ‘Position Level’ core table in Business > Business Core Tables.
(Optional) Upload ATTACHMENTS by choosing a file from your computer.
These could be supporting documents related to the position.
(Optional) Add LINKS by entering a URL.
Like attachments, the links could be supporting documents related to the position.
Set ACTIVE to Yes or No.
Set to Yes to activate the position so that you build position establishments in the Position Chart.
Set to No to stop the position from being used to build position establishments. This will remove it from the Positions list in Position Chart. If the position was previously active, any employees linked to its position establishment will remain attached.
Select the Green Tick Button to save and close the panel.
Once you’ve finished adding positions to the Positions Catalogue, you can start creating position establishments in the Position Chart. Connect position establishments to employees through their Occupancy record.
How to edit a Position
You can edit a position at any time. Any changes will only apply to position establishments created after the edits.
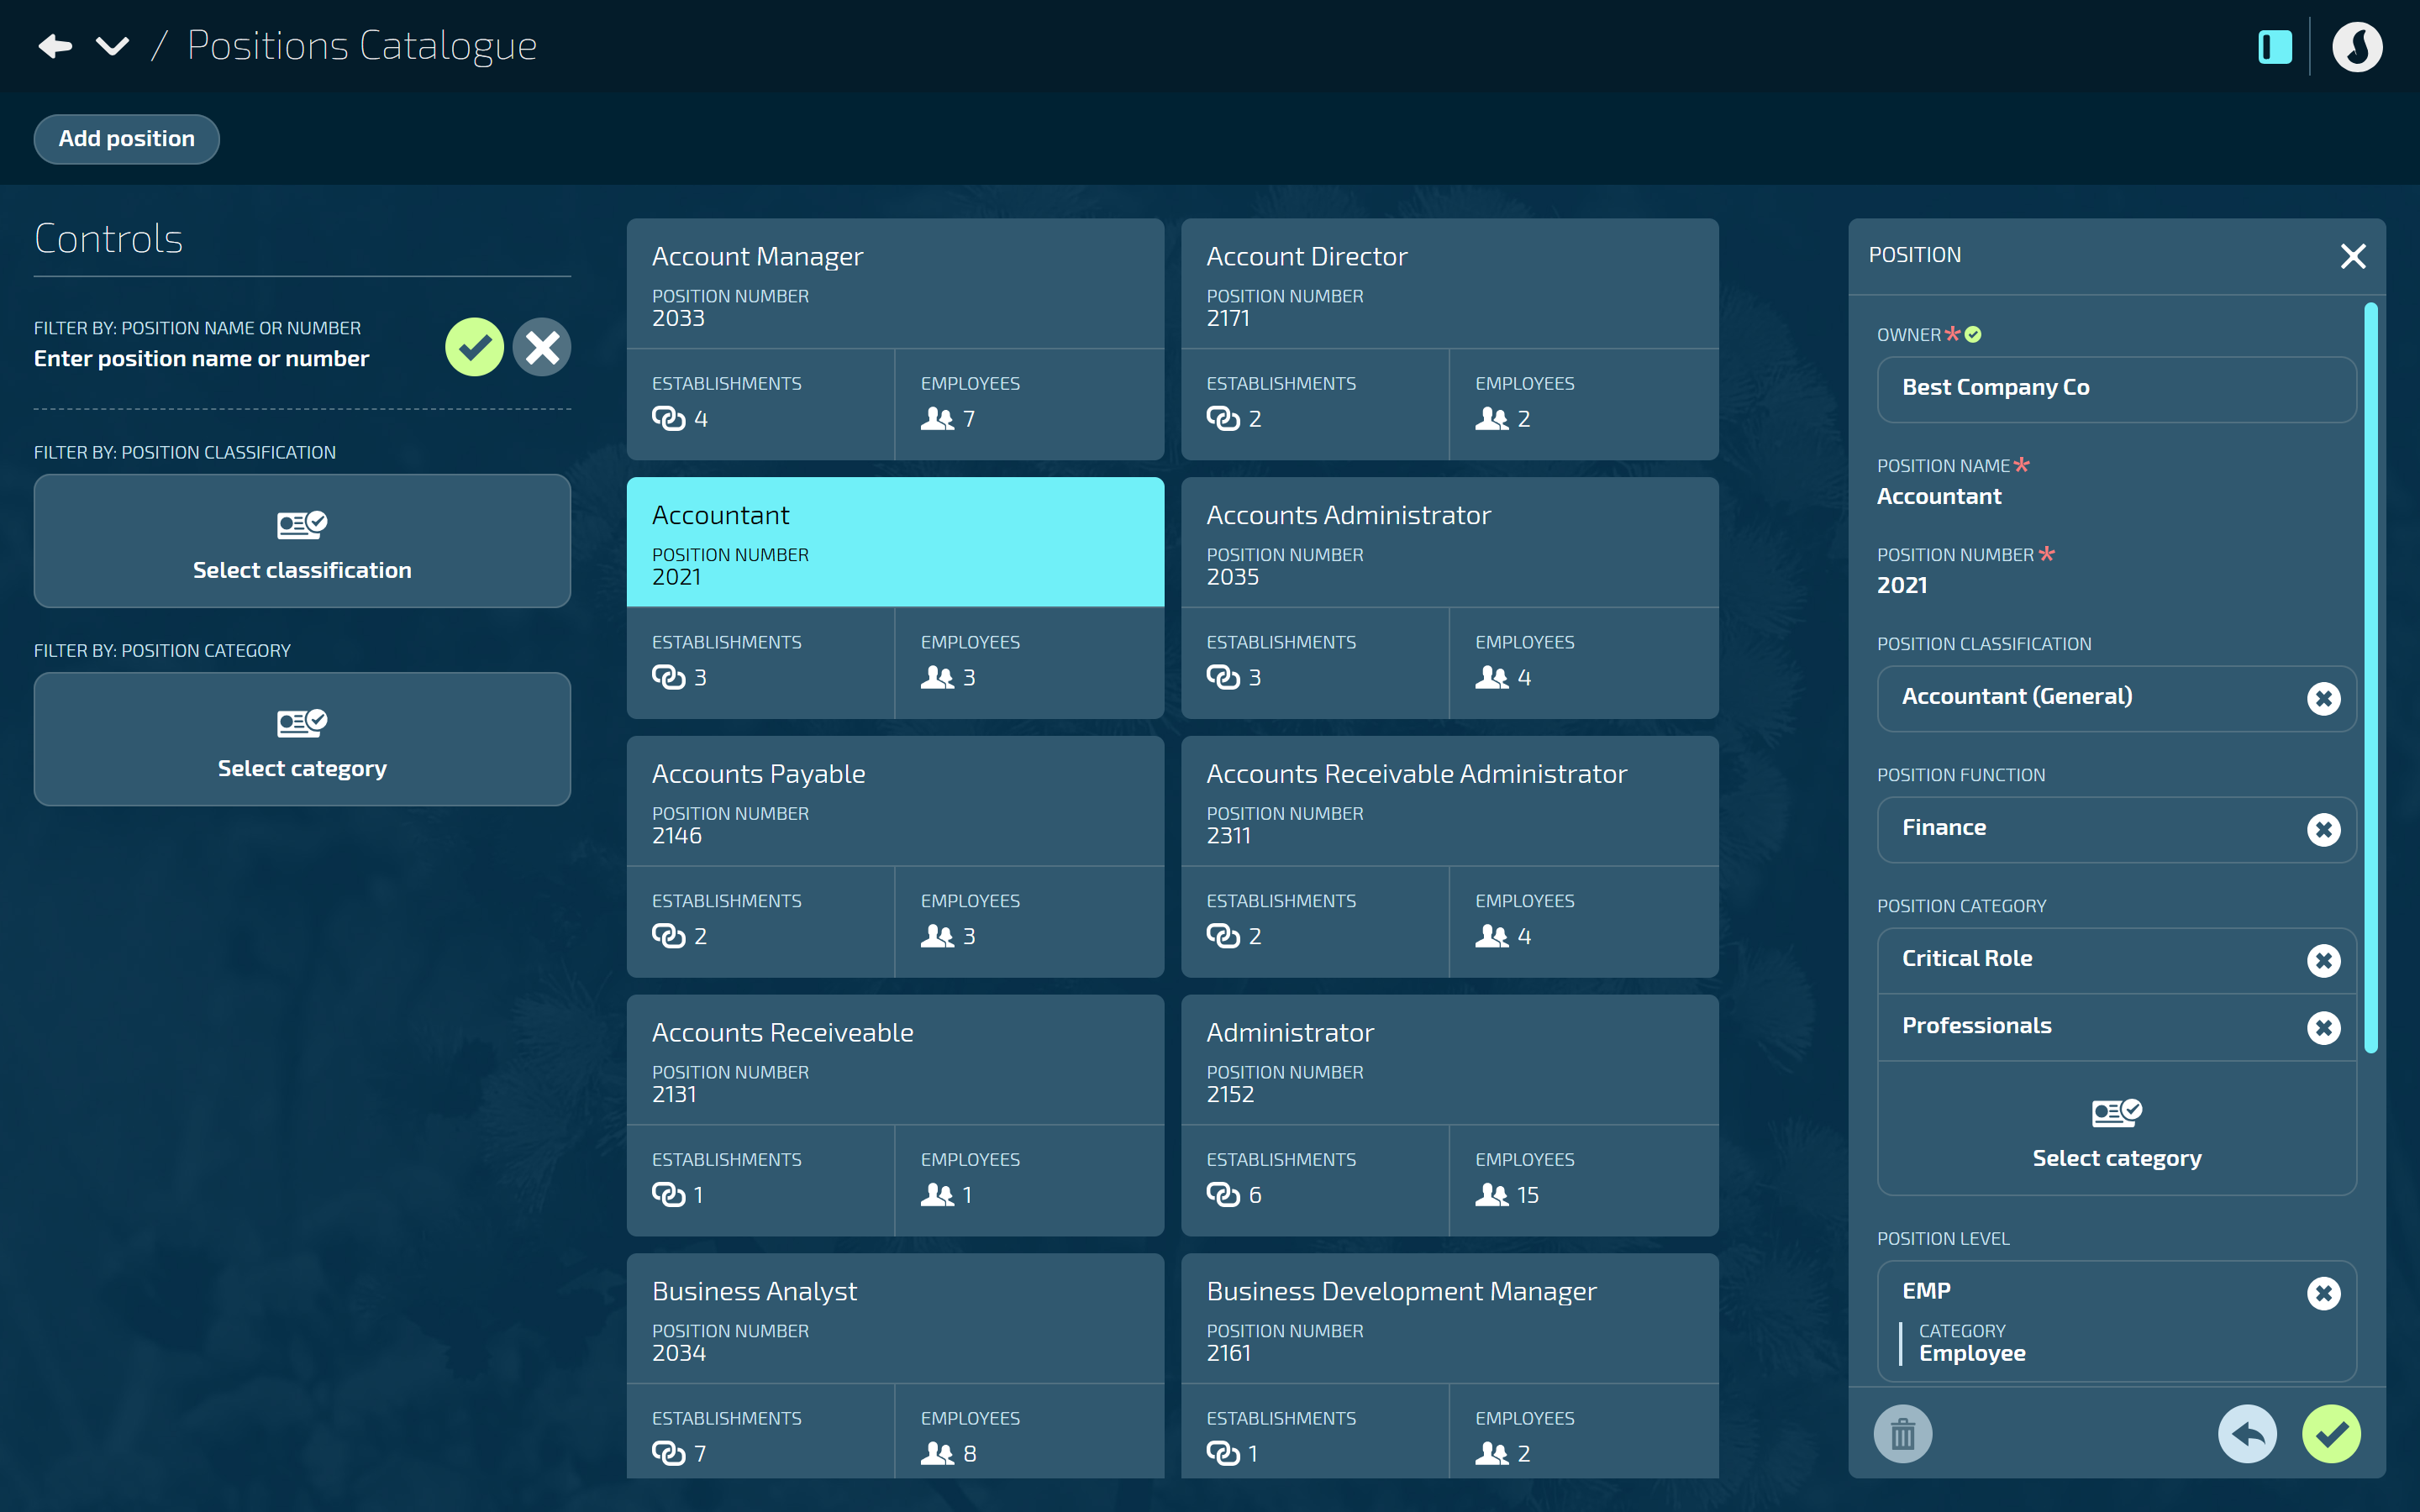
Go to BUSINESS > POSITIONS > POSITIONS CATALOGUE.
Select the position card that you want to edit. The POSITION panel will open.
Make any necessary changes to the position information. Refer to How to add a Position above for details on each section.
Select the Green Tick Button to save and close the panel.
How to delete a Position
TIP
A position can’t be deleted if it has employees connected to its position establishments. You’ll need to disconnect the employees from the position establishment, then delete the position establishment before deleting the position.
Go to BUSINESS > POSITIONS > POSITIONS CATALOGUE.
Select the position card that you want to delete. The POSITION panel will open.
Select the Delete Button.
Select Go ahead when the confirmation message appears, or select Go back if you’ve changed your mind.
TIP
Check how many employees are connected to a position by selecting the EMPLOYEES section of the position card. This will open the POSITION EMPLOYEES panel.