What you’ll find in this guide
Navigating to the Position Chart
Go to Business > Positions > Position Chart to open the application.
.png)
TIP
Navigation may vary depending on the permissions set in your security profile. For example, if you only have access to the Position Chart and not the Positions Catalogue, your navigation will become Business > Position Chart.
If a position chart hasn’t been created yet, the chart view will be empty
You’ll find the Controls on the left and the Positions list on the right, provided these have already been created in the Positions Catalogue.
.png)
Once the Position Chart is created, you'll see position establishments clearly displayed
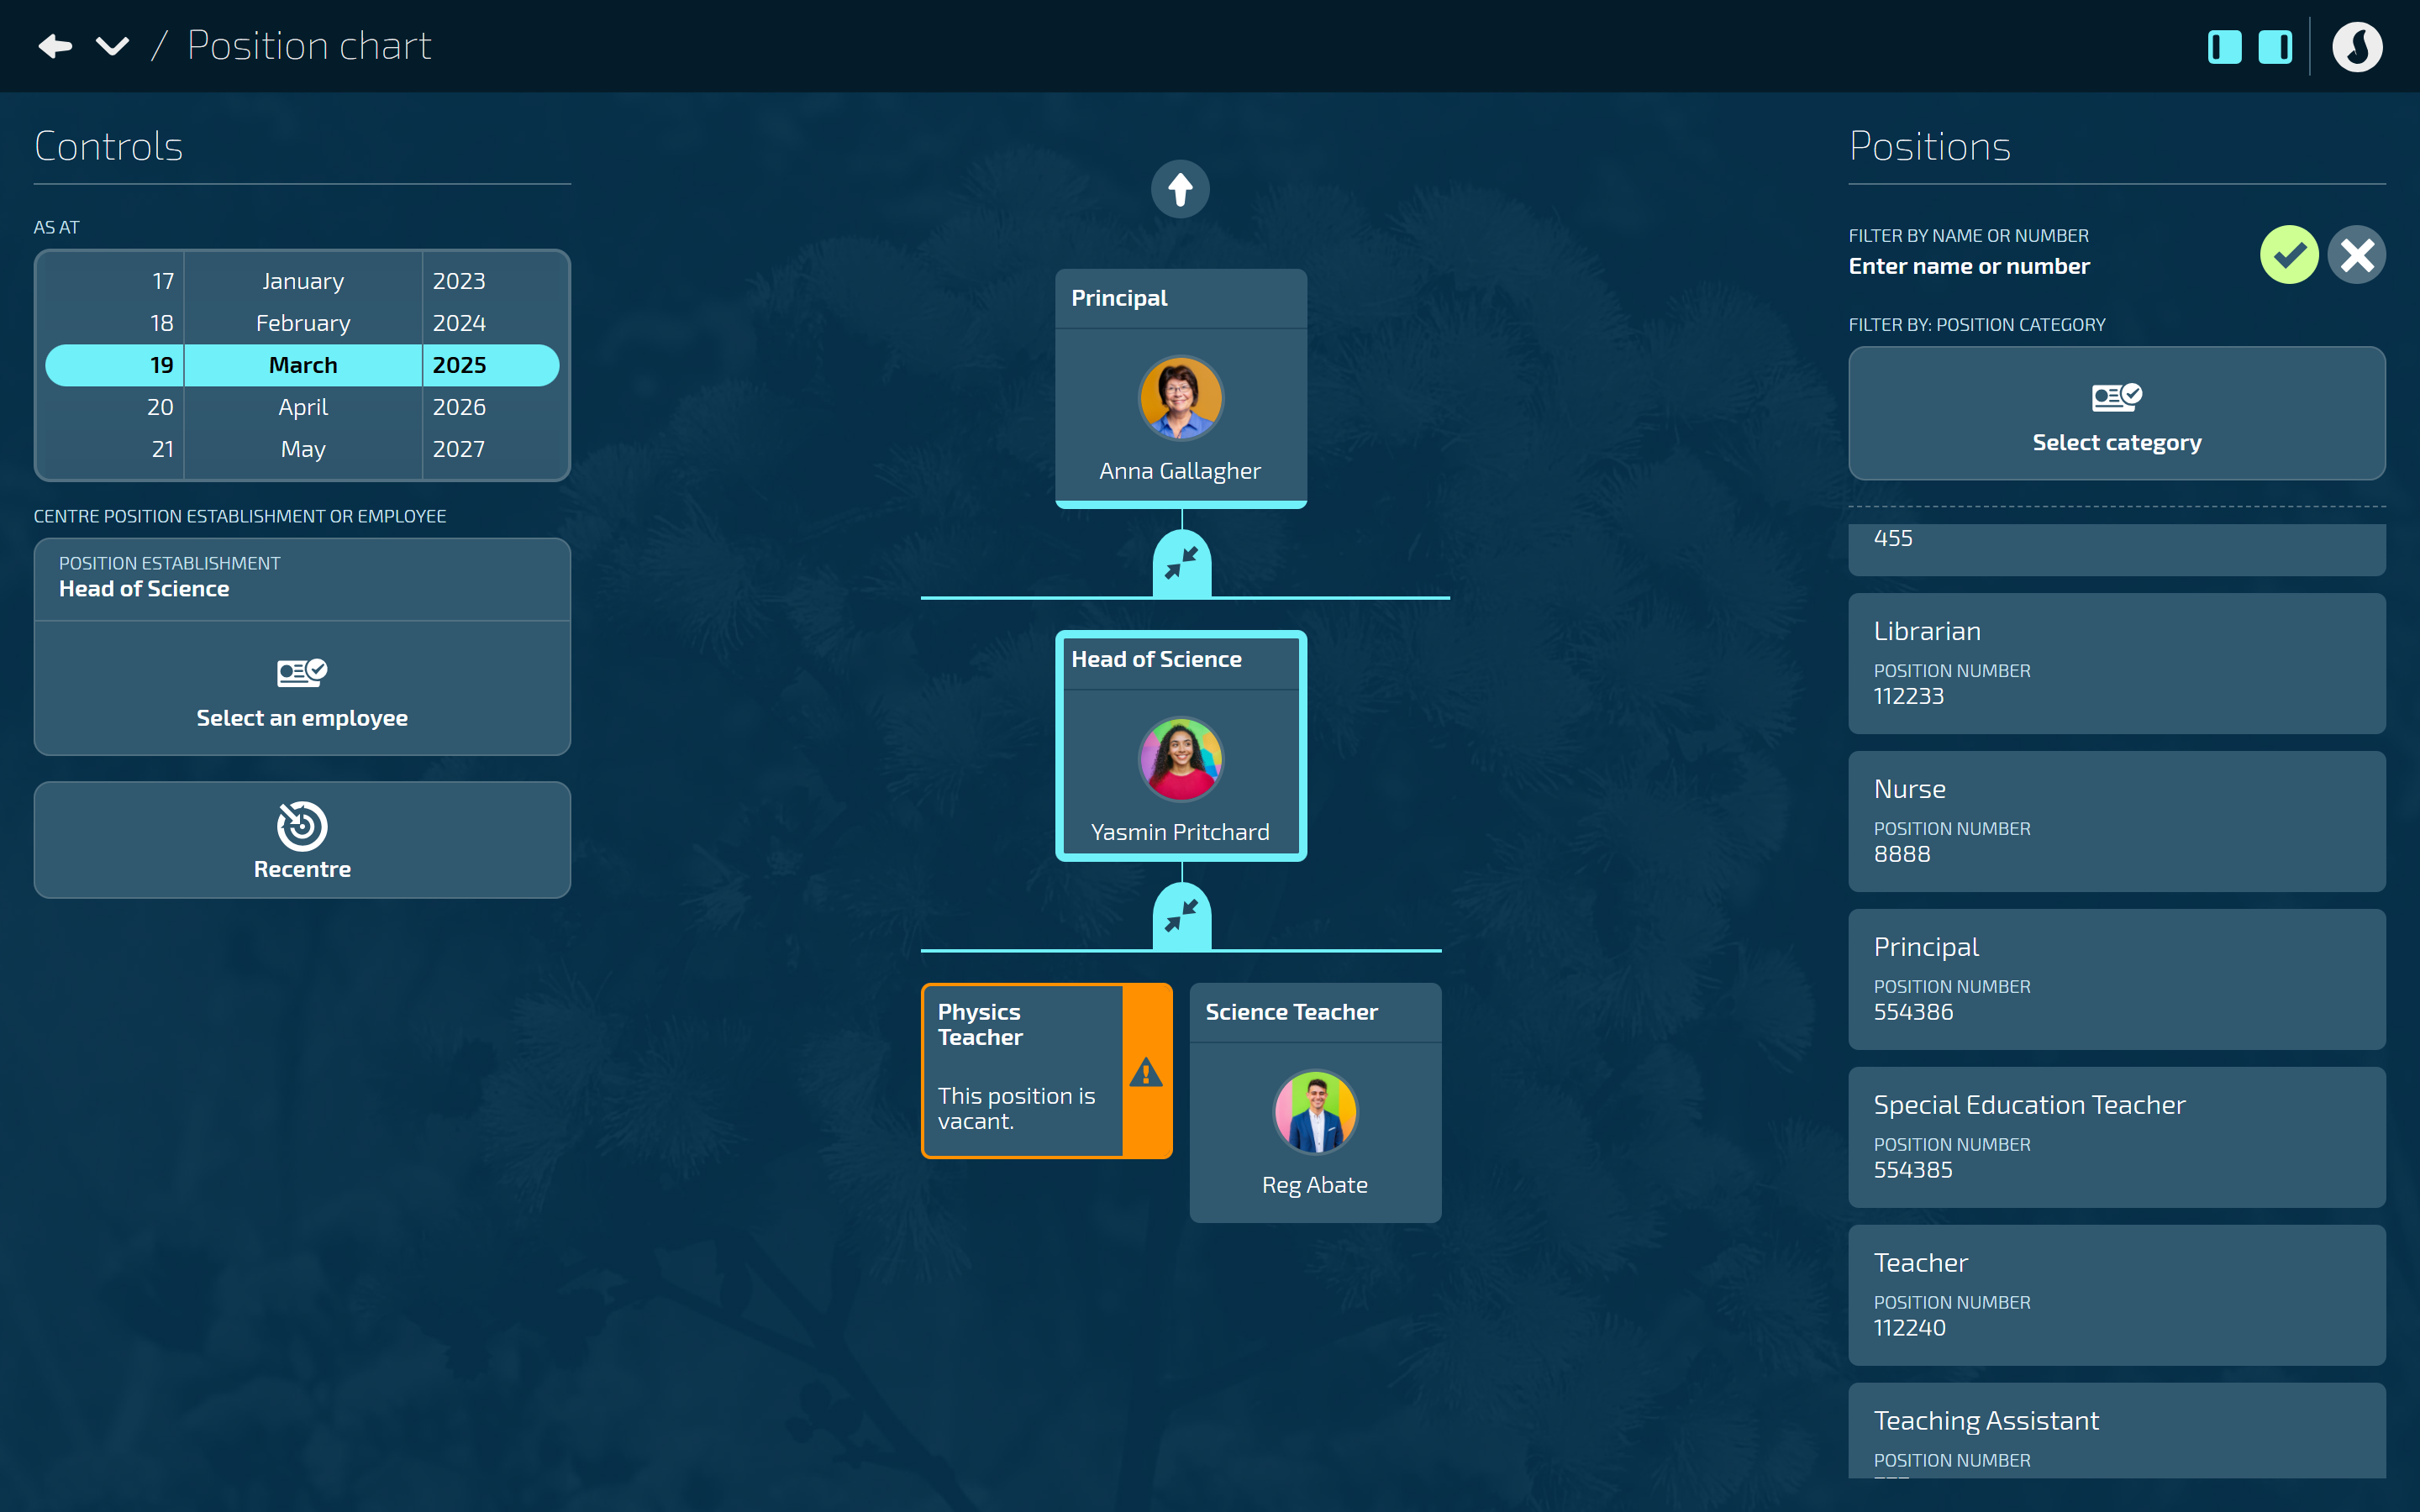
If employees occupy the position establishments, their profile picture and name will be visible. Some position might even have multiple employees occupying them. Vacant positions will be indicated in orange.
.png)
How to add a Position Establishment
TIP
Before adding positions establishments to the Position Chart, you’ll need to create positions in the Position Catalogue. To learn how, refer to How to add, edit, and delete Positions in the Positions Catalogue.
.png)
Create the head of the position chart
The first position establishment should be the leader of your organisation, such as the Chief Executive Officer (CEO). Only one position establishment can be the head of the chart.
Go to BUSINESS > POSITIONS > POSITION CHART.
Find the position card in the Positions list that will represent the head of the chart.
This list is managed in the Positions Catalogue.
Drag and drop the card into the dotted square that will appear in the middle of the screen.
The white dotted lines of the square will turn purple when the card is ready to drop:
When the card is succesfully dropped, the ADD AN ESTABLISHMENT panel will open.
.png)
Enter the position establishment’s START DATE
The start date defaults to the date set in the Controls.
Position establishments must start on or before the date when a person will start in (occupy) the position. A line manager’s position establishment must also start on or before their direct report’s start date. The order of the position establishment and occupancy start dates are important as they interact with reporting and other system functions.
(Optional) Enter the END DATE if known, otherwise leave blank.
The POSITION will be filled with the information from the position card you’ve dragged and dropped.
Enter the POSITION TITLE.
We suggest using a unique Position Title for each position establishment. If multiple establishments have the same title, it can be confusing when assigning the ‘reports to’ for direct reports and selecting the ‘position establishment’ for an employee occupancy record.
Select an ORGANISATION component from the backpack.
This gives you one layer of reporting across one level of your organisation. For example, you may choose to connect position establishments to department levels or team levels, depending on how your organisation component types are set up.
Use the Organisations structures section (next step) to build additional relationships between different layers of your organisation. This will enhance reporting capabilites, allowing you to report on any component within the structure, as well as providing special visibility of employees within the components.
Select Organisation structures to expand the ORGANISATION STRUCTURES section if required (this may or may not be optional depending on your organisation’s settings).
If one or more organisation structures exist, you can select the relevant organisation component from each structure’s backpack to connect to the position establishment.
TIP
Generally, you’ll always want to select the lowest organisation component that applies to that position establishment. This way, you can get reporting from the lowest component all the way up to the highest component in your organisation structure.
Select the Circled tick icon to close the ORGANISATION STRUCTURES section.
Select a LOCATION from the backpack.
Location can also be set as a different value on the occupancy for the employee.
Enter the FULL-TIME HOURS PER WEEK.
This is the hours that a full-time person in this role would be expected to work. An employee’s occupancy will derive this information from the position establishment they’re connected to.
The default value is set in your system settings.
Enter the APPROVED FTE (Full-Time Equivalent).
Default is 1.00.
This is the number of full-time employees that are budgeted or approved to occupy this position establishment.
If it’s a part-time position, change the number to reflect the proportion of full-time hours the position requires (for example, 0.50 for half-time).
(Optional) Enter NOTES related to the position establishment if needed.
(Optional) Add ATTACHMENTS related to the position establishment if needed.
(Optional) Add LINKS related to the position establishment if needed.
(Optional) Select Costing type to expand the COSTING TYPE section if required.
Select Add costing.
Enter the costing NAME.
Select cost code for each available costing type as needed.
If there are no available options, it means costing codes are not set up. These can be set up in PAY > COSTING.
Add more costings if required.
If you add more than one costing, a costings percentage bar will appear for each costing. You can adjust this if required.
Select the Circled tick icon to close that section.
Select the Green Tick Button to save and close the panel.
The position is established! You’ll see the position establishment has created the top level of the position chart. This position will be vacant.
.png)
Add new position establishments
If you want to create a new position establishment, you need to first preselect the target position establishment or employee, and then drag the new position card into the position chart area. Two boxes will appear to indicate that you can make the new position either a team member or a direct report of the activated position. When you’ve correctly dragged the position card into the box, the box will turn purple.
Go to BUSINESS > POSITIONS > POSITION CHART.
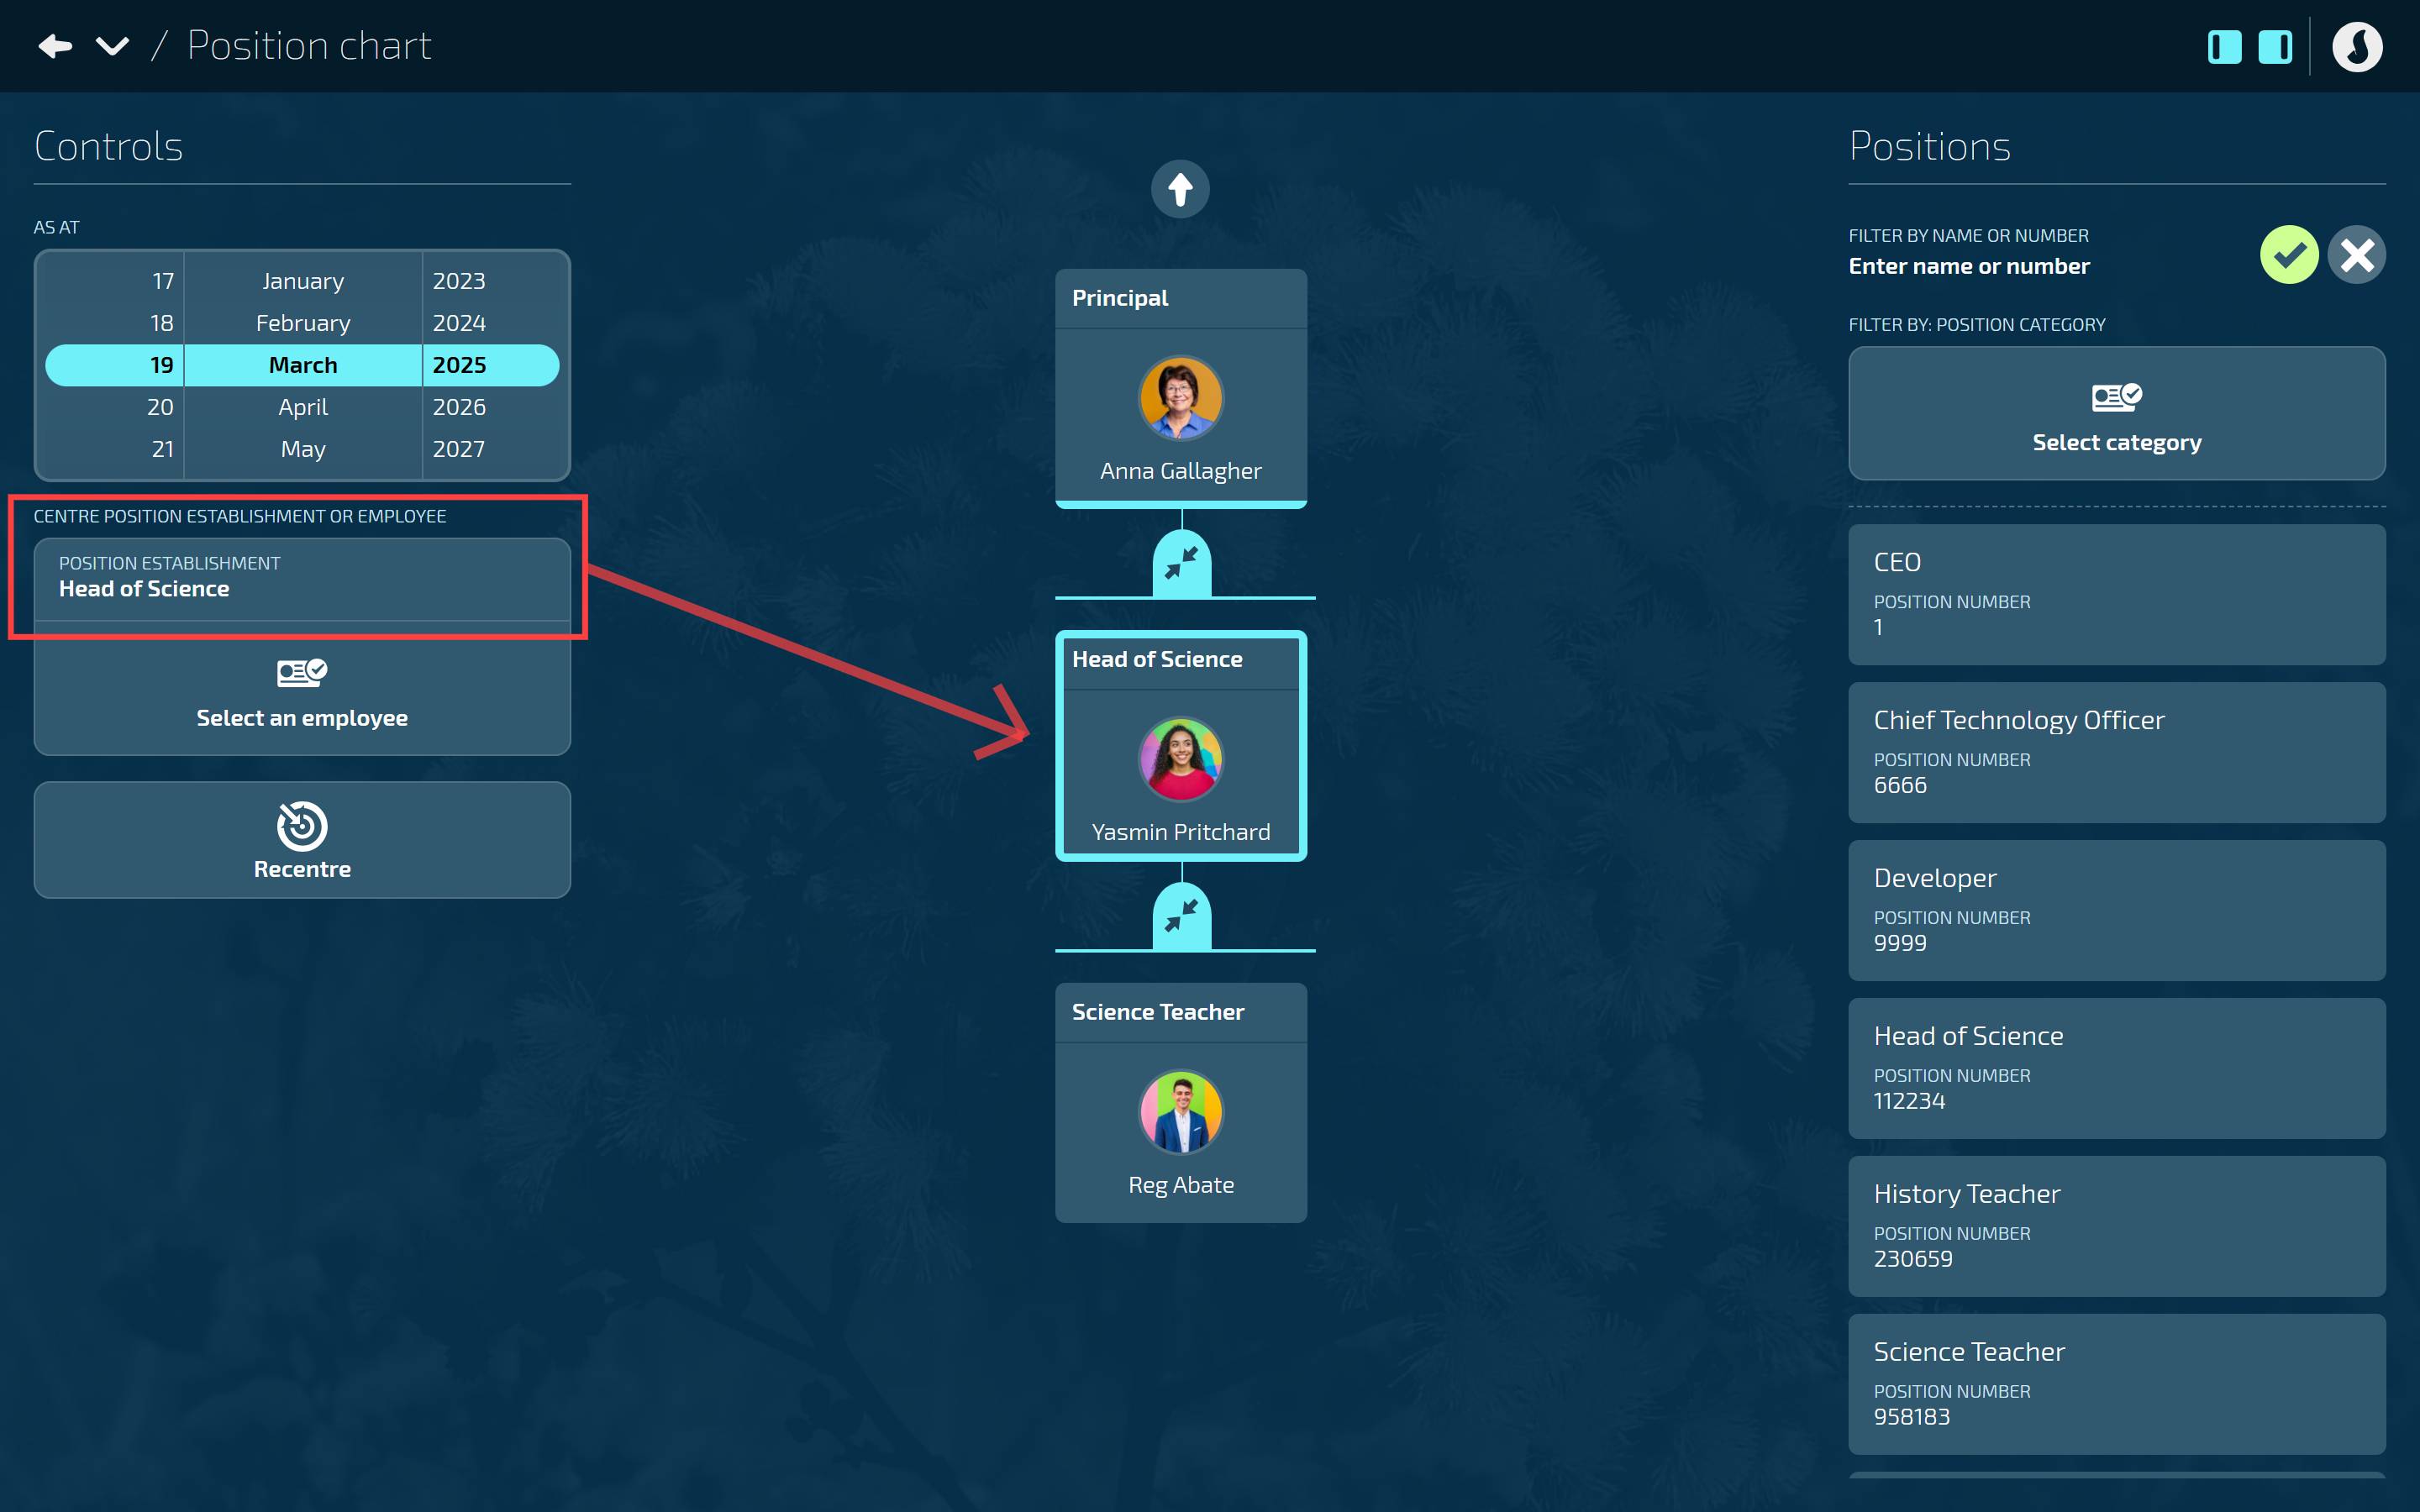
Select the position establishment or employee that the new position will be reporting to. To do this:
In Controls, under CENTRE POSITION ESTABLISHMENT OR EMPLOYEE, select the POSITION ESTABLISHMENT or EMPLOYEE from their backpack. Use the Search function to filter your results if needed.
The ‘reports to’ position establishment in the position chart should now be outlined in light blue.
Find the position card in the Positions list that you want to add as a team member or direct report to the activated position.
This list is managed in the Positions Catalogue.
Drag and drop the card into one of the dotted squares that will appear in the position chart area.
Two boxes will appear to indicate that you can make the new position either a team member or a direct report of the activated position. The white dotted lines of the square will turn purple when the card is ready to drop:
When the card is succesfully dropped, the ADD AN ESTABLISHMENT panel will open.
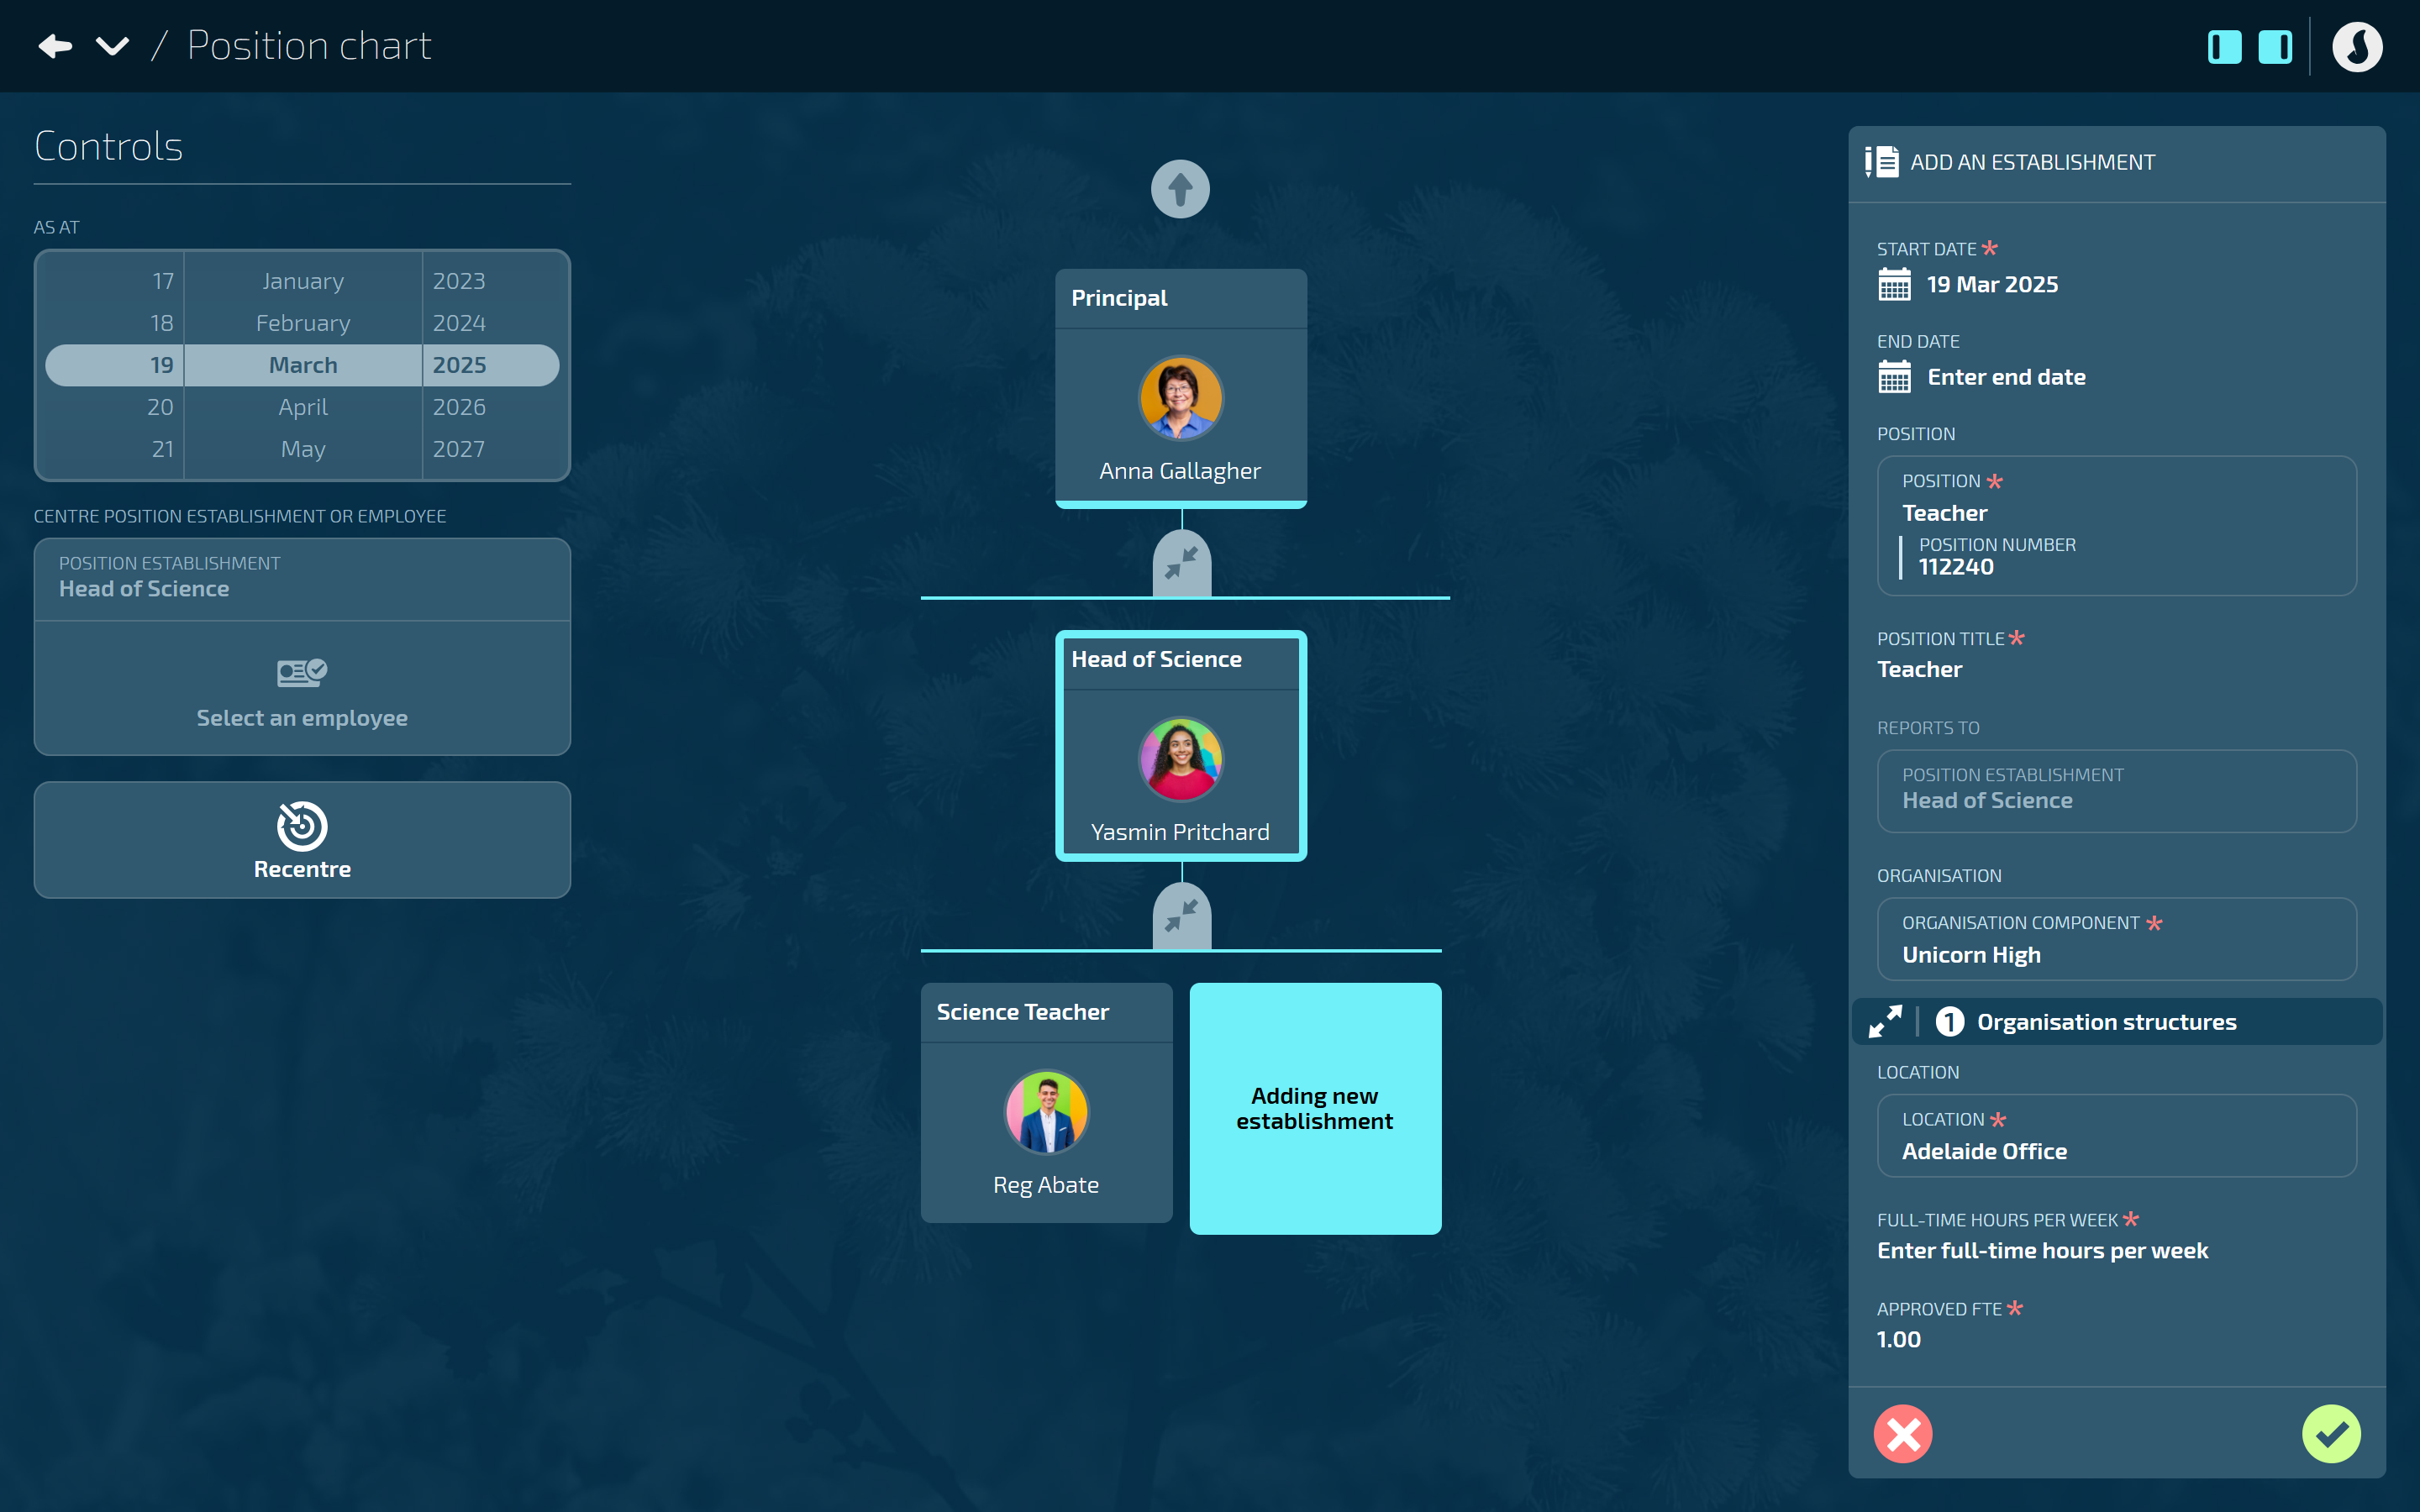
Enter the START DATE.
The start date defaults to the date set in the Controls.
Position establishments must start on or before the date when a person will start in (occupy) the position. A line manager’s position establishment must also start on or before their direct report’s start date. The order of the position establishment and occupancy start dates are important as they interact with reporting and other system functions.
(Optional) Enter the END DATE if known, otherwise leave blank.
The POSITION will be filled with the information from the position card you’ve dragged and dropped.
Enter the POSITION TITLE.
We suggest using a unique Position Title for each position establishment. If multiple establishments have the same title, it can be confusing when assigning the ‘reports to’ for direct reports and selecting the ‘position establishment’ for an employee occupancy record.
The backpack in REPORTS TO will show the position title that the new position is reporting to.
If this is a new position establishment, the backpack will be greyed out and can’t be edited.
If you’re editing the position establishment by creating a new record, open the backpack and choose a new position if you need to change the reporting line.
Select an ORGANISATION component from the backpack.
This gives you one layer of reporting across one level of your organisation. For example, you may choose to connect position establishments to department levels or team levels, depending on how your organisation component types are set up.
Use the Organisations structures section (next step) to build additional relationships between different layers of your organisation. This will enhance reporting capabilites, allowing you to report on any component within the structure, as well as providing special visibility of employees within the components.
Select the Expand Arrows Icon to open the Organisation structures section (this may or may not be optional depending on your organisation’s settings).
If one or more organisation structures exist, you can select the relevant organisation component from each structure’s backpack to connect to the position establishment.
TIP
Generally, you’ll always want to select the lowest organisation component that applies to that position establishment. This way, you can get reporting from the lowest component all the way up to the highest component in your organisation structure.
Select the Circled tick icon to close the ORGANISATION STRUCTURES section.
The new establishment will automatically use the same LOCATION as its 'reports to' position establishment.
These can be changed if they are different from the ‘reports to’ position establishment.
Location can also be set as a different value on the occupancy for the employee.
Enter the FULL-TIME HOURS PER WEEK.
This is the hours that a full-time person in this role would be expected to work. An employee’s occupancy will derive this information from the position establishment they’re connected to.
The default value is set in your system settings.
Enter the APPROVED FTE (Full-Time Equivalent).
Default is 1.00.
This is the number of full-time employees that are budgeted or approved to occupy this position establishment.
If it’s a part-time position, change the number to reflect the proportion of full-time hours the position requires (for example, 0.50 for half-time).
(Optional) Enter NOTES related to the position establishment if needed.
(Optional) Add ATTACHMENTS and LINKS related to the position establishment if needed.
We suggest adding a URL link to your document storage system to connect items like position descriptions to a position establishment.
(Optional) Select Costing type to expand the COSTING TYPE section if required.
Select Add costing.
Enter the costing NAME.
Select cost code for each available costing type as needed.
If there are no available options, it means costing codes are not set up. These can be set up in PAY > COSTING.
Add more costings if required.
If you add more than one costing, a costings percentage bar will appear for each costing. You can adjust this if required.
Select the Circled tick icon to close that section.
Select the Green Tick Button to save and close the panel.
The position is now established! You’ll see it displayed in the position chart as a vacant position. To fill it, connect the position establishment to an employee’s Occupancy record.
How to edit a Position Establishment
IMPORTANT
A current position establishment record should only be edited without creating a date stamped change, in the following scenarios:
1. If you’ve made an error when originally setting up the position establishment.
2. If you don’t want to report on changes to the position establishment.
Otherwise, create a new record by selecting Update position establishment.
Go to BUSINESS > POSITIONS > POSITION CHART.
Find the position establishment in the Position Chart. You can either:
Use the CENTRE POSITION ESTABLISHMENT OR EMPLOYEE selection function in the Controls.
Manually search for the position establishment in the chart. Use the Expand Arrows Icon to open hidden reporting lines.
Select the position establishment title to open the dated POSITION ESTABLISHMENT panel.
TIP
Make sure to select the actual position establishment title, not the employee name or anywhere else on the card.
Select Update position establishment to open the ADD POSITION ESTABLISHMENT panel.
Make any necessary changes to the position information. Refer to Adding new position establishments above for details on each section.
Select the Green Tick Button to save and close the ADD POSITION ESTABLISHMENT panel.
A new record will be created and added to the CURRENT or FUTURE section of the dated POSITION ESTABLISHMENT panel.
Select the X to close the dated POSITION ESTABLISHMENT panel.
Moving a position establishment to a new reporting line
If an employee is being transferred, promoted, or restructured, you may need to change the position establishment’s reporting line. To do this, follow the instructions for editing a position establishment above. In the REPORTS TO section, select the new manager from the POSITION ESTABLISHMENT backpack. When you save your changes, the position establishment card will have moved to the new reporting line in the Position Chart.
TIP
If an employee is connected to the position establishment, their occupancy record will automatically update to display their new manager. Please note, this will not create a new record but will update the position establishment details in the existing record.
How to delete a position establishment
IMPORTANT
A current position establishment record can only be deleted if it’s vacant and has no occupancy history. Otherwise, open the current record and set an end date instead.
Go to BUSINESS > POSITIONS > POSITION CHART.
Find the position establishment in the Position Chart. You can either:
Use the CENTRE POSITION ESTABLISHMENT OR EMPLOYEE selection function in the Controls.
Manually search for the position establishment in the chart. Use the Expand Arrows Icon to open hidden reporting lines.
Select the position establishment title to open the dated POSITION ESTABLISHMENT panel.
TIP
Make sure to select the actual position establishment title, not anywhere else on the card.
Select the Delete Button on the current record.
Select Go ahead when the confirmation message appears, or select Go back if you’ve changed your mind.
 Select this icon when you're done making changes in the panel. Your changes will be saved, and the panel will close.