Who can benefit from this guide?
Payroll staff who are responsible for managing employee pay.
An ad hoc pay cycle handles one-time payments outside the regular schedule
An ad hoc pay cycle is a special or irregular pay cycle that occurs outside of the regular or scheduled pay cycles. It's typically used to handle specific, one-time payments or adjustments, such as bonuses, back pay, or corrections, which don't align with the usual pay schedule. Ad hoc pay cycles are usually created when there's a need to process payments that don't fit the standard payroll timing.
Create an ad hoc pay cycle in the Payroll Management bubble
In Jemini, you can create an ad hoc pay cycle in the Payroll Management bubble. Instructions can be found below.
In some instances, an ad hoc pay cycle will be automatically created. This will happen when you:
Back pay an employee
If you need to back pay an employee's new pay rate and set the payment date outside of a regular pay cycle, Jemini will create an ad hoc pay that recalculates transactions affected by the pay rate changes. Learn more in Intro to Back Pay.Terminate an employee
Upon an employee's termination, Jemini will create an ad hoc pay that includes all legislatively required leave payments. Learn more in Intro to Termination.
Ad hoc pay transactions can be edited in the employee's Pay Mode and then processed in Pay Cycles, just like regular pay. To learn how to process a pay cycle, refer to Intro to Pay Cycles.
How to add an ad hoc pay cycle
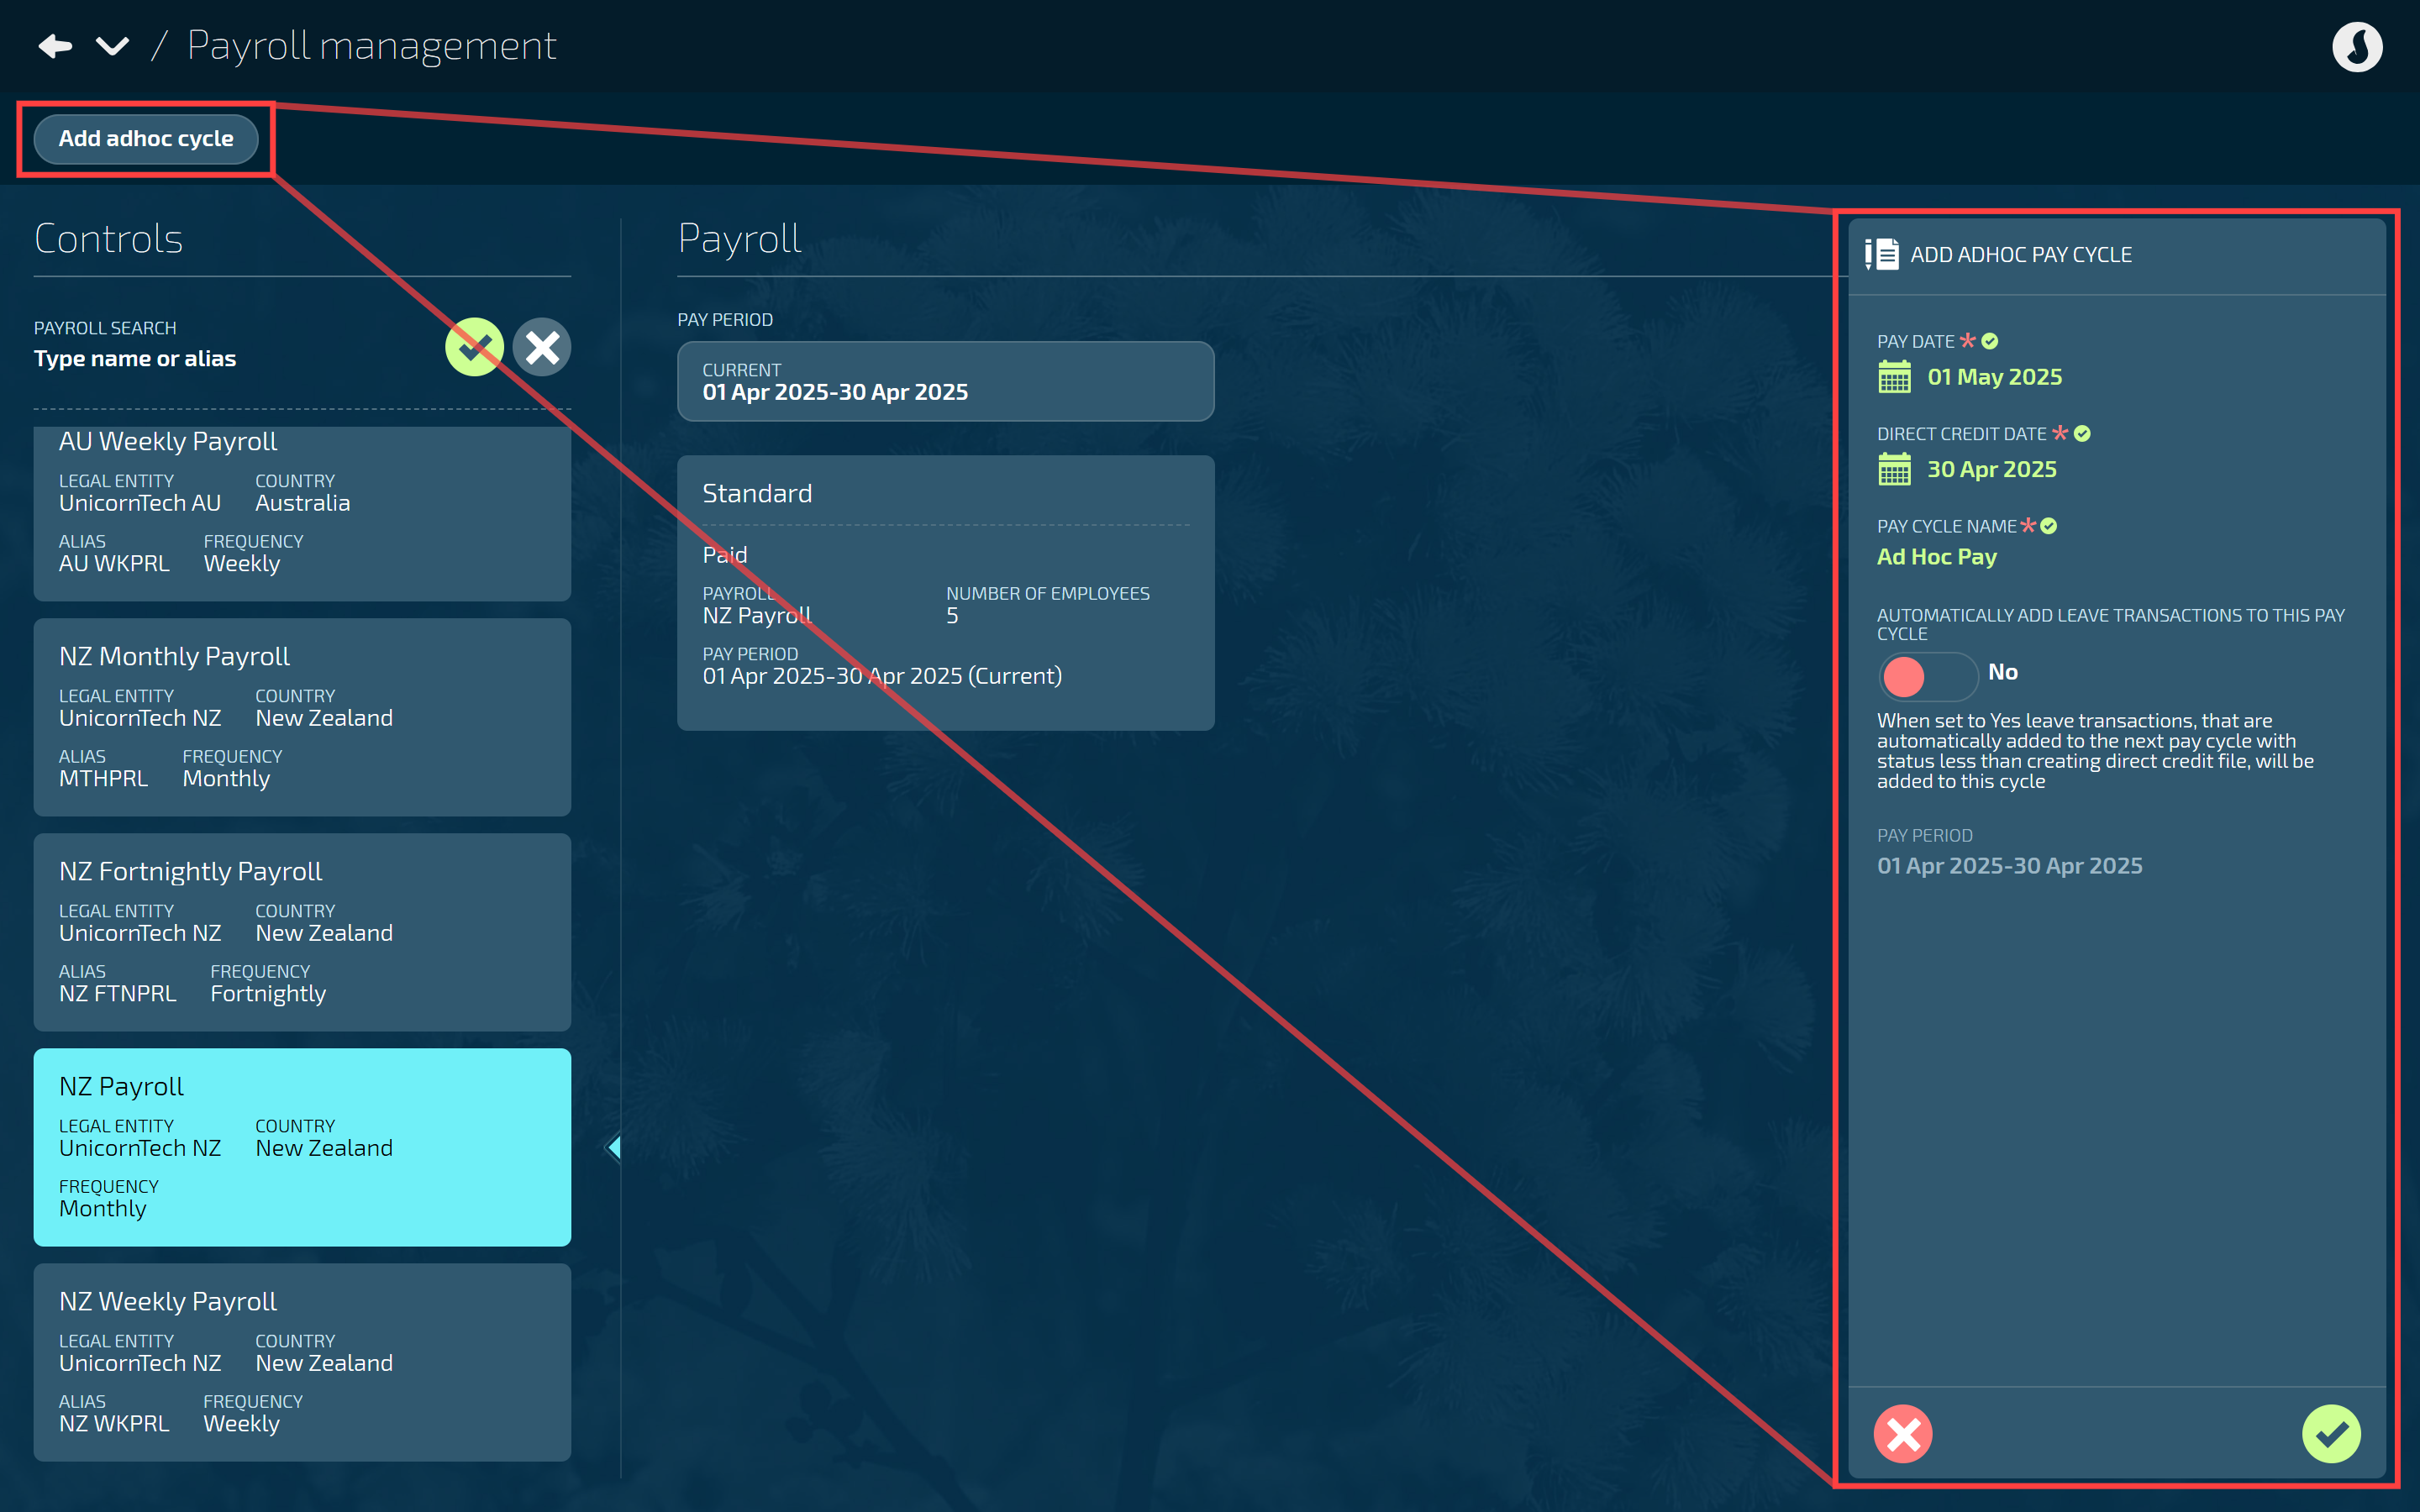
Go to PAY > PAYROLL MANAGEMENT.
Select Add adhoc cycle to open the ADD ADHOC PAY CYCLE panel.
Enter the PAY DATE.
The pay date will default to the next pay cycle pay date, so it'll need to be changed to your chosen ad hoc pay date.
Enter the DIRECT CREDIT DATE.
As with the PAY DATE, the direct credit date will default to the next pay cycle pay date, so it'll need to be changed to your chosen ad hoc direct credit date.
Enter the PAY CYCLE NAME.
Choose a name that helps you identify this pay cycle from the others.
Set AUTOMATICALLY ADD LEAVE TRANSACTIONS TO THIS PAY CYCLE to Yes or No.
When set to Yes, leave transactions that are normally automatically added to the next pay cycle* will be added to this ad hoc pay cycle instead. *If the direct credit file hasn't been created yet.
When set to No, leave transactions will be added to the next pay cycle as usual.
The PAY PERIOD is displayed for reference only and is greyed out.
This section indicates that the ad hoc pay is associated with that pay period, even if you pay it outside of those dates.
Select Green Tick Button to save and close the panel.
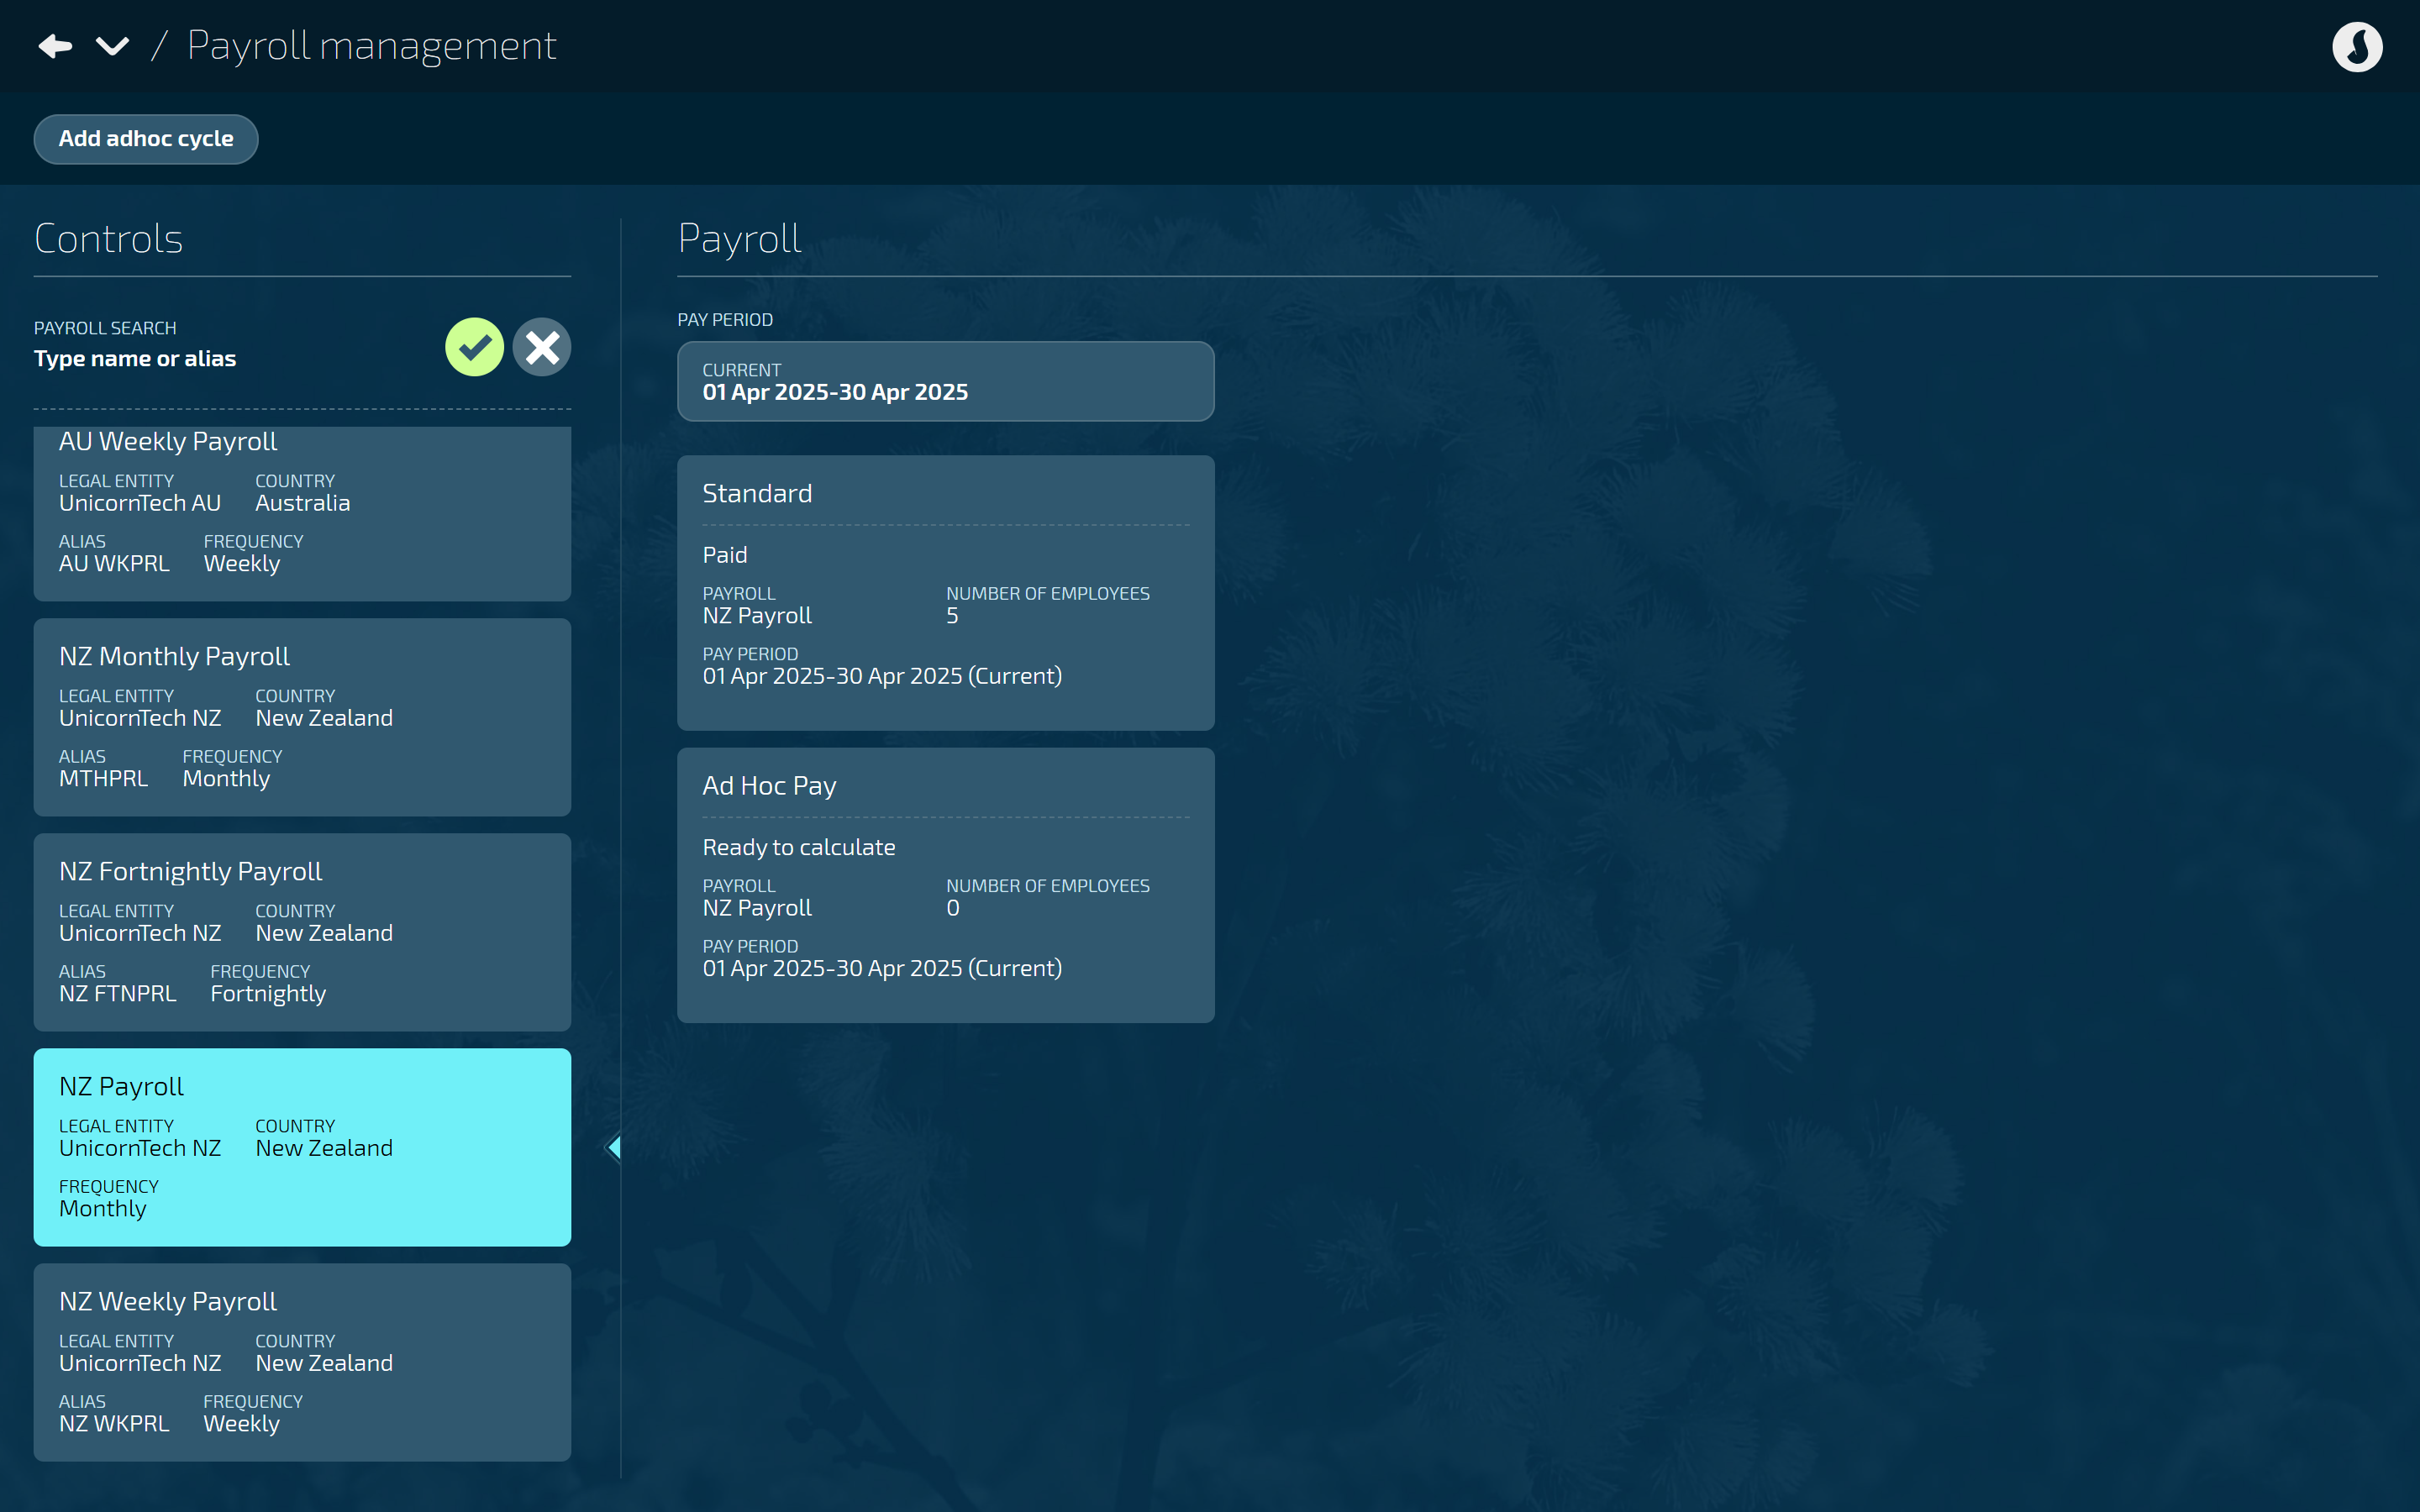
Once you save and close the ADD ADHOC PAY CYCLE panel, you'll see the new ad hoc pay cycle card below the standard pay cycle card.
What do I do once the ad hoc pay cycle is created?
When Jemini automatically creates an ad hoc pay cycle or when you create one manually, it can be accessed in an employee's pay mode in the pay period that it relates to.
Open the employee's Pay Mode:
Go to PEOPLE > EMPLOYEES.
Select the employee you need to edit.
Go to ACTION > PAY MODE. The PAY MODE panel will open.
Under Controls, select the relevant PAY PERIOD from the drop-down list.
The pay period you choose needs to be the one that has the ad hoc pay cycle associated with it.
The standard pay cycle card and ad hoc pay cycle card will be visible under PAY CYCLES in the Controls once you select the PAY PERIOD.
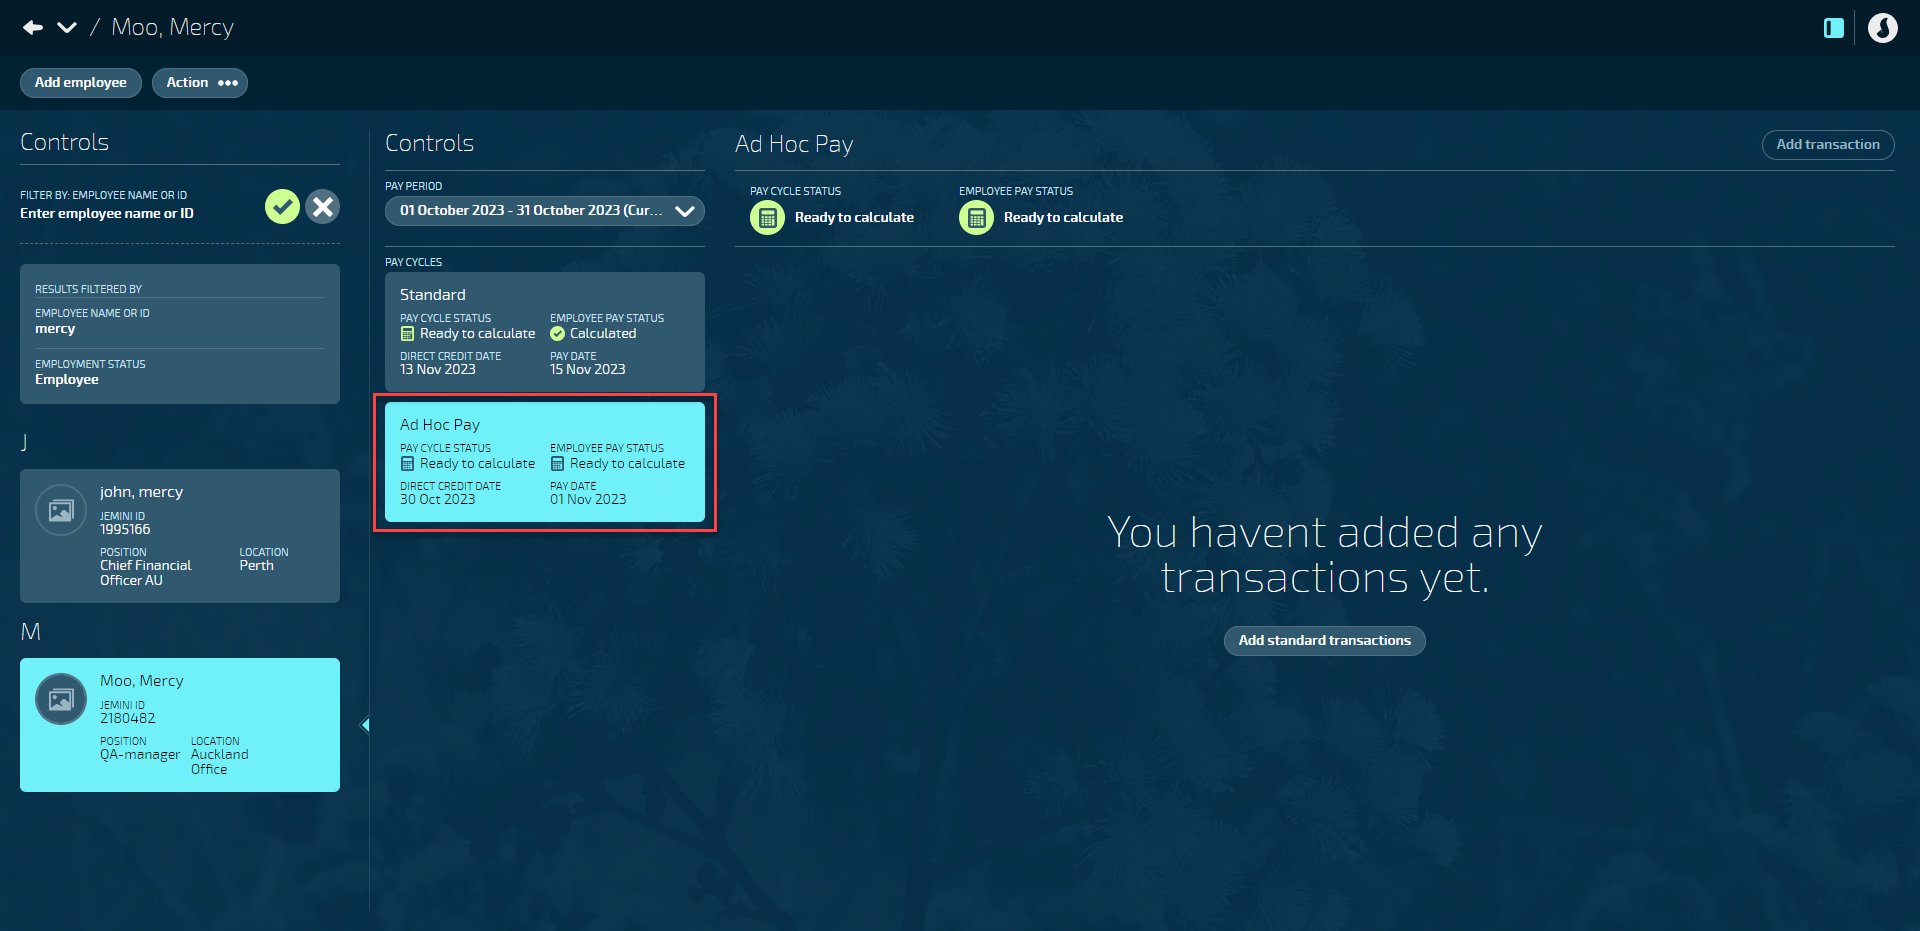
From Pay Mode, you can:
Move an employee's entire standard pay within the pay period by dragging and dropping it into the ad hoc pay.
This action is useful if you have a problem with that employee's pay and you need more time to fix it because you're not going to make the regular pay date.
NOTE: You can only transfer employee pay from pay cycles that are not beyond the 'Creating Direct Credit File' stage.
Add transactions to the ad hoc pay if you need to give the employee additional compensation beyond their standard pay.
This action is useful if you can't add the extra transaction to the standard pay. For example, the employee might have already been paid their standard pay or you can't wait for the next pay period.
See below to learn how to add a transaction to an ad hoc pay.
How to add a transaction to an ad hoc pay
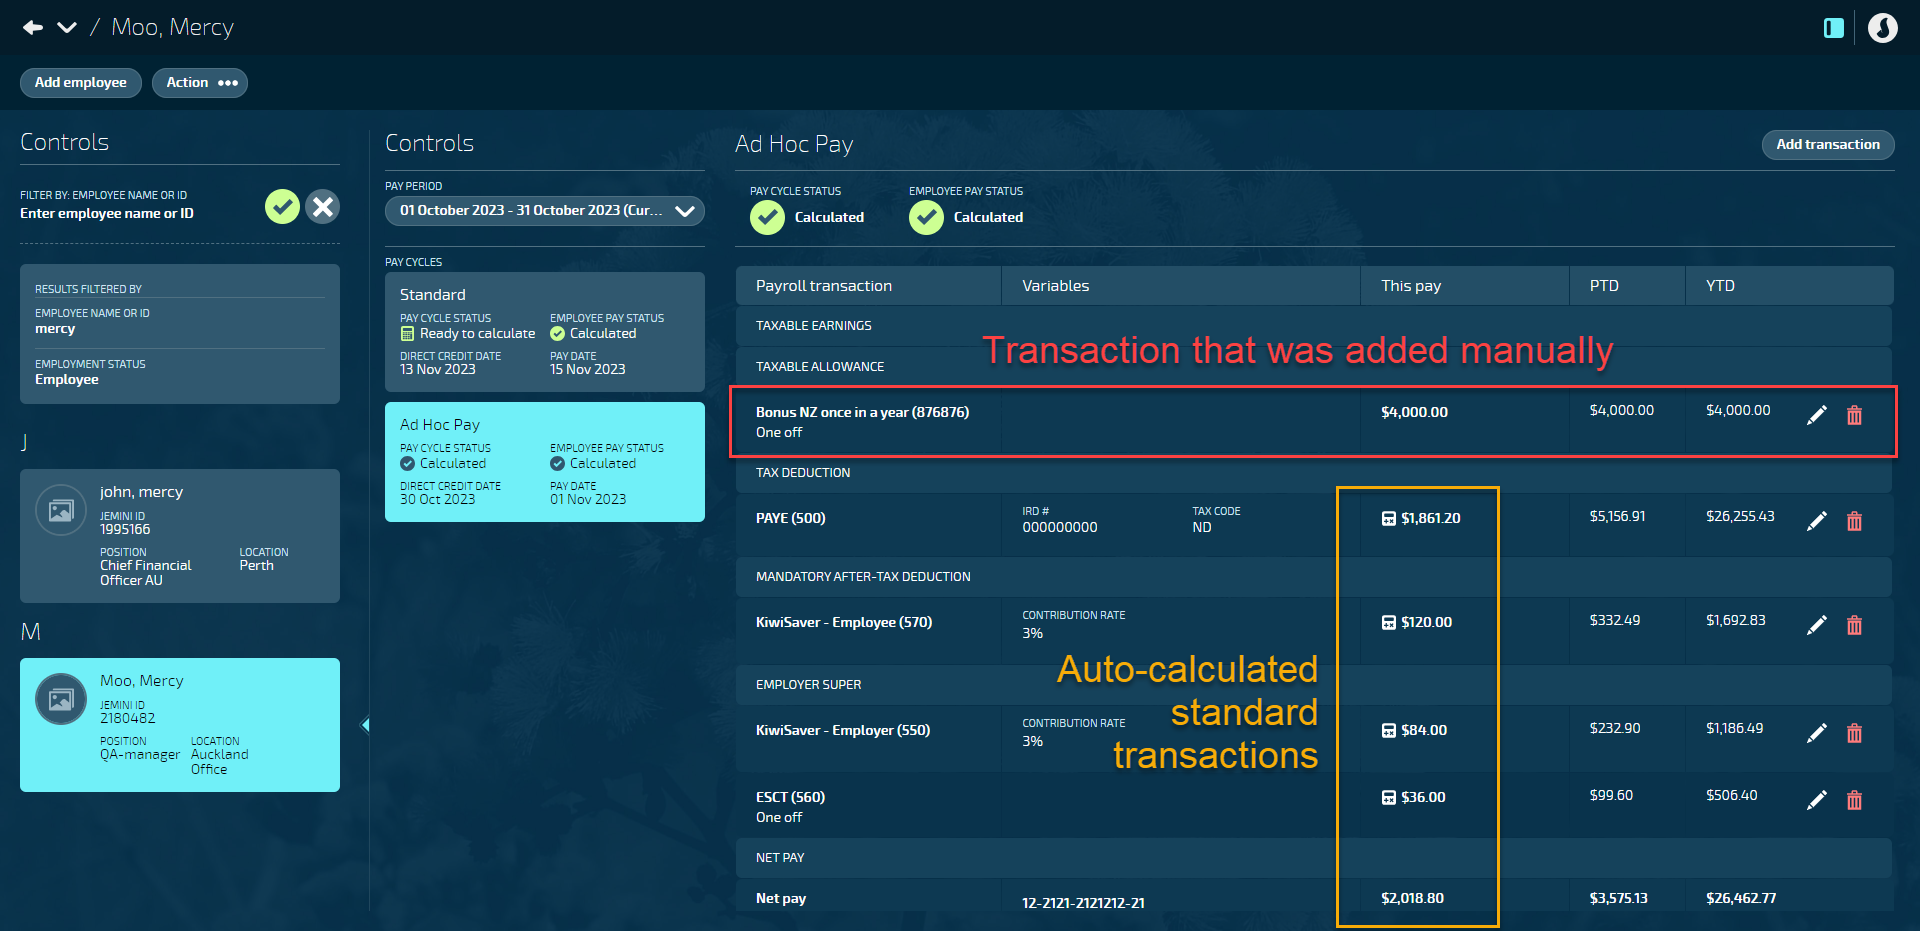
Before you add additional transactions to an ad hoc pay, you'll need to add the standard transactions which include Net Pay, Tax, and KiwiSaver (NZ only). When you add a new transaction, the standard transactions will auto-calculate.
Open the employee's Pay Mode:
Go to PEOPLE > EMPLOYEES.
Select the employee you need to edit.
Go to ACTION > PAY MODE. The PAY MODE panel will open.
Under Controls, make sure the correct PAY PERIOD is selected (the current pay period will be selected by default).
Select the ad hoc pay cycle card under PAY CYCLES.
Select Add standard transactions.
Selecting this will add the Net Pay, Tax, and KiwiSaver (NZ only) transactions. The amounts in the 'This pay' column will be set to $0.00.
When you add a new transaction (see next steps), the system will populate the 'This pay' column with the correct amounts using the transaction's calculation rules.
TIP
If you need to delete the new transaction, you'll need to delete all the standard transactions too.
Select Add Transaction to open the PAYROLL TRANSACTIONS panel.
Choose a payroll transaction from the list (use the search or filter options to narrow down the list).
Once you've chosen a payroll transaction, the PAYROLL TRANSACTIONS panel will close and the ADD PAYROLL TRANSACTION panel will be visible.
If you need to change the payroll transaction, select the transaction to reopen the PAYROLL TRANSACTIONS panel.
Complete the rest of the panel as required, such as whether the transaction is ongoing or not, the start and end date, costing type, and any other settings available.
TIP
Each transaction will have different settings available in the panel, depending on the transaction type associated with it.
You can learn more about adding, editing, and deleting transactions in Intro to Pay Mode.
Alternatively, reach out to our support team if you need help: raise an iHelp through Infusion.Select the Green Tick Button to save and close the panel.
The new transaction will be added to the ad hoc pay and the standard transaction amounts will be calculated automatically.
Processing an ad hoc pay cycle
Once you've added the transactions to the pay mode as required, the ad hoc pay cycle can be processed. To learn how, go to Intro to Pay Cycles.
