Navigation: Pay | Payroll Setup
System administration permissions
Click or tap here to view permission settings
For a user to successfully set up a payroll in Jemini, they may need access granted for:
Pay related permissions in the Employees application:
Employee Pay Transactions
Employee Payslip Download
Pay Rates
Super Fund
Tax Details
TFN Declaration
At least these two permissions in Payroll:
Payroll Configuration
Payroll Processing
Permissions can be set in System | Security Profiles.
Please reach out to our support team for assistance: raise an iHelp through Infusion.
What's Payroll Setup?
Payroll Setup is a crucial component in managing employee pay. It provides an overview of all the different payrolls created for your organisation and allows you to set up new payrolls for different entities. You can choose from various payroll frequencies: weekly, fortnightly, monthly, and quarterly.
Payrolls need pay periods
Once you’ve done the first step of adding a payroll and set the frequency (like weekly or monthly), you’ll need configure the pay period settings. Jemini can then automatically figure out and fill in future pay periods based on the frequency you choose, the pay date, and the end date of each pay period. These pay periods also determine when direct credit files are released and when payment is made to the employees.
.png)
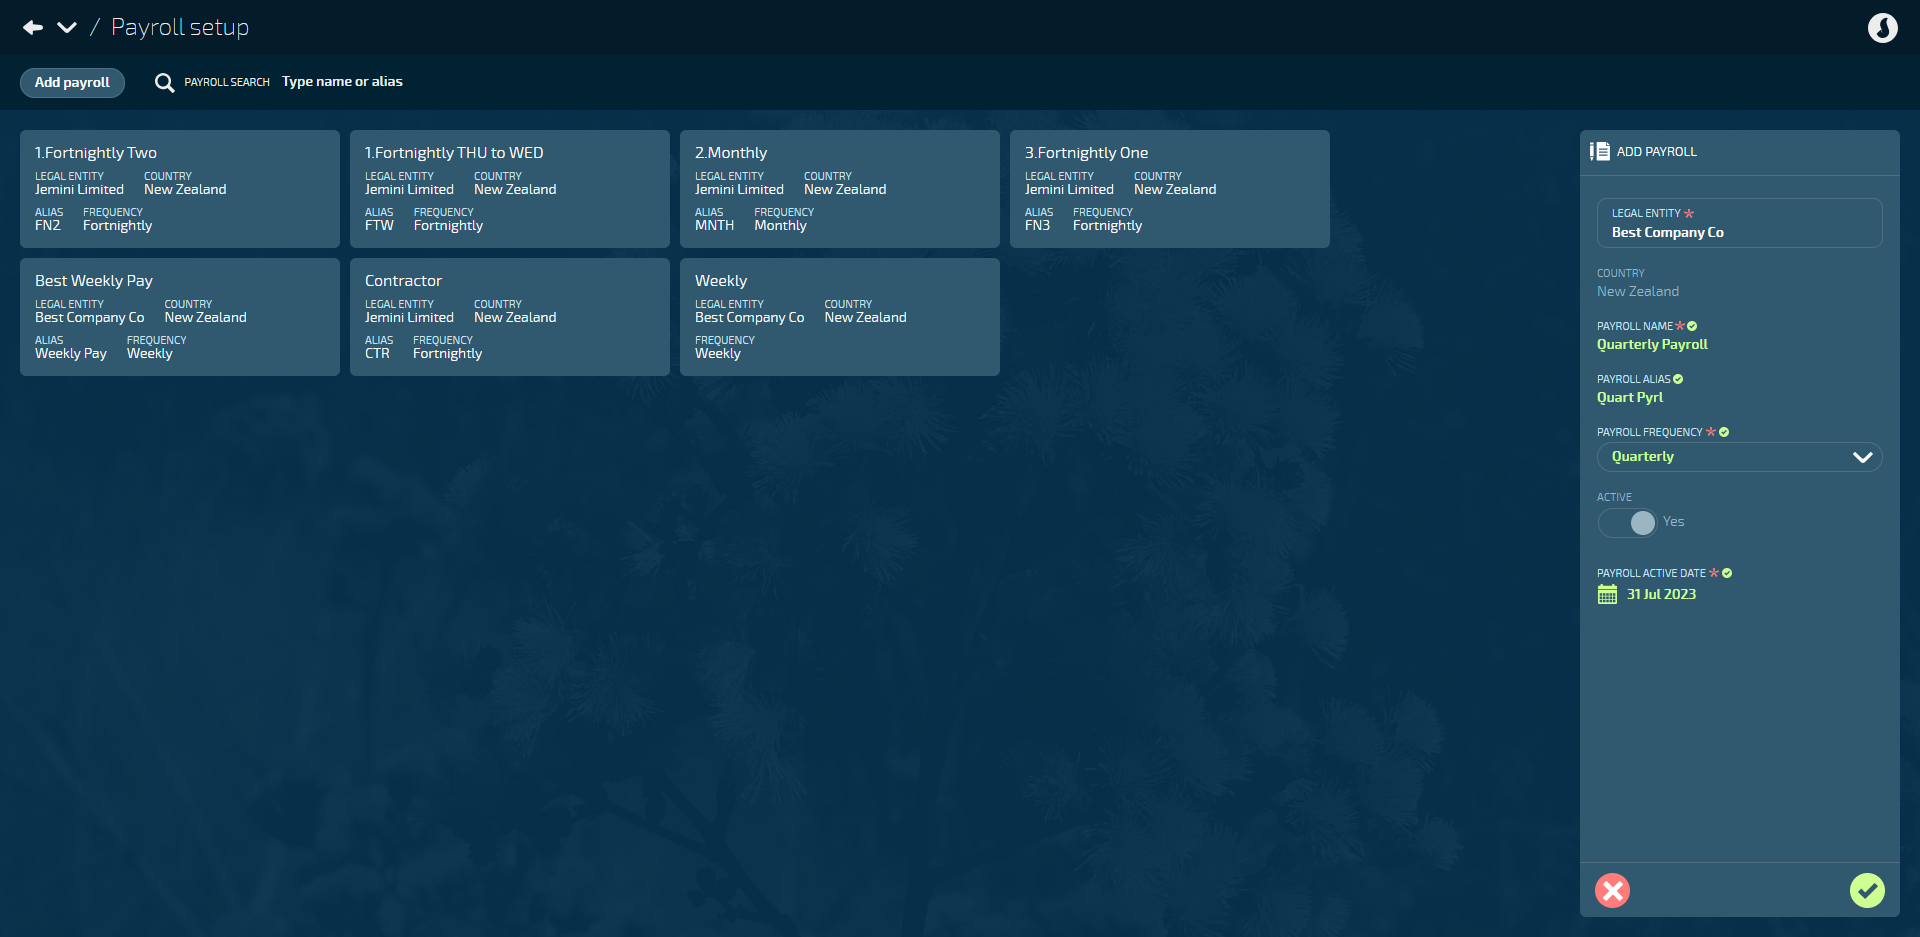
How to add a payroll
Go to PAY > PAYROLL SETUP.
Select Add payroll to open the ADD PAYROLL panel.
Select a legal entity to open the LEGAL ENTITIES backpack and select an entity from the list.
COUNTRY will be automatically set based on the legal entity settings.
Enter the PAYROLL NAME.
Enter the PAYROLL ALIAS if required. The payroll alias will be visible on the employee's first pay period when you first view it in their Pay Mode to help you easily identify it.
Select the PAYROLL FREQUENCY (Quarterly, Monthly, Fortnightly, Weekly).
Set ACTIVE to Yes or No. If this setting is greyed out, it means at least one employee has been linked to the payroll, so you can't deactivate it.
Set EMPLOYEES GET PAID THROUGH THIS PAYROLL to Yes or No.
If set to Yes, employees attached to the payroll will be paid through Jemini.
If set to No, the PAYROLL ACTIVE DATE in the next step will be removed. Employees attached to the payroll won't be paid through Jemini.
Enter the PAYROLL ACTIVE DATE. The payroll active date defines the date when the payroll will appear in Pay Cycle and becomes available for processing payments. Before that date, you can import year-to-date transactions, such as earnings in the last 52 weeks, for calculations before you start using Jemini for employee payments.
Set IS THIS PAYROLL PROCESSED BY AN INTERMEDIARY? to Yes or No.
This step is only available for Australian payrolls.
If set to Yes, you’ll then need to select an intermediary entity from the LEGAL ENTITIES backpack.
If set to No, the LEGAL ENTITIES backpack will remain hidden and you can move to the next step.
Select Green Tick Button to save and close the panel.
Once you add a payroll, Jemini will prompt you to add pay periods and display a warning on the card.
If pay periods haven't been added to a payroll, there will be a warning on the card to say the payroll is nonfunctional.
How to add pay periods
Pay periods let you determine when to pay employees. The settings are slightly different depending on the chosen pay frequency in the payroll:
How to add pay periods with Quarterly pay frequency
Go to PAY > PAYROLL SETUP.
Select the payroll card you need to add pay periods to.
TIP
The card will already be selected if you've just finished adding a new payroll.
Select Add pay periods to open the ADD PAY PERIODS panel. Alternatively, select Add, then select Add pay periods.
TIP
If pay periods have already been added to a payroll, the Add pay periods option will be greyed out. This is because only one set of pay periods can be added to a payroll. If you want to make changes, you'll need to edit the current pay periods or create a new payroll.
Enter the FIRST PAY PERIOD END DATE. For example, if your pay period is set to start at the beginning of the month and the frequency is monthly, the first pay period end date will be at the end of that month.
Set the PAY DATE OFFSET conditions. The pay date is the date your company pays your employees.
Set IS THE PAY DATE THE LAST DAY OF THE QUARTER? to Yes or No. (If Yes, jump ahead to DIRECT CREDIT DATE OFFSET step).
Enter THE PAY DATE WILL BE DAY ... of each month where the quarter ends. For example, if you want to pay your employees on the 15th of each month where the quarter ends, enter 15 into this field.
Set IS THE PAY DATE AFTER THE PAY PERIOD END DATE? to Yes or No.
If Yes, the employees will be paid on the pay date in the month that comes after the period end date.
If No, the employees will be paid on the pay date in the month that comes before the period end date.
Set the DIRECT CREDIT DATE OFFSET conditions. The direct credit date is when the direct credit file is to be released for clearance and disbursement.
Enter NUMBER OF WORKING DAYS BEFORE PAY DATE that the direct credit file will be released. This setting defaults to '1'. However, due to same day banking in New Zealand, it can be set to '0' if required so that the Direct Credit and Pay Date are the same.
Select Green Tick Button to save and close panel.
TIP
Once you select Submit, the system will validate all the pay period dates. If a pay date or direct credit date falls on a Saturday or Sunday, the system will automatically adjust the dates to the previous Thursday.
NOTE: If a pay date or direct credit date falls on a public holiday, you must manually adjust those dates.
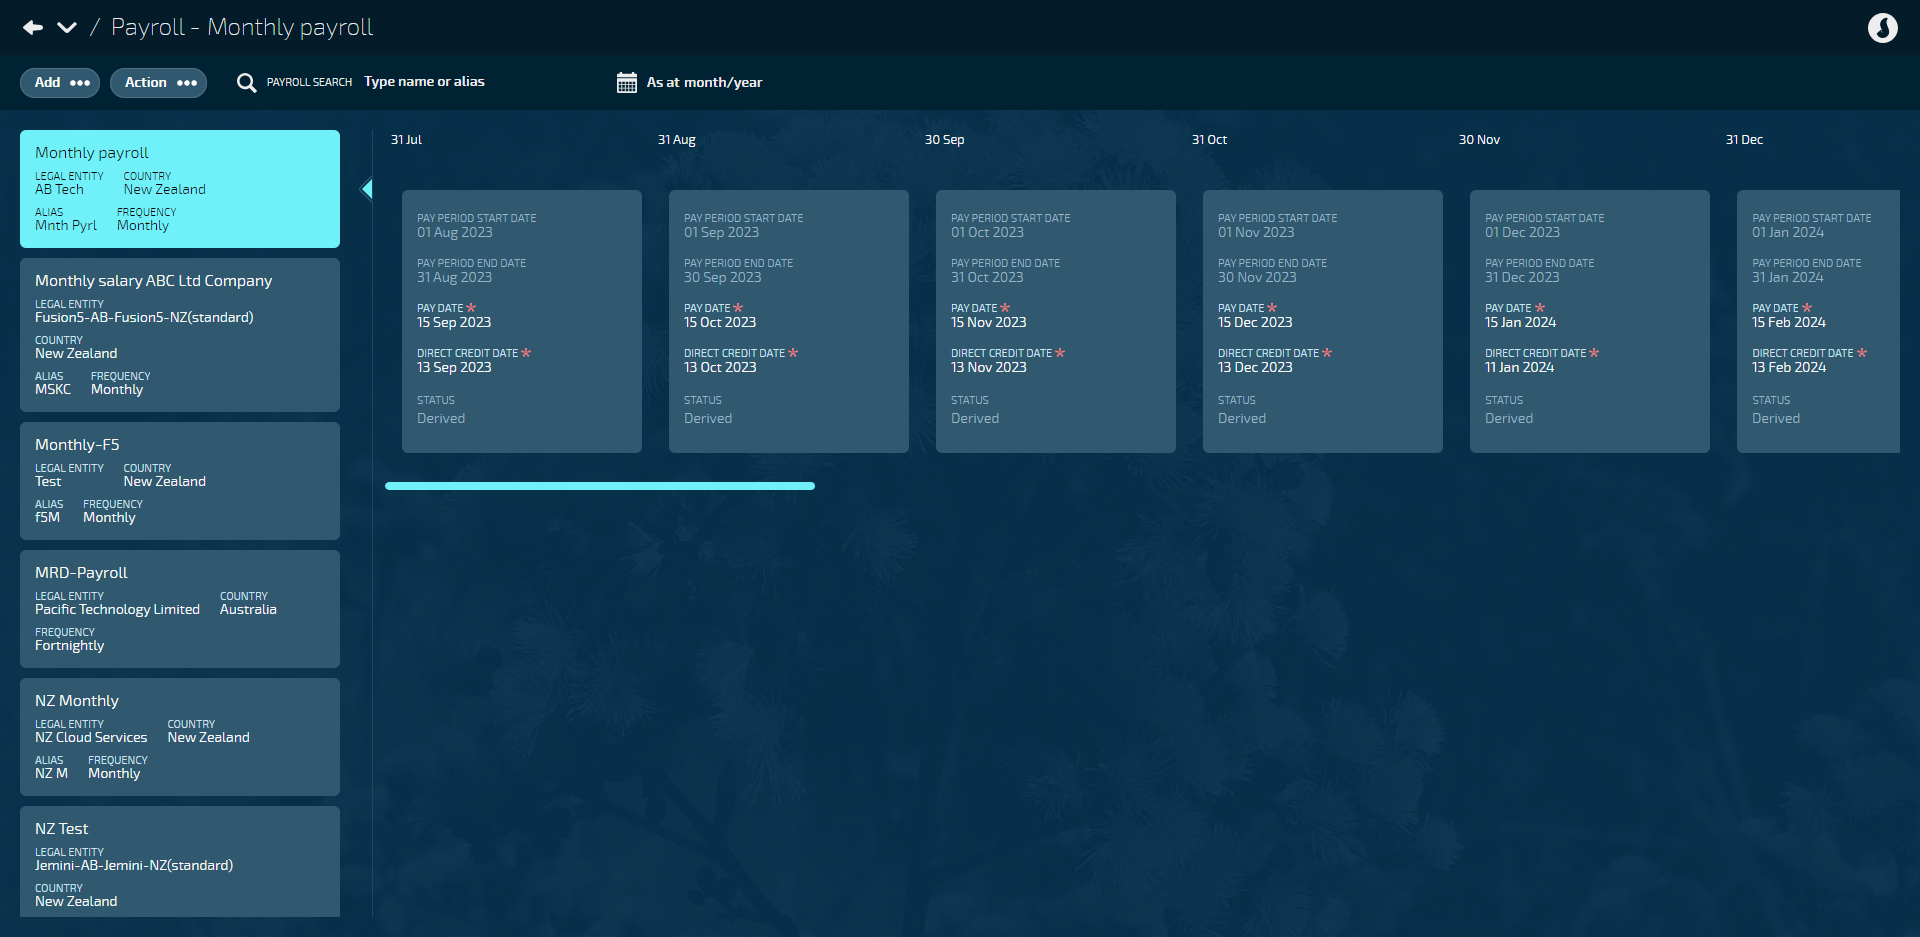
How to add pay periods with Monthly pay frequency
Go to PAY > PAYROLL SETUP.
Select the payroll card you need to add pay periods to.
TIP
The card will already be selected if you've just finished adding a new payroll.
Select Add pay periods to open the ADD PAY PERIODS panel. Alternatively, select Add, then select Add pay periods.
TIP
If pay periods have already been added to a payroll, the Add pay periods option will be greyed out. This is because only one set of pay periods can be added to a payroll. If you want to make changes, you'll need to edit the current pay periods or create a new payroll.
Enter the FIRST PAY PERIOD END DATE. For example, if your pay period is set to start at the beginning of the month and the frequency is monthly, the first pay period end date will be at the end of that month.
Set the PAY DATE OFFSET conditions. The pay date is the date your company pays your employees.
Set IS THE PAY DATE THE LAST DAY OF THE MONTH? to Yes or No. (If Yes, jump ahead to DIRECT CREDIT DATE OFFSET step).
Enter THE PAY DATE WILL BE DAY ... of each month. For example, if you want to pay your employees on the 20th of each month, enter '20' into this field.
Set IS THE PAY DATE AFTER THE PAY PERIOD END DATE? to Yes or No.
If Yes, the employees will be paid on the pay date that comes after the period end date.
If No, the employees will be paid on the pay date that comes before the period end date.
Set the DIRECT CREDIT DATE OFFSET conditions. The direct credit date is when the direct credit file is to be released for clearance and disbursement.
Enter NUMBER OF WORKING DAYS BEFORE PAY DATE that the direct credit file will be released.
Select Green Tick Button to save and close panel.
TIP
Once you select Submit, the system will validate all the pay period dates. If a pay date or direct credit date falls on a Saturday or Sunday, the system will automatically adjust the dates to the previous Thursday.
NOTE: If a pay date or direct credit date falls on a public holiday, you must manually adjust those dates.
How to add pay periods with Fortnightly pay frequency
Go to PAY > PAYROLL SETUP.
Select the payroll card you need to add pay periods to.
TIP
The card will already be selected if you've just finished adding a new payroll.
Select Add pay periods to open the ADD PAY PERIODS panel. Alternatively, select Add, then select Add pay periods.
TIP
If pay periods have already been added to a payroll, the Add pay periods option will be greyed out. This is because only one set of pay periods can be added to a payroll. If you want to make changes, you'll need to edit the current pay periods or create a new payroll.
Enter the FIRST PAY PERIOD END DATE. For example, if your pay period is set to start at the beginning of the month and the frequency is fortnightly, the first pay period end date will be at the end of that fortnight, or midway through the month.
Set the PAY DATE OFFSET conditions. The pay date is the date your company pays your employees.
Set IS THE PAY DATE THE SAME AS THE PAY PERIOD END DATE? to Yes or No. (If Yes, jump ahead to DIRECT CREDIT DATE OFFSET step).
Set IS THE PAY DATE AFTER THE PAY PERIOD END DATE? to Yes or No.
If Yes, the employees will be paid on the pay date that comes after the date set in the next step.
If No, the employees will be paid on the pay date that comes before the date set in the next step.
Enter the number of days that THE PAY DATE WILL BE before or after the pay period end date.
Set the DIRECT CREDIT DATE OFFSET conditions. The direct credit date is when the direct credit file is to be released for clearance and disbursement.
Enter NUMBER OF WORKING DAYS BEFORE PAY DATE that the direct credit file will be released.
Select Green Tick Button to save and close panel.
TIP
Once you select Submit, the system will validate all the pay period dates. If a pay date or direct credit date falls on a Saturday or Sunday, the system will automatically adjust the dates to the previous Thursday.
NOTE: If a pay date or direct credit date falls on a public holiday, you must manually adjust those dates.
How to add pay periods with Weekly pay frequency
Go to PAY > PAYROLL SETUP.
Select the payroll card you need to add pay periods to.
TIP
The card will already be selected if you've just finished adding a new payroll.
Select Add pay periods to open the ADD PAY PERIODS panel. Alternatively, select Add, then select Add pay periods.
TIP
If pay periods have already been added to a payroll, the Add pay periods option will be greyed out. This is because only one set of pay periods can be added to a payroll. If you want to make changes, you'll need to edit the current pay periods or create a new payroll.
Enter the FIRST PAY PERIOD END DATE. For example, if your pay period is set to start at the beginning of the month and the frequency is fortnightly, the first pay period end date will be at the end of that fortnight, or midway through the month.
Set the PAY DATE OFFSET conditions. The pay date is the date your company pays your employees.
Set IS THE PAY DATE THE SAME AS THE PAY PERIOD END DATE? to Yes or No. (If Yes, jump ahead to DIRECT CREDIT DATE OFFSET step).
Set IS THE PAY DATE AFTER THE PAY PERIOD END DATE? to Yes or No.
If Yes, the employees will be paid on the pay date that comes after the date set in the next step.
If No, the employees will be paid on the pay date that comes before the date set in the next step.
Enter the number of days that THE PAY DATE WILL BE before or after the pay period end date.
Set the DIRECT CREDIT DATE OFFSET conditions. The direct credit date is when the direct credit file is to be released for clearance and disbursement.
Enter NUMBER OF WORKING DAYS BEFORE PAY DATE that the direct credit file will be released.
Select Green Tick Button to save and close panel.
TIP
Once you select the Green Tick Button, the system will validate all the pay period dates. If a pay date or direct credit date falls on a Saturday or Sunday, the system will automatically adjust the dates to the previous Thursday.
NOTE: If a pay date or direct credit date falls on a public holiday, you must manually adjust those dates.
How to edit or delete pay periods and payrolls
How to edit or delete pay periods
IMPORTANT
Once the pay cycle process has reached the direct credit point, the pay periods can no longer be edited or deleted, as they'll interfere with processed calculations.
You may be able to edit a pay period during the pay cycle process before the direct credit file is generated. However, you'll need to recalculate the pay if any changes are made to make sure they're included.
Once the pay periods are created, you may need to edit individual pay periods. For example, if a pay date or direct credit date falls on a public holiday, you'll need to move them to an earlier date.
You can edit the PAY DATE and DIRECT CREDIT DATE on any current or future pay periods by selecting the pay period card and entering the new dates (or selecting the calendar icon for the calendar view). Any greyed-out dates aren't editable.
If you want to delete the pay periods in your selected payroll, select Action, then Delete all pay periods. You can then add new pay periods by following the process above.
How to edit payrolls
The 'payroll name', 'payroll alias', 'active status', 'employees get paid through this payroll', and 'active date' can be edited if required.
IMPORTANT
Once the pay cycle process has reached the direct credit point, the payroll will have limited options for editing, as any changes will interfere with processed calculations.
You may be able to edit a payroll during the pay cycle process before the direct credit file is generated. However, you'll need to recalculate the pay if any changes are made to make sure they're included.
Go to PAY > PAYROLL SETUP.
Select the payroll card you need to edit. This will open the payroll details view.
Select Action.
Select Edit this payroll to open the PAYROLL detail panel.
Edit fields as required.
Select Green Tick Button to save and close panel.
How to delete payrolls
IMPORTANT
Once the pay cycle process has reached the direct credit point, the payroll can't be deleted, as any changes will interfere with processed calculations.
Go to PAY > PAYROLL SETUP.
Select the payroll card you need to delete. A confirmation message will ask you if you're sure you want to delete the payroll.
Select Go ahead.
How to attach a payroll to an employee
There are two ways to attach a payroll to an employee:
Attach payroll to an employee through their Occupancy bubble
You can attach a payroll to an employee through their Occupancy bubble in Action.
To learn how to do this, refer to Intro to Occupancy.
Attach payroll to new starter through Onboarding
If you're using the Onboarding functionality, you can attach the payroll when completing the System Workflow.
Learn how to onboard a new starter.
